Microsoft
Overview
Configuring a cloud source in Scope is a two-step process.
-
Generating Microsoft client credentials in the Microsoft Azure Portal. Please refer to Section 1 – Microsoft Setup
-
Setting up the Microsoft cloud source in the Scope application. Please refer to Section 2 – Scope Setup
Pre-requisistes
License Requirements (Mandatory for AAD)
The following 2 APIs have additional license requirements:
- servicePrincipalRiskDetection – Entra Workload Identity Premium license
- riskyServicePrincipals – Workload Identities Premium license
Note: If the required licenses are not available, Scope will not be able to ingest the AAD logs from the specified APIs.
Verify Unified Audit Logging Is Enabled
-
Unified Audit Logging must be enabled in Microsoft 365 before audit events can be collected.
-
If Unified Audit Logging is not enabled, follow this Microsoft documentation to enable it before proceeding.
-
To verify if the Unified Audit Logging is enabled -
-
Run the following PowerShell command in the Exchange Online PowerShell: P
Get-AdminAuditLogConfig | FL UnifiedAuditLogIngestionEnabled -
Confirm that the command returns the following value:
UnifiedAuditLogIngestionEnabled : True
-
-
For additional information, refer to the Microsoft documentation on Unified Audit Logging.
Microsoft Setup
To get started, you’ll need to generate the following client credentials in the Microsoft Azure Portal –
- Client ID and Tenant ID (required for all auth methods)
- Client Secret & Client Secret Expiry Date (for Client Secret authentication)
- Certificate (*.pem & *.cer), Thumbprint ID & Certificate Expiry Date (for existing certificate upload)
- Thumbprint (when using Scope Portal-generated certificate)
Step 1: Create an Application in Microsoft Entra ID
-
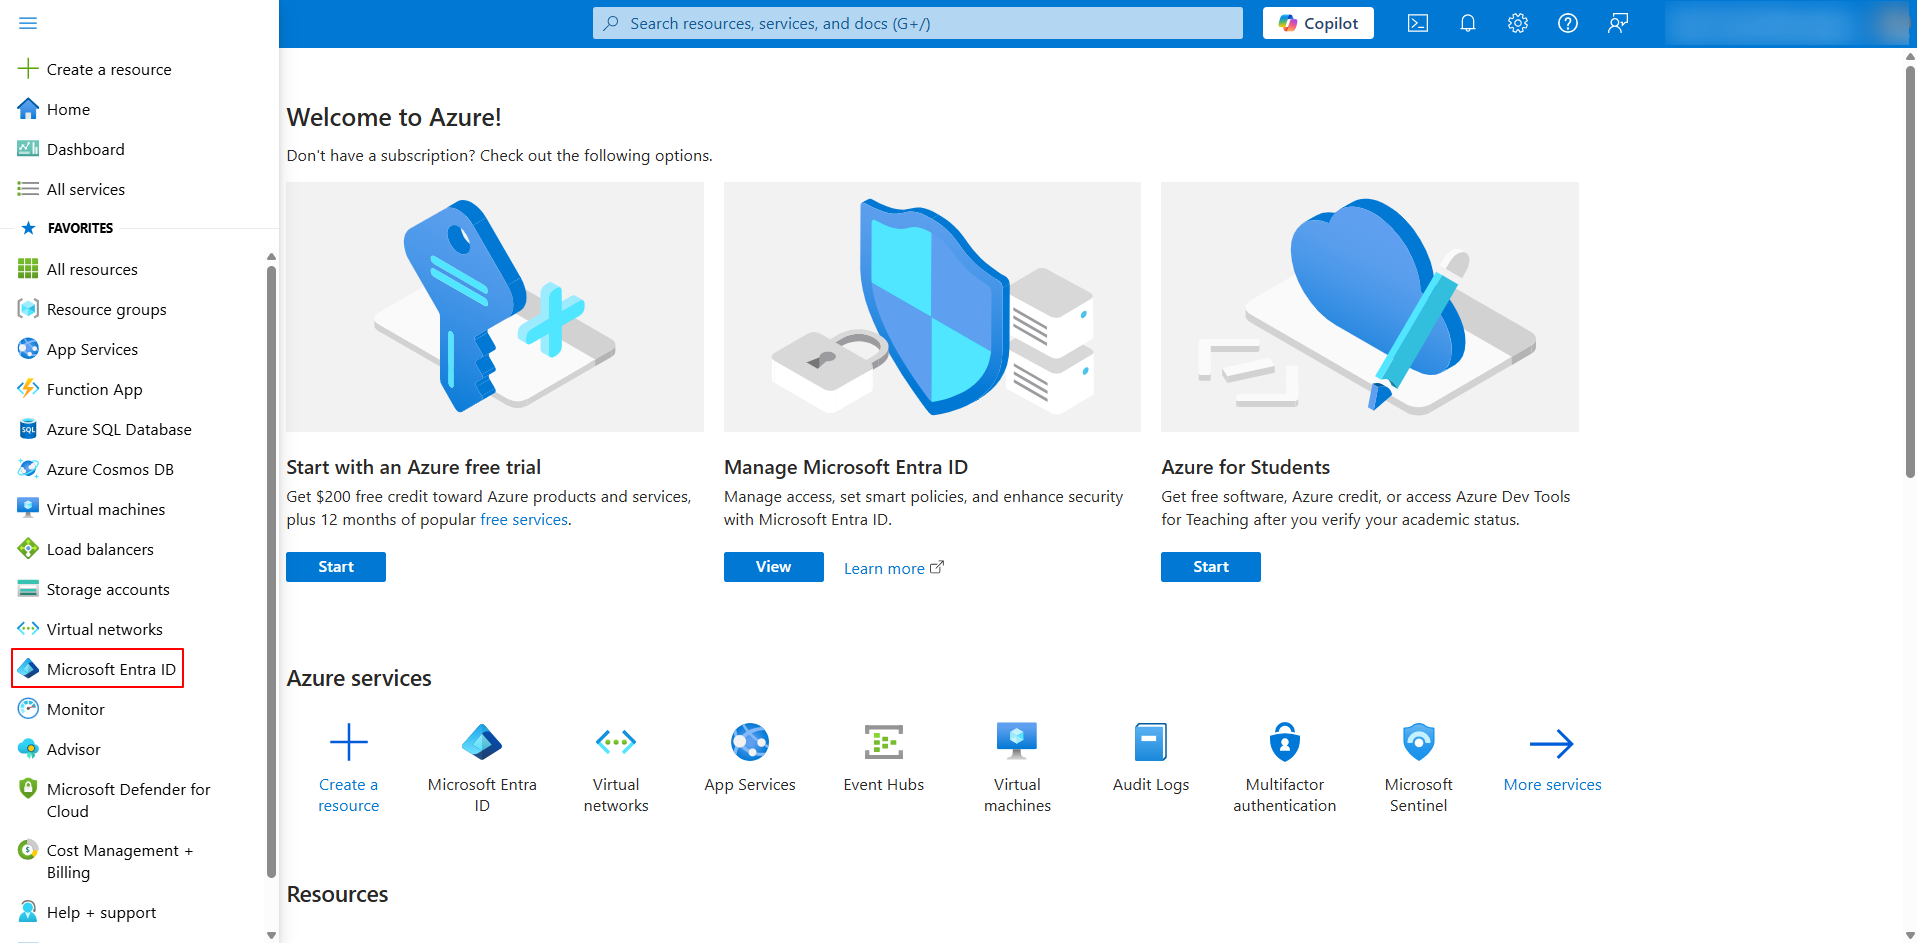
Log into the Microsoft Azure Portal and click on Microsoft Entra ID from the side menu.
-
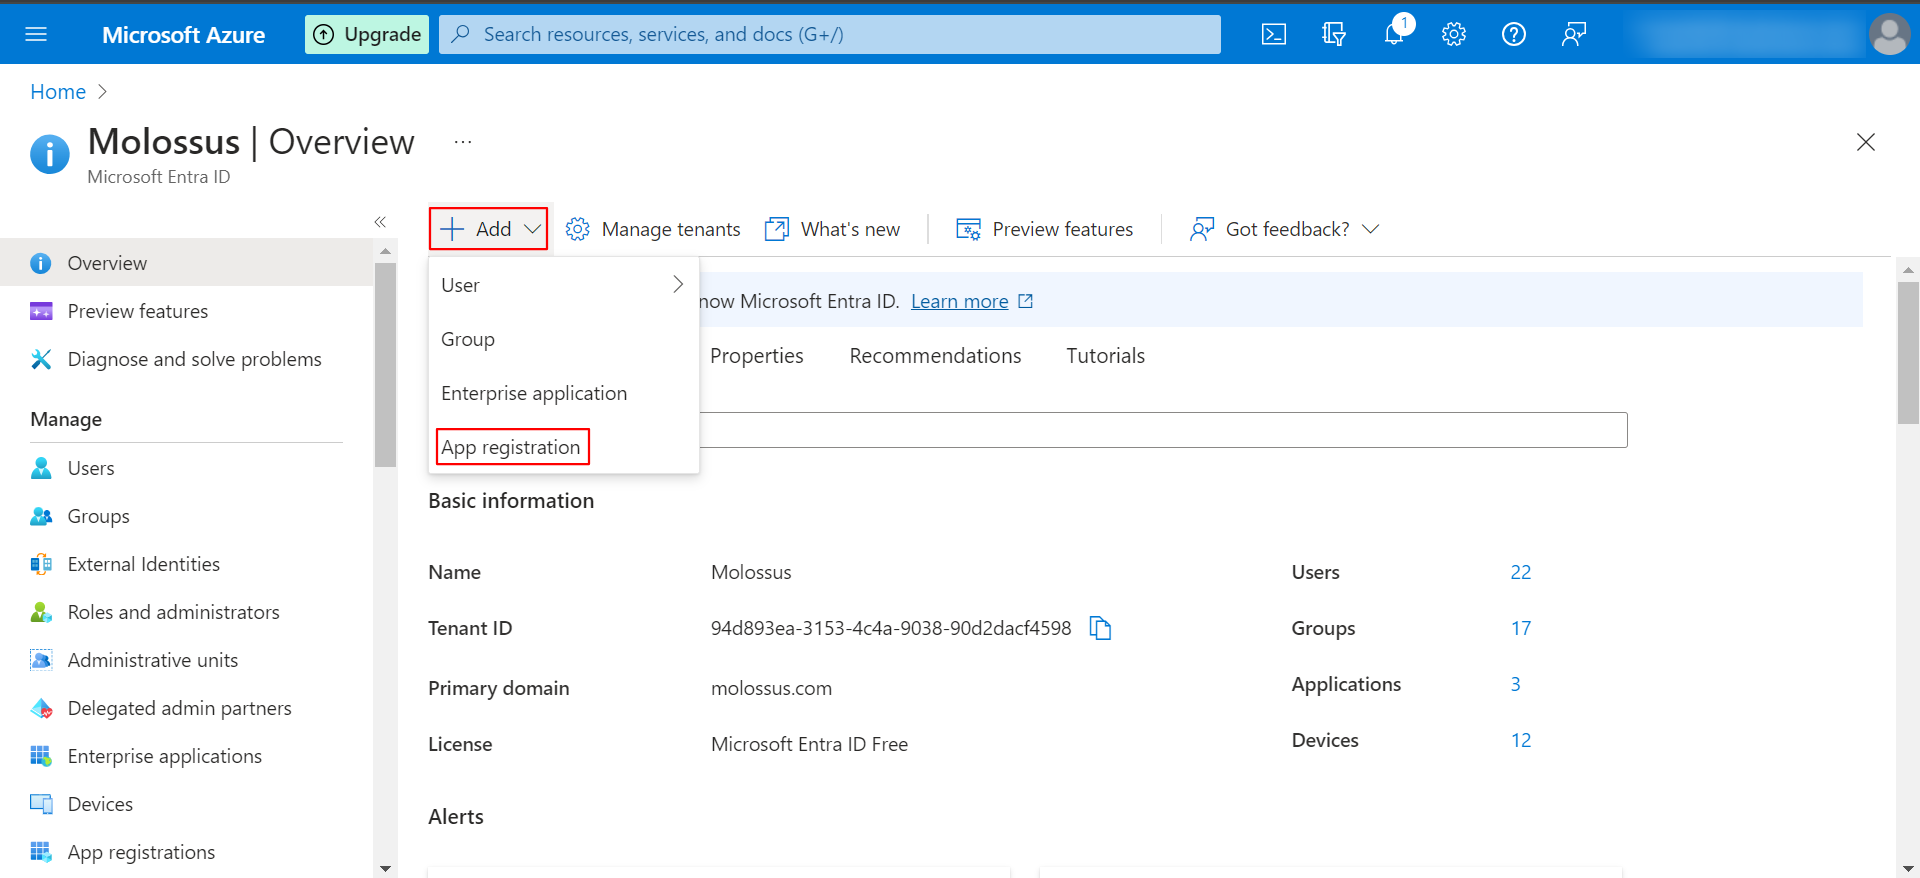
Create an App by clicking on App registrations -> New registration.
-
Provide a name (user defined) and type of access for the App, then click Register.
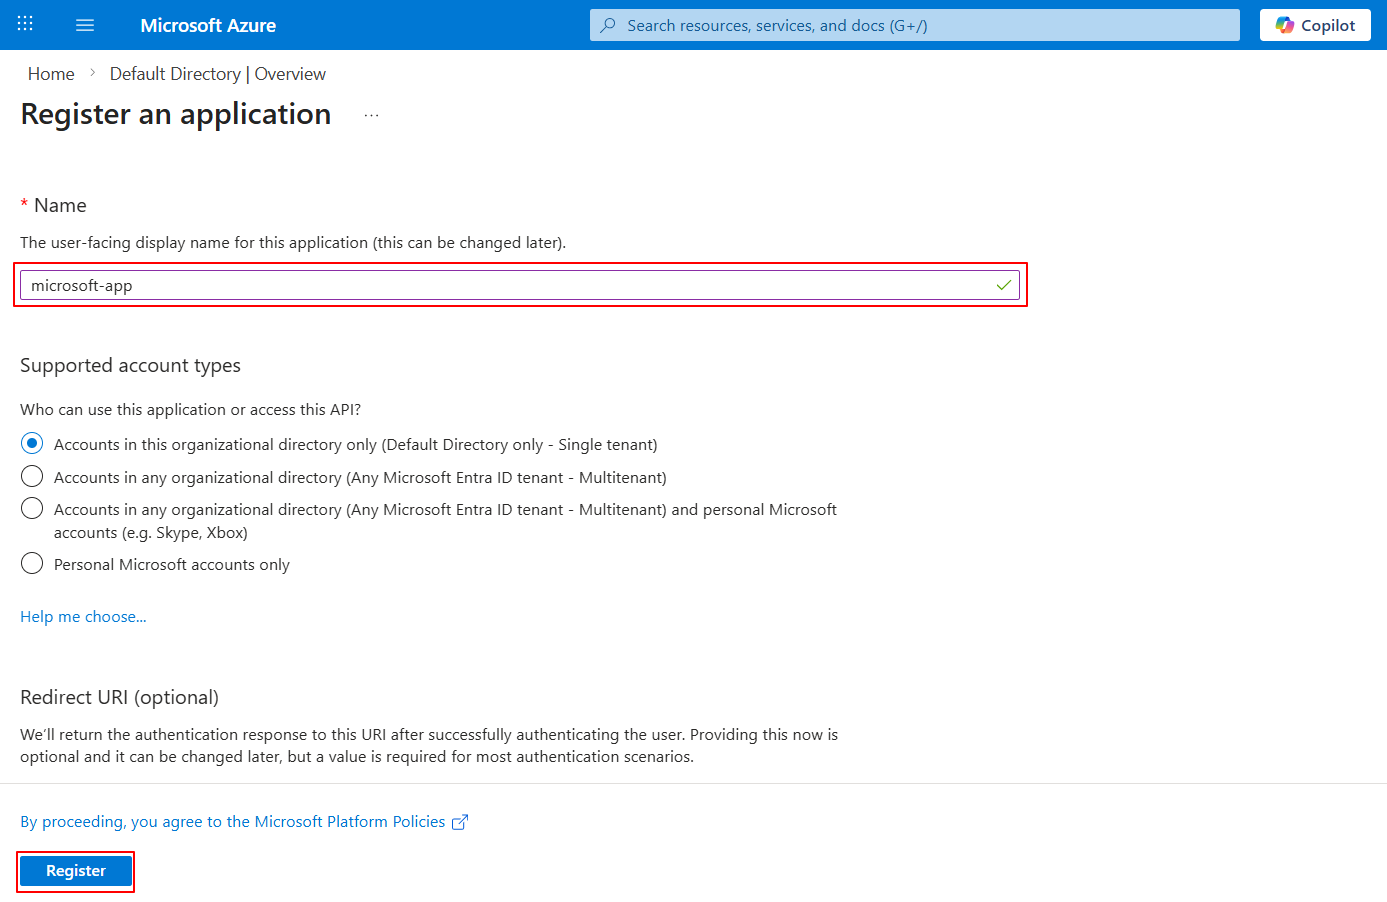
Now, the App has been created in the Microsoft Azure account.
Step 2: Configure the Required API Permissions
Navigate to the Permissions tab (Azure portal -> Microsoft Entra ID -> Manage -> App registrations -> All applications -> Select the required app -> Manage -> API Permissions).
Note: Grant permissions only to the specific Microsoft cloud sources required for ingesting the needed logs.
Microsoft Defender Unified – Required Permissions
| Microsoft Defender Unified - Categories | Permissions required to ingest events | Configuration steps |
|---|---|---|
| MS Defender of Endpoint | Alert.Read.AllSecurityEvents.Read.All |
Configuration Step A |
| MS Defender for Cloud Apps | investigation.read |
Configuration Step B |
| MS Defender for Identity | IdentityRiskEvent.Read.All |
Configuration Step C |
| Microsoft 365 Defender | SecurityIncident.Read.All |
Configuration Step D |
| Azure AD Identity Protection | IdentityRiskEvent.Read.AllIdentityRiskyServicePrincipal.Read.AllIdentityRiskyUser.Read.AllAuditLog.Read.All |
Configuration Step E |
| Microsoft Defender for Office 365 App Governance Microsoft Data Loss Prevention |
SecurityAlert.Read.All |
Configuration Step F |
Configuration Step A – MS Defender for Endpoint
-
Click Add Permissions -> APIs my organization uses tab -> WindowsDefenderATP -> Application Permissions
-
Select the
Alert.Read.Allpermission.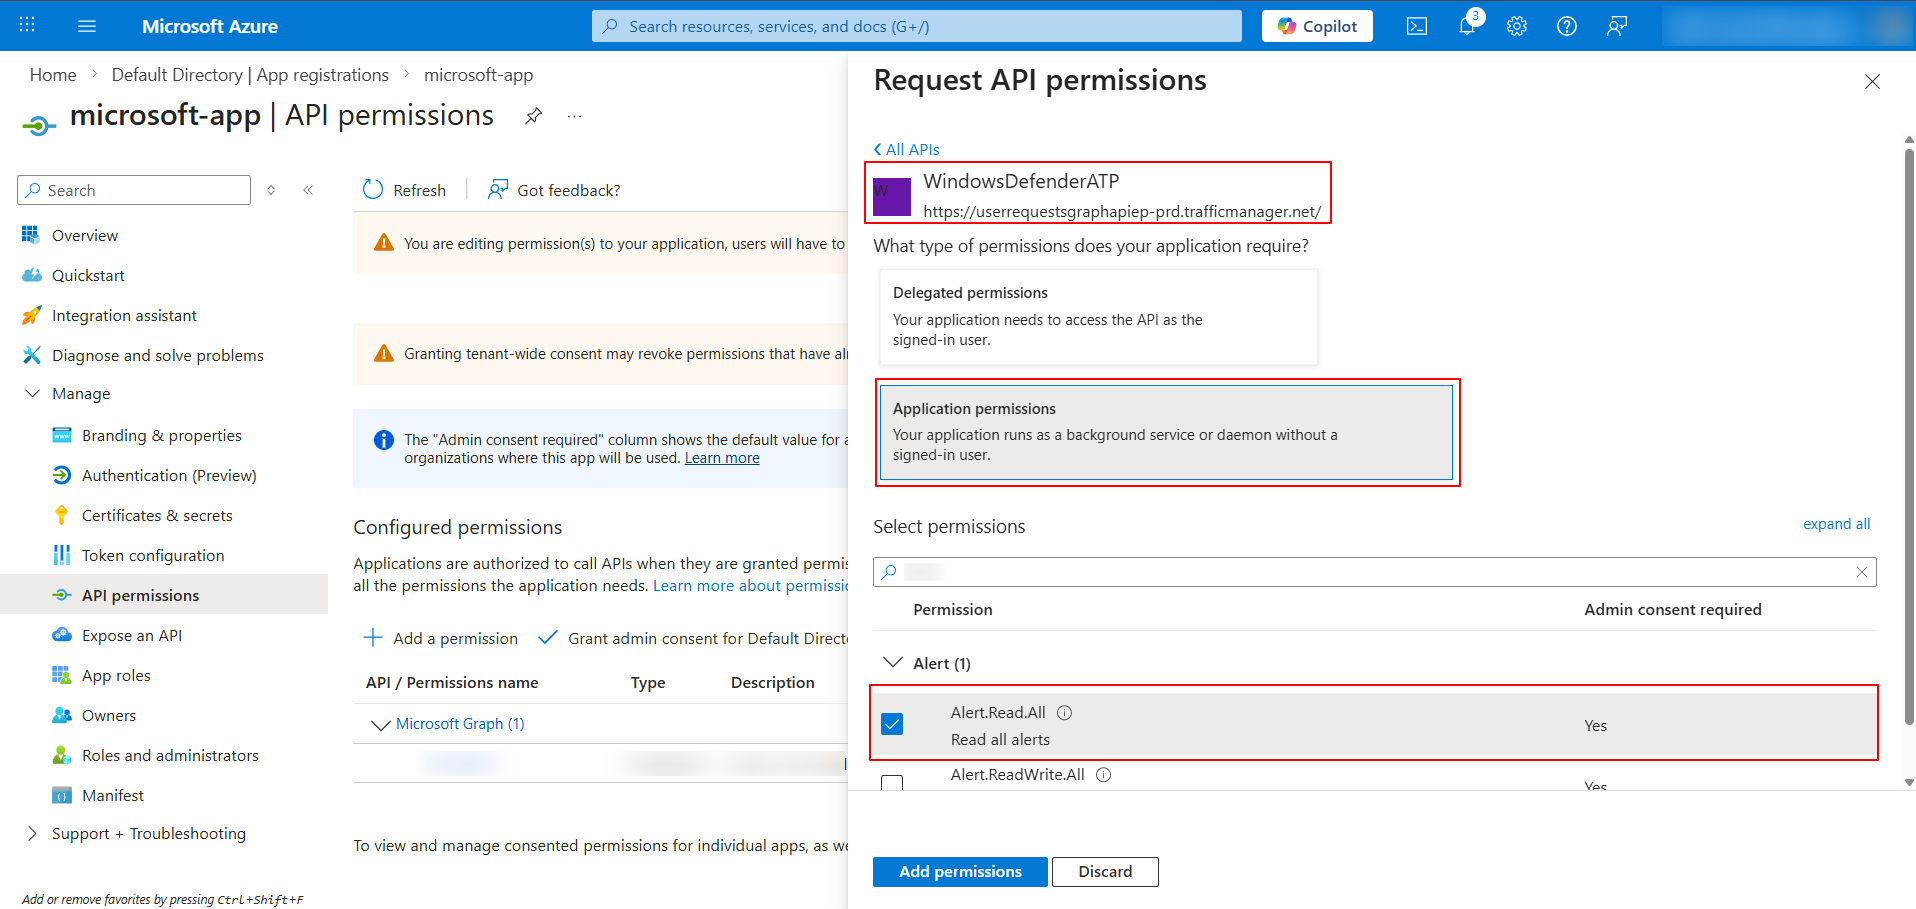
-
Click Add Permissions -> Microsoft APIs tab -> Microsoft Graph -> Application Permissions
-
Select the
SecurityEvents.Read.Allpermission.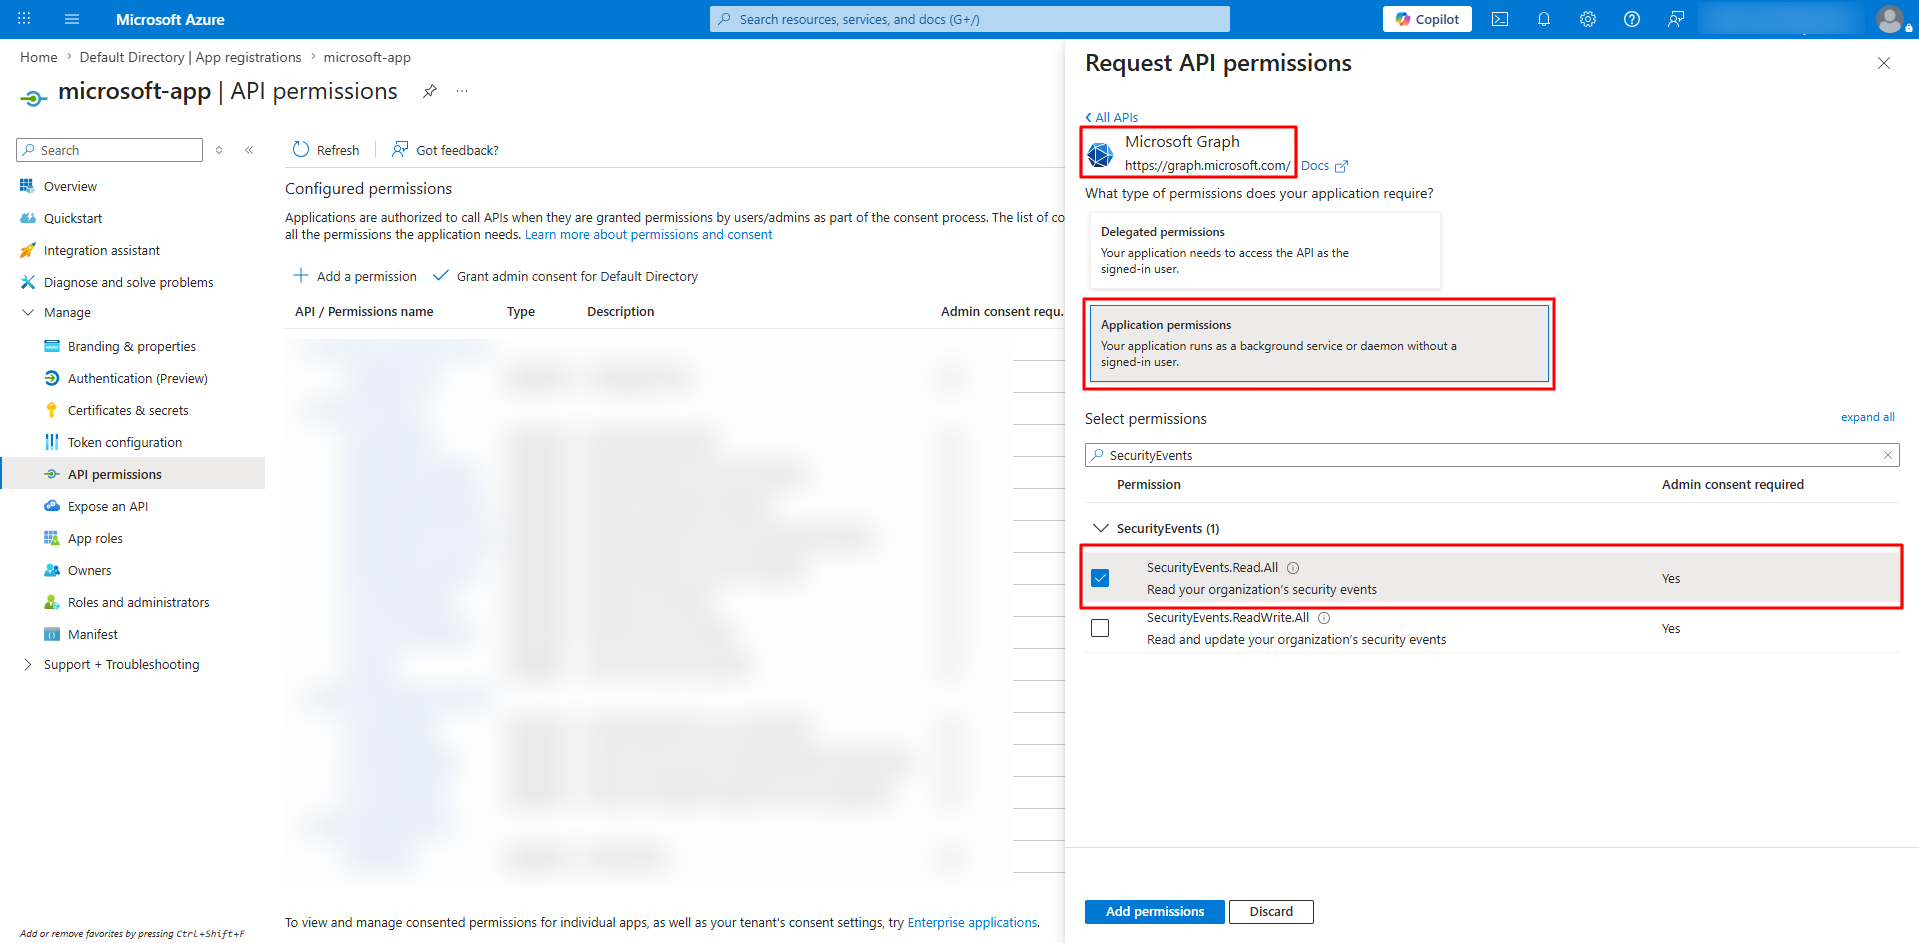
Configuration Step B – MS Defender for Cloud Apps
-
Click Add Permissions -> APIs my organization uses tab -> Microsoft Cloud App Security -> Application Permissions
-
Select the
investigation.readpermission.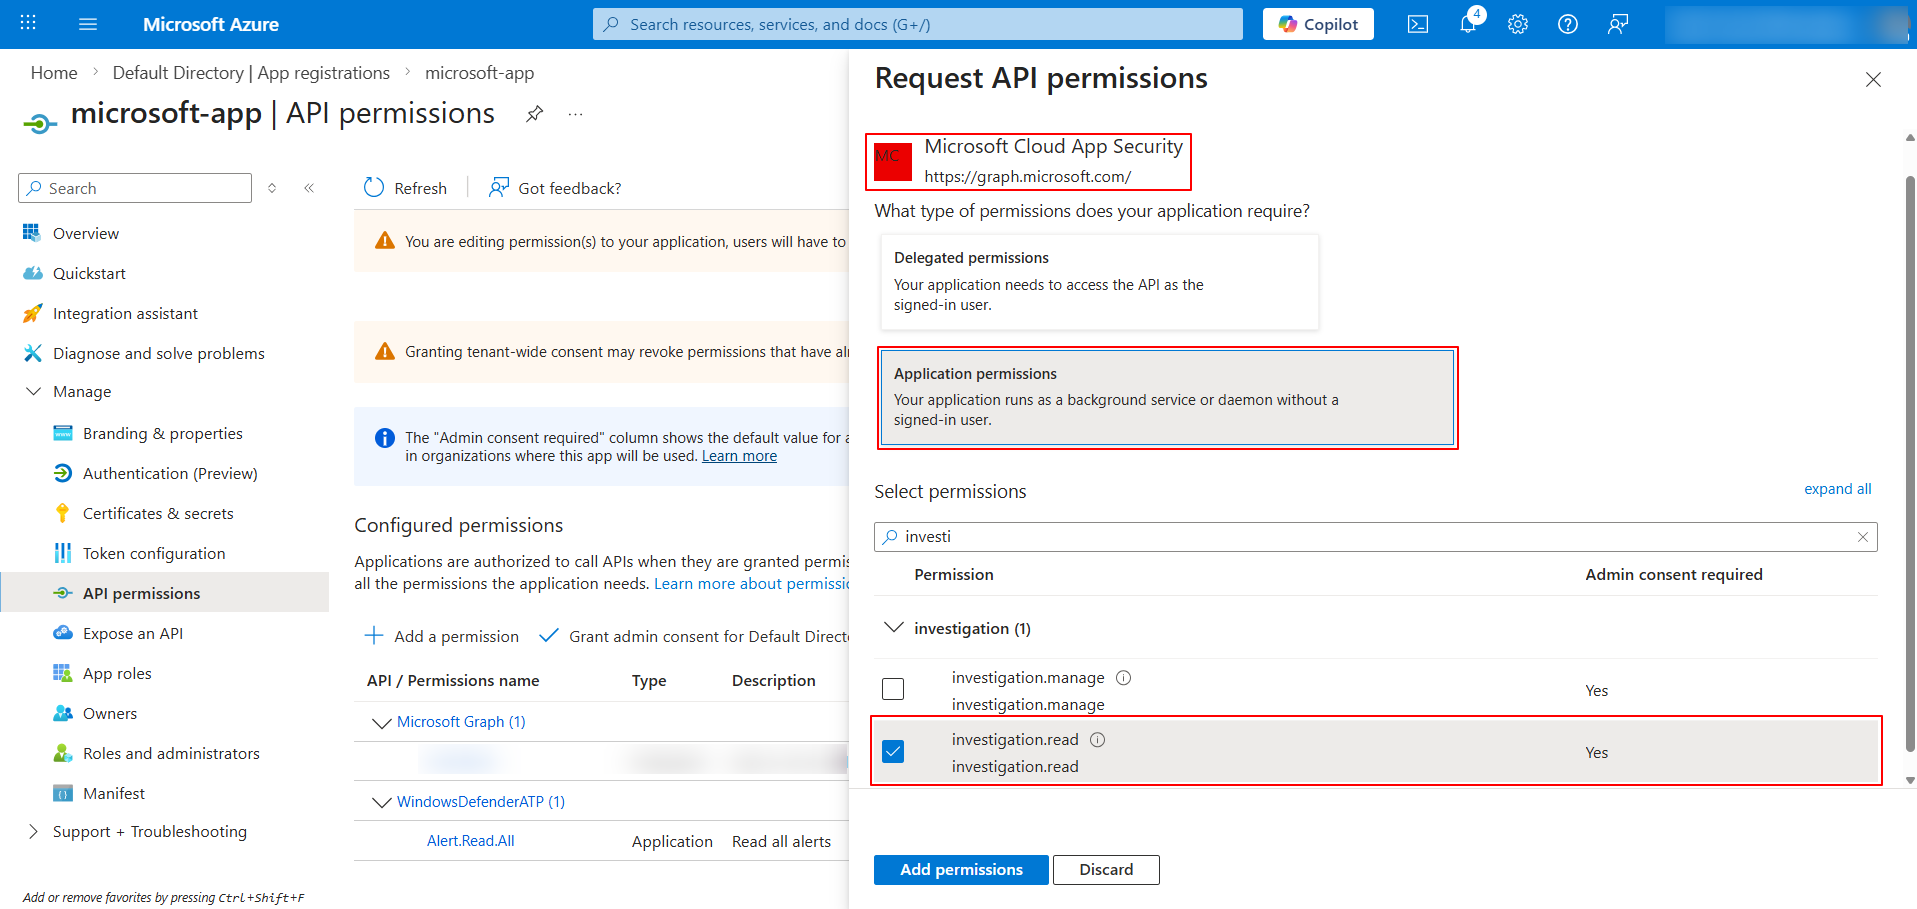
Configuration Step C – MS Defender for Identity
-
Click Add Permissions -> Microsoft APIs tab -> Microsoft Graph -> Application Permissions
-
Select the
IdentityRiskEvent.Read.Allpermission.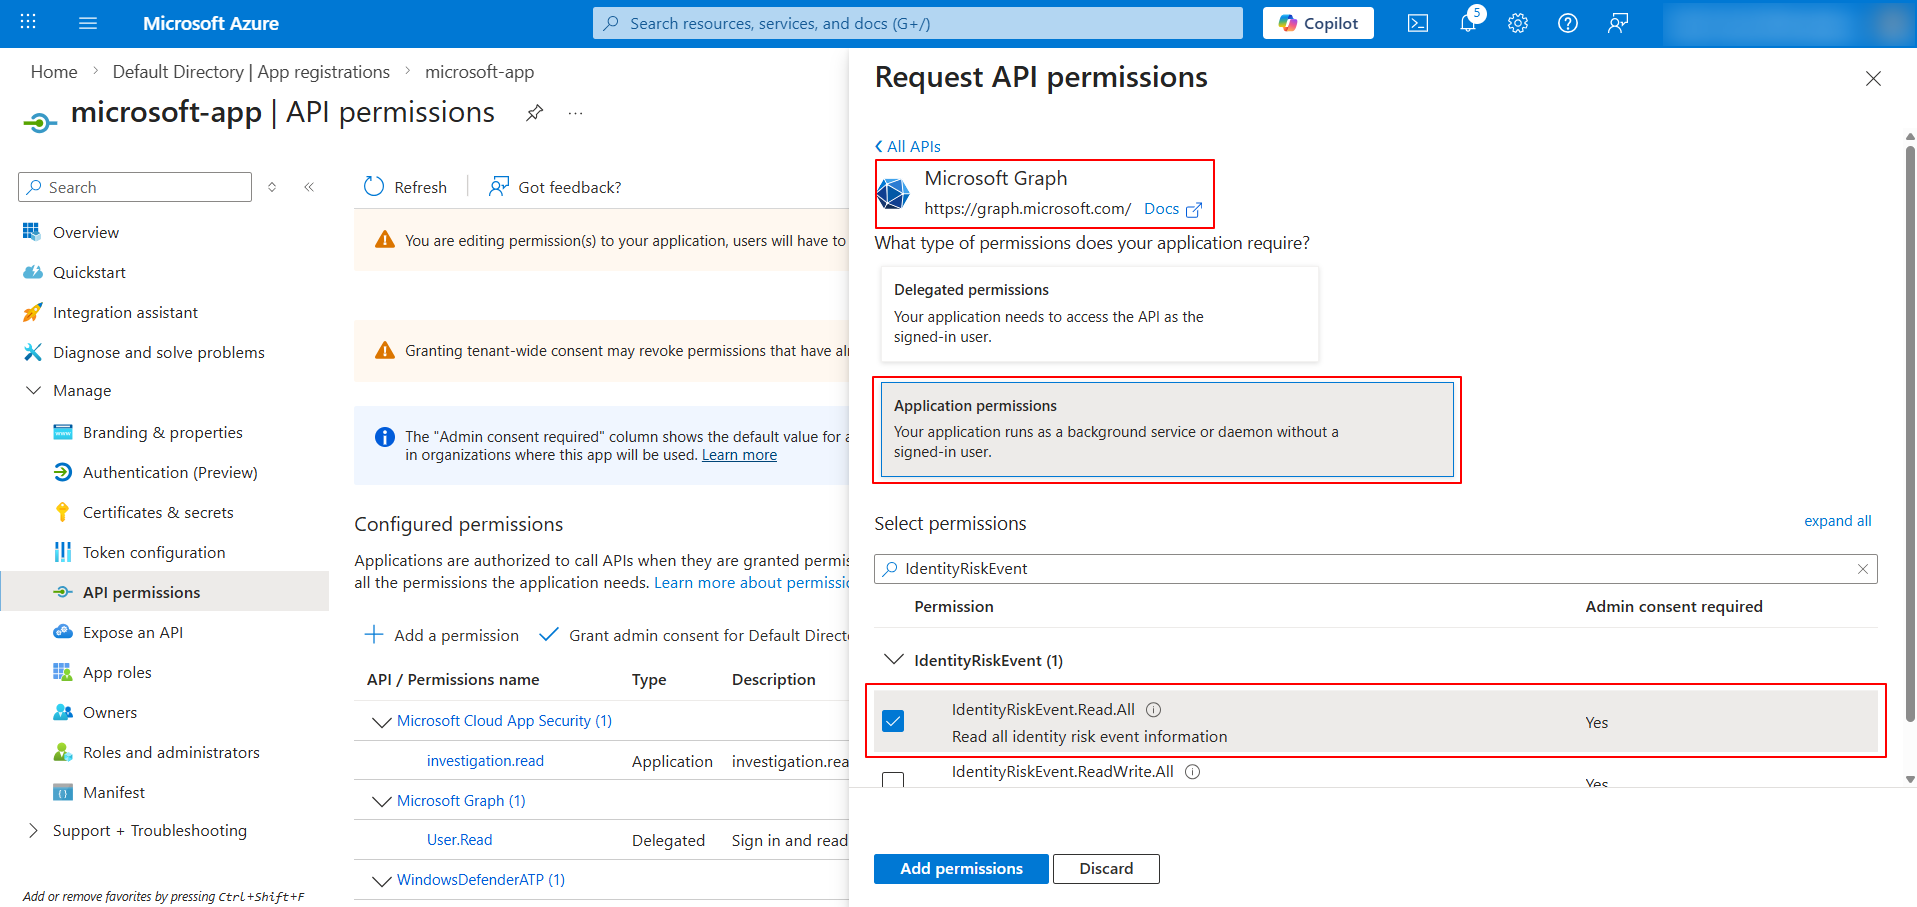
Configuration Step D – Microsoft 365 Defender
-
Click Add Permissions -> Microsoft APIs tab -> Microsoft Graph -> Application Permissions
-
Select the
SecurityIncident.Read.Allpermission.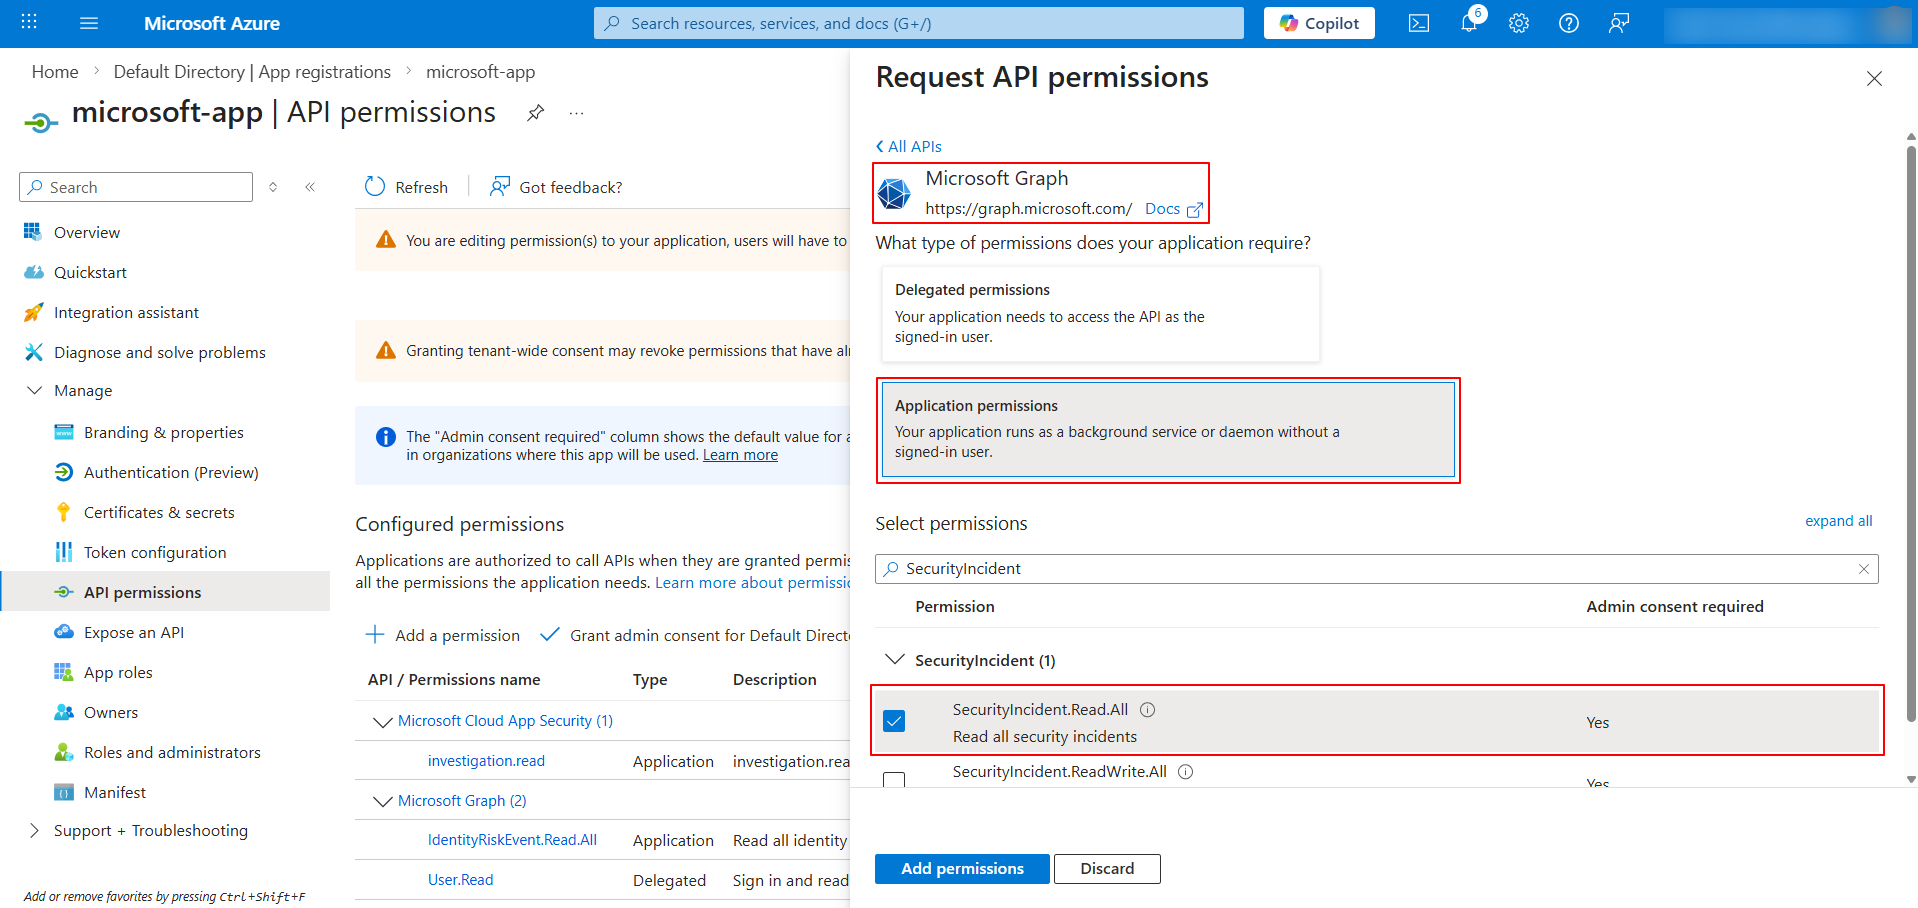
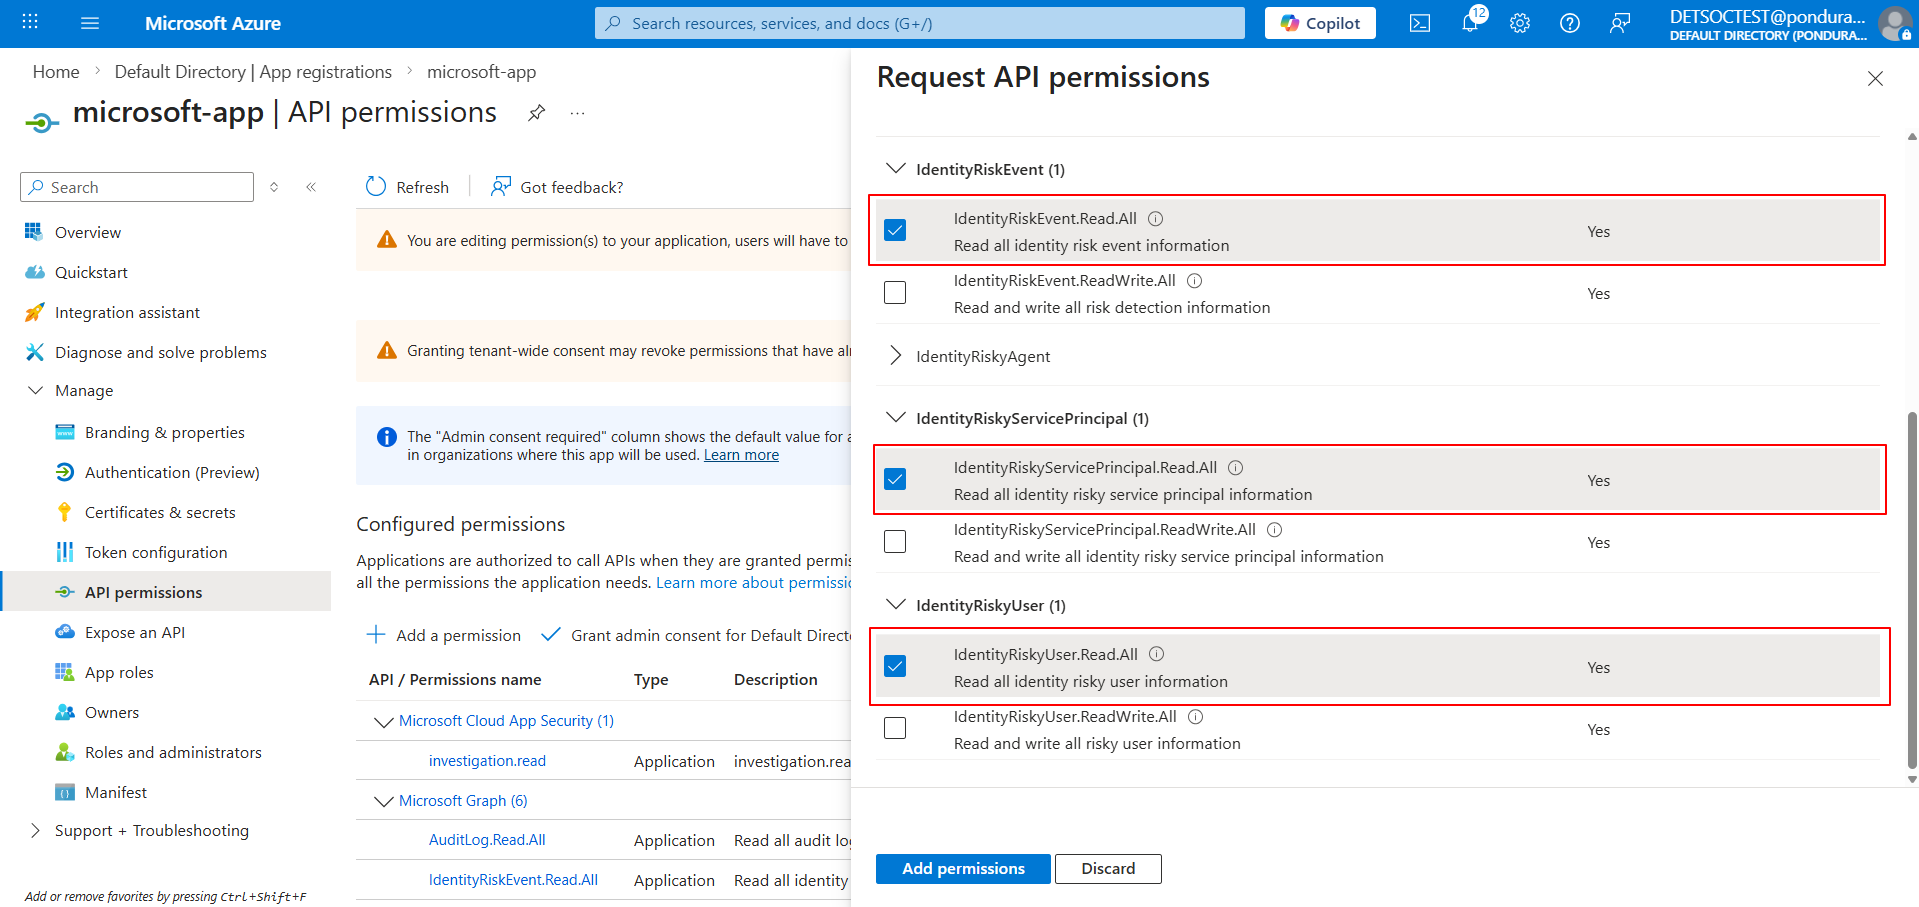
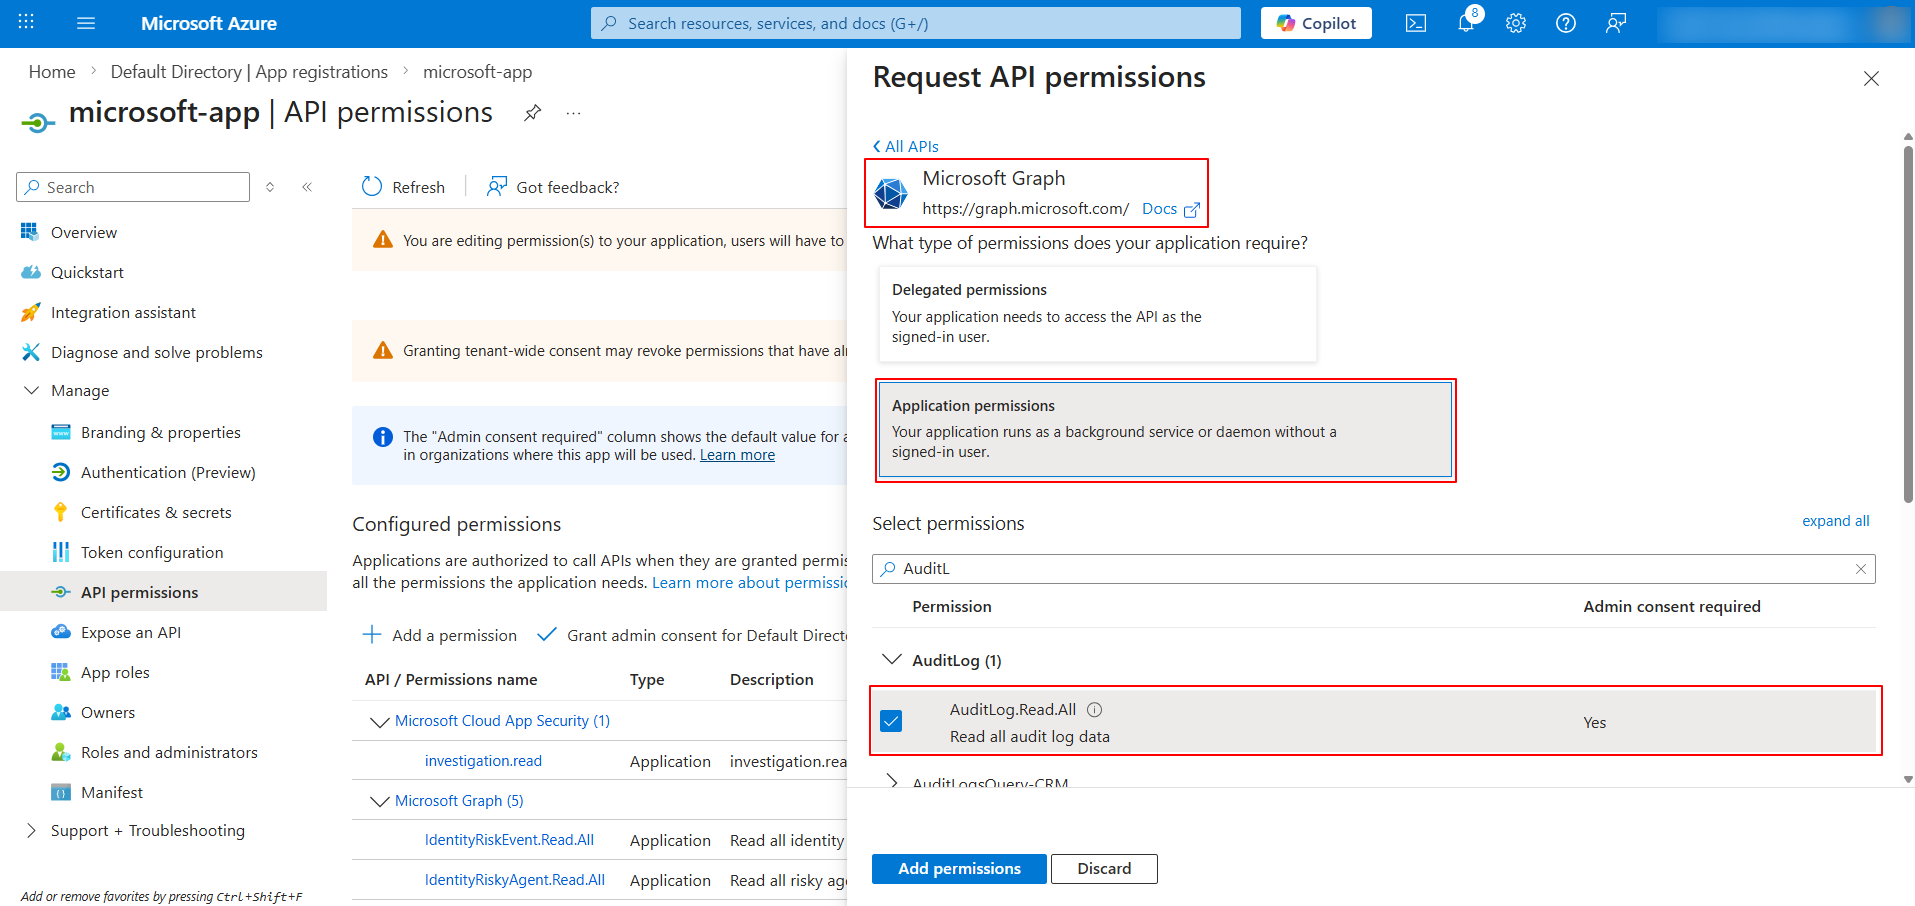
Configuration Step E – Azure AD Identity Protection
-
Click Add Permissions -> Microsoft APIs tab -> Microsoft Graph -> Application Permissions
-
Select the following permissions:
IdentityRiskEvent.Read.AllIdentityRiskyServicePrincipal.Read.AllIdentityRiskyUser.Read.AllAuditLog.Read.All
Configuration Step F – MS Defender for Office 365, App Governance & Data Loss Prevention
-
Click Add Permissions -> Microsoft APIs tab -> Microsoft Graph -> Application Permissions
-
Select the
SecurityAlert.Read.Allpermission.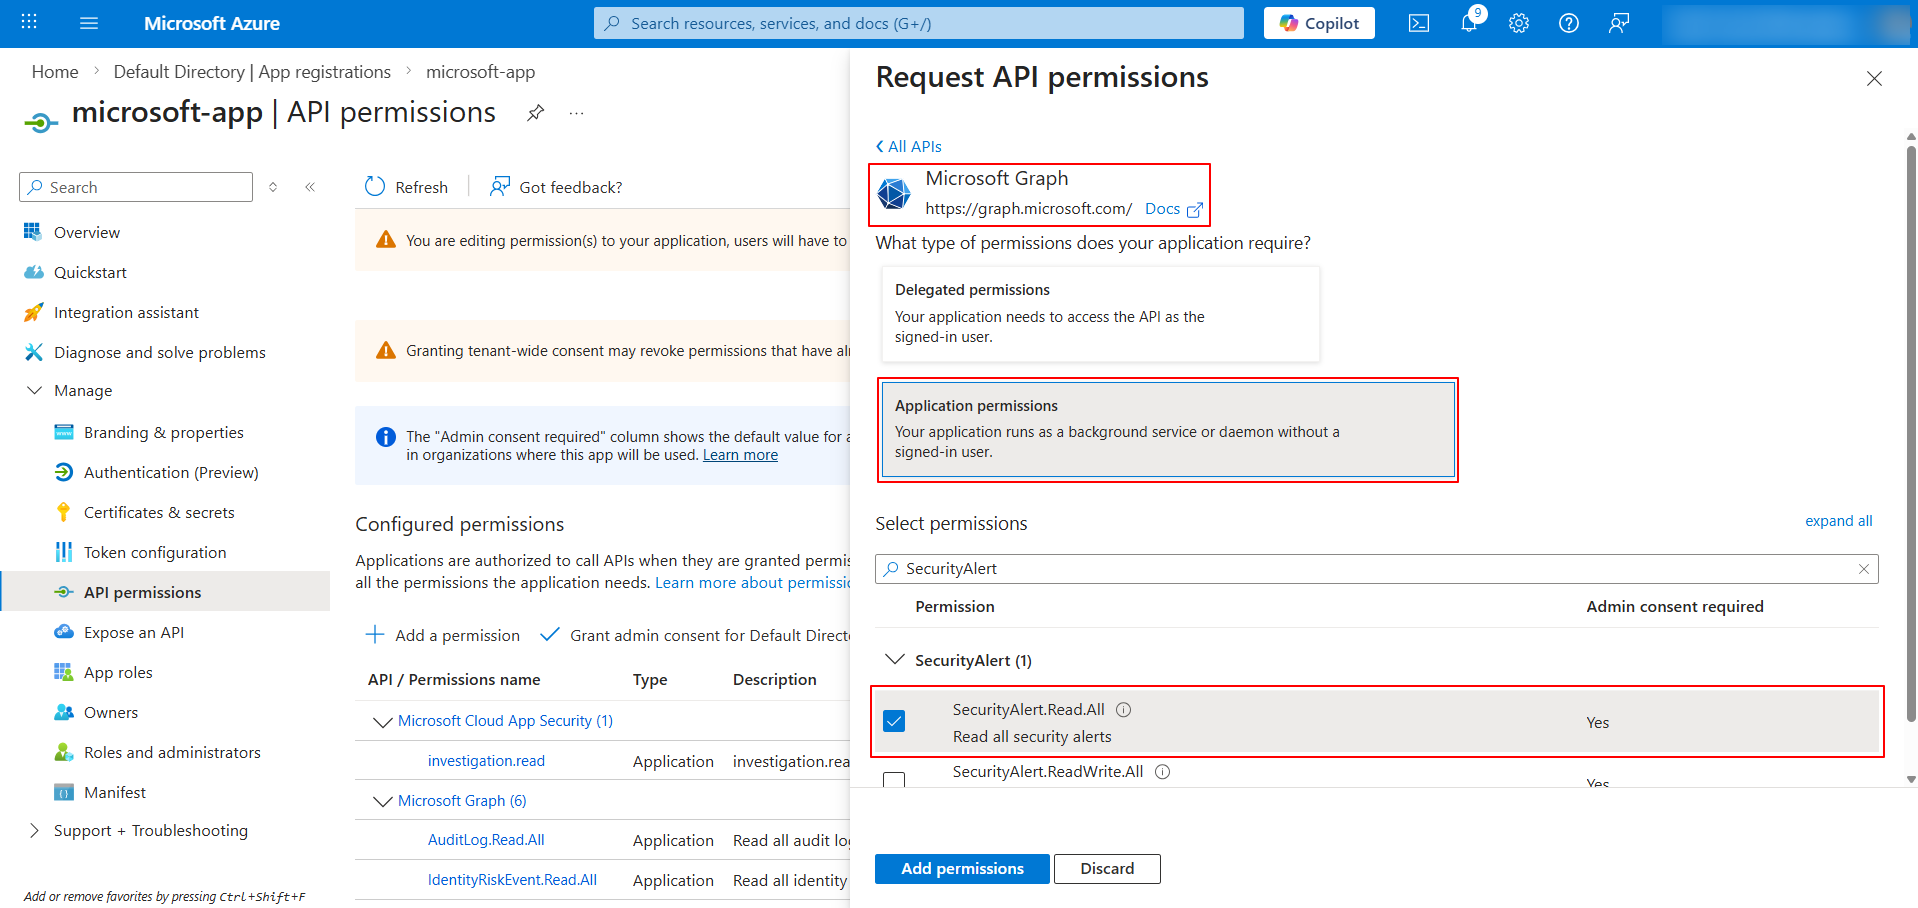
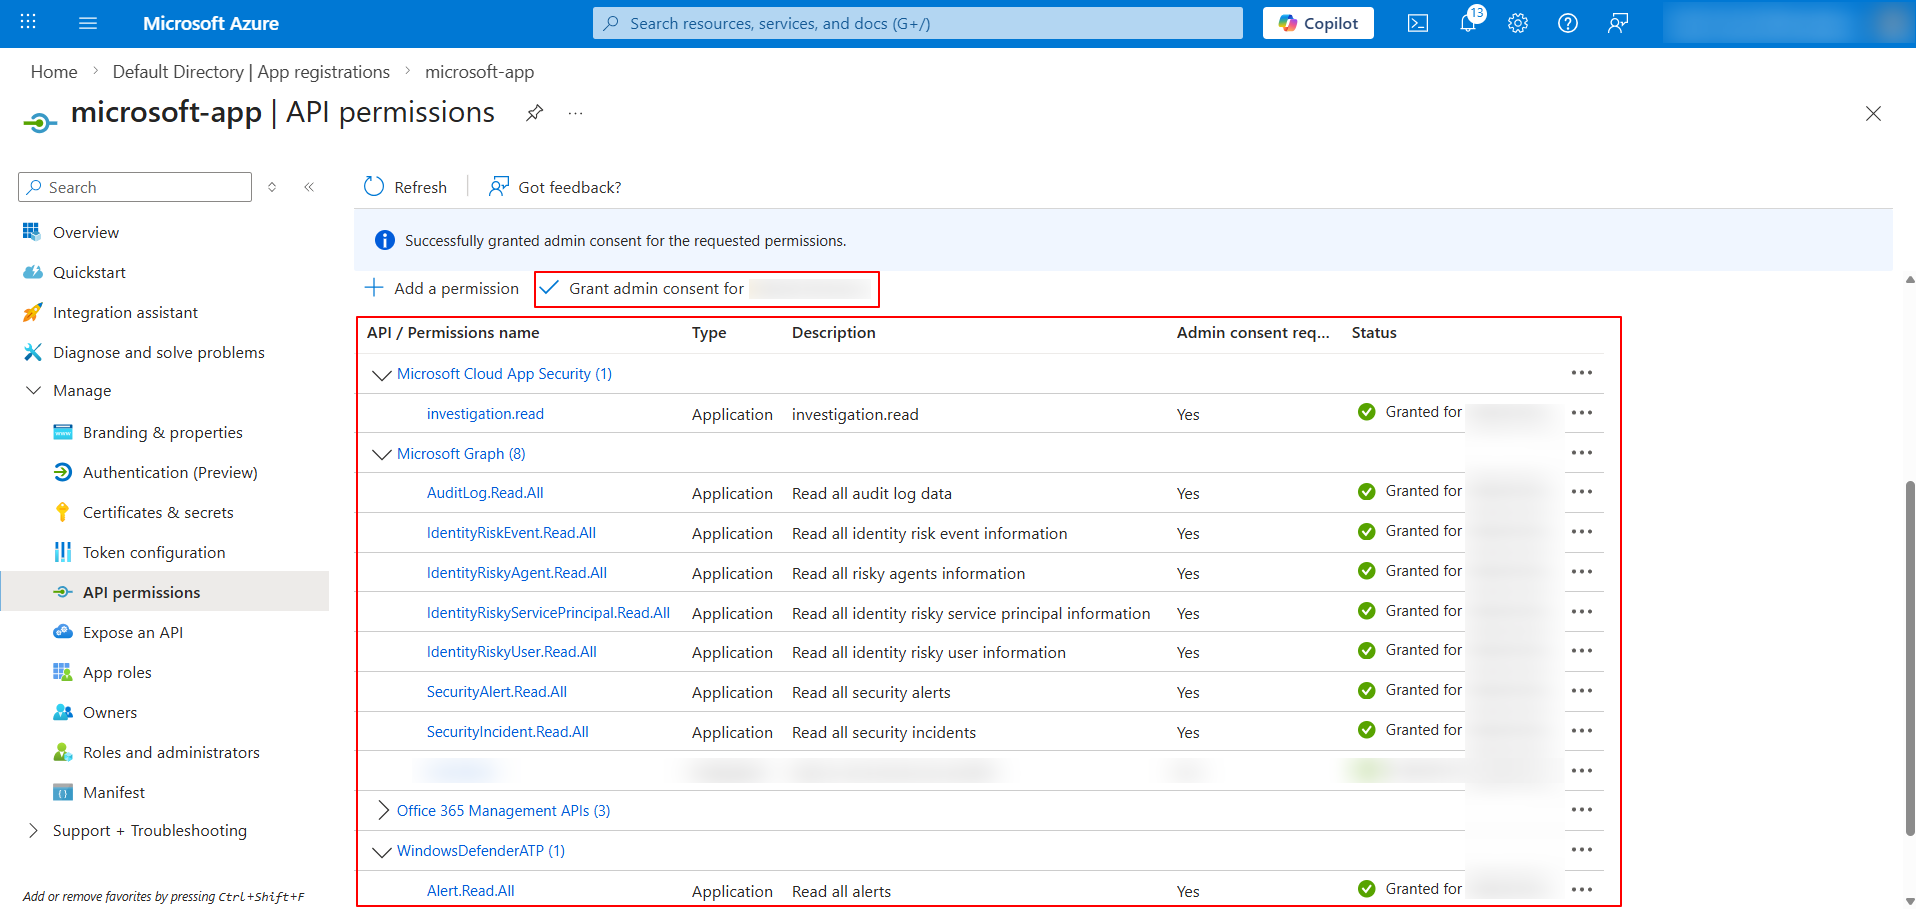
Provide Admin Consent
-
Click Grant admin consent for <Organization name> to provide admin approval for all selected API permissions.
O365 – Required Permissions
| O365 — Categories | Permissions required to ingest events | Configuration steps |
|---|---|---|
| Audit.Exchange Audit.General Audit.SharePoint DLP.All |
ActivityFeed.ReadActivityFeed.ReadDlpServiceHealth.Read |
Configuration Step A |
Configuration Step A – Office 365 Management API
-
Click Add Permissions -> Microsoft APIs tab -> Office 365 Management APIs -> Application Permissions
-
Select
ActivityFeed.Read,ActivityFeed.ReadDlp, andServiceHealth.Readpermissions.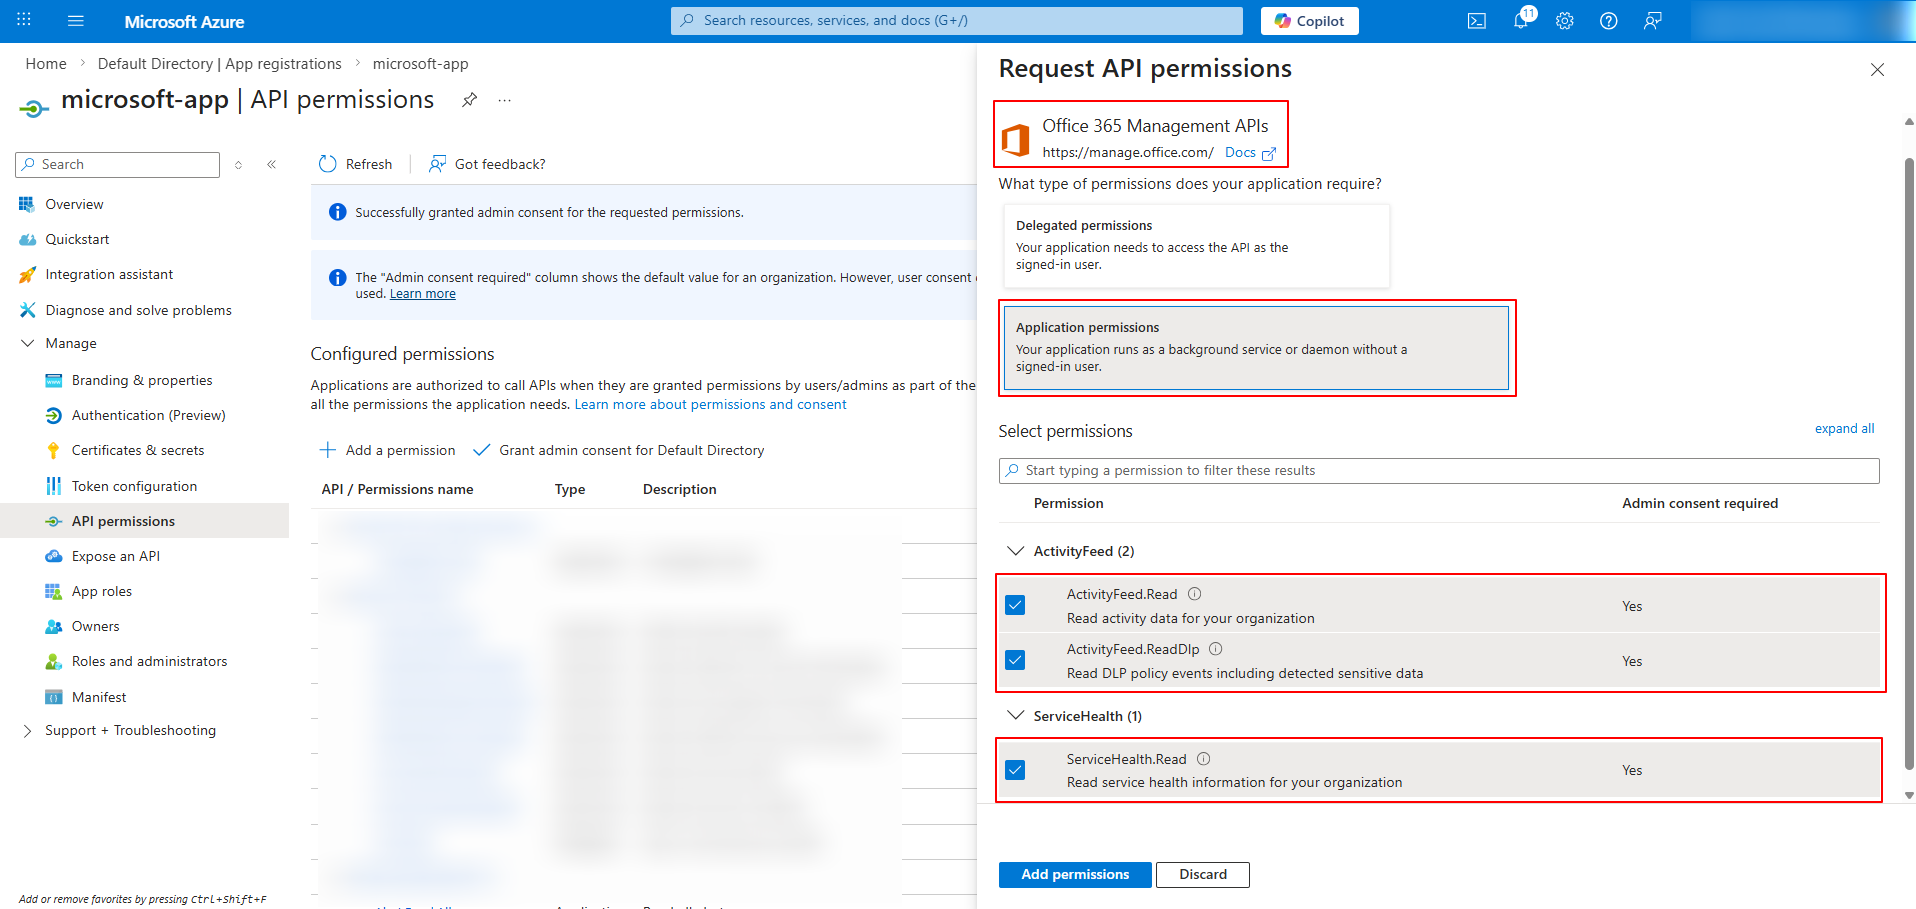
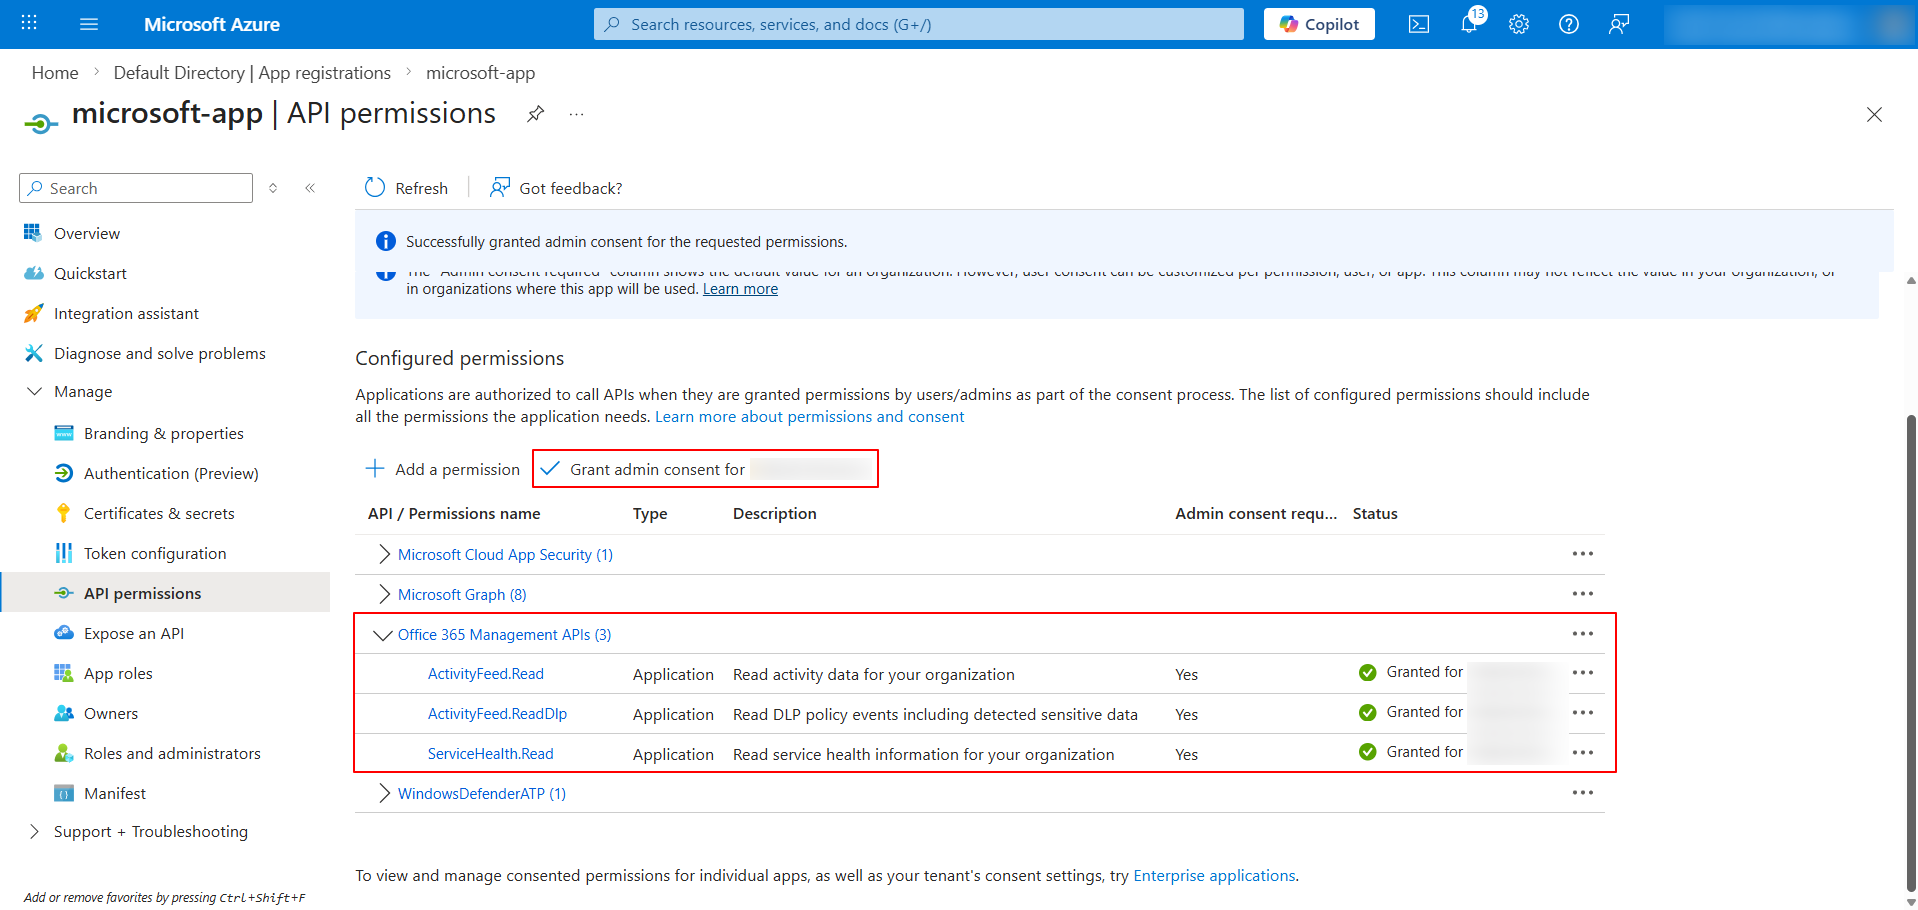
Provide Admin Consent
-
Click Grant admin consent for <Organization name> to provide admin approval for all selected API permissions.
Microsoft Entra ID – Required Permissions
| Microsoft Entra ID - Categories | Permissions required to ingest events | Configuration steps |
|---|---|---|
| Sign in – Graph | AuditLog.Read.AllDirectory.Read.AllOrganization.Read.All |
Configuration Step A |
| DirectoryAudit – Graph | AuditLog.Read.AllDirectory.Read.AllOrganization.Read.All |
Configuration Step A |
| Sign in - Office 365 | ActivityFeed.ReadActivityFeed.ReadDlpServiceHealth.Read |
Configuration Step B |
Configuration Step A – Sign in (Graph) and DirectoryAudit (Graph)
-
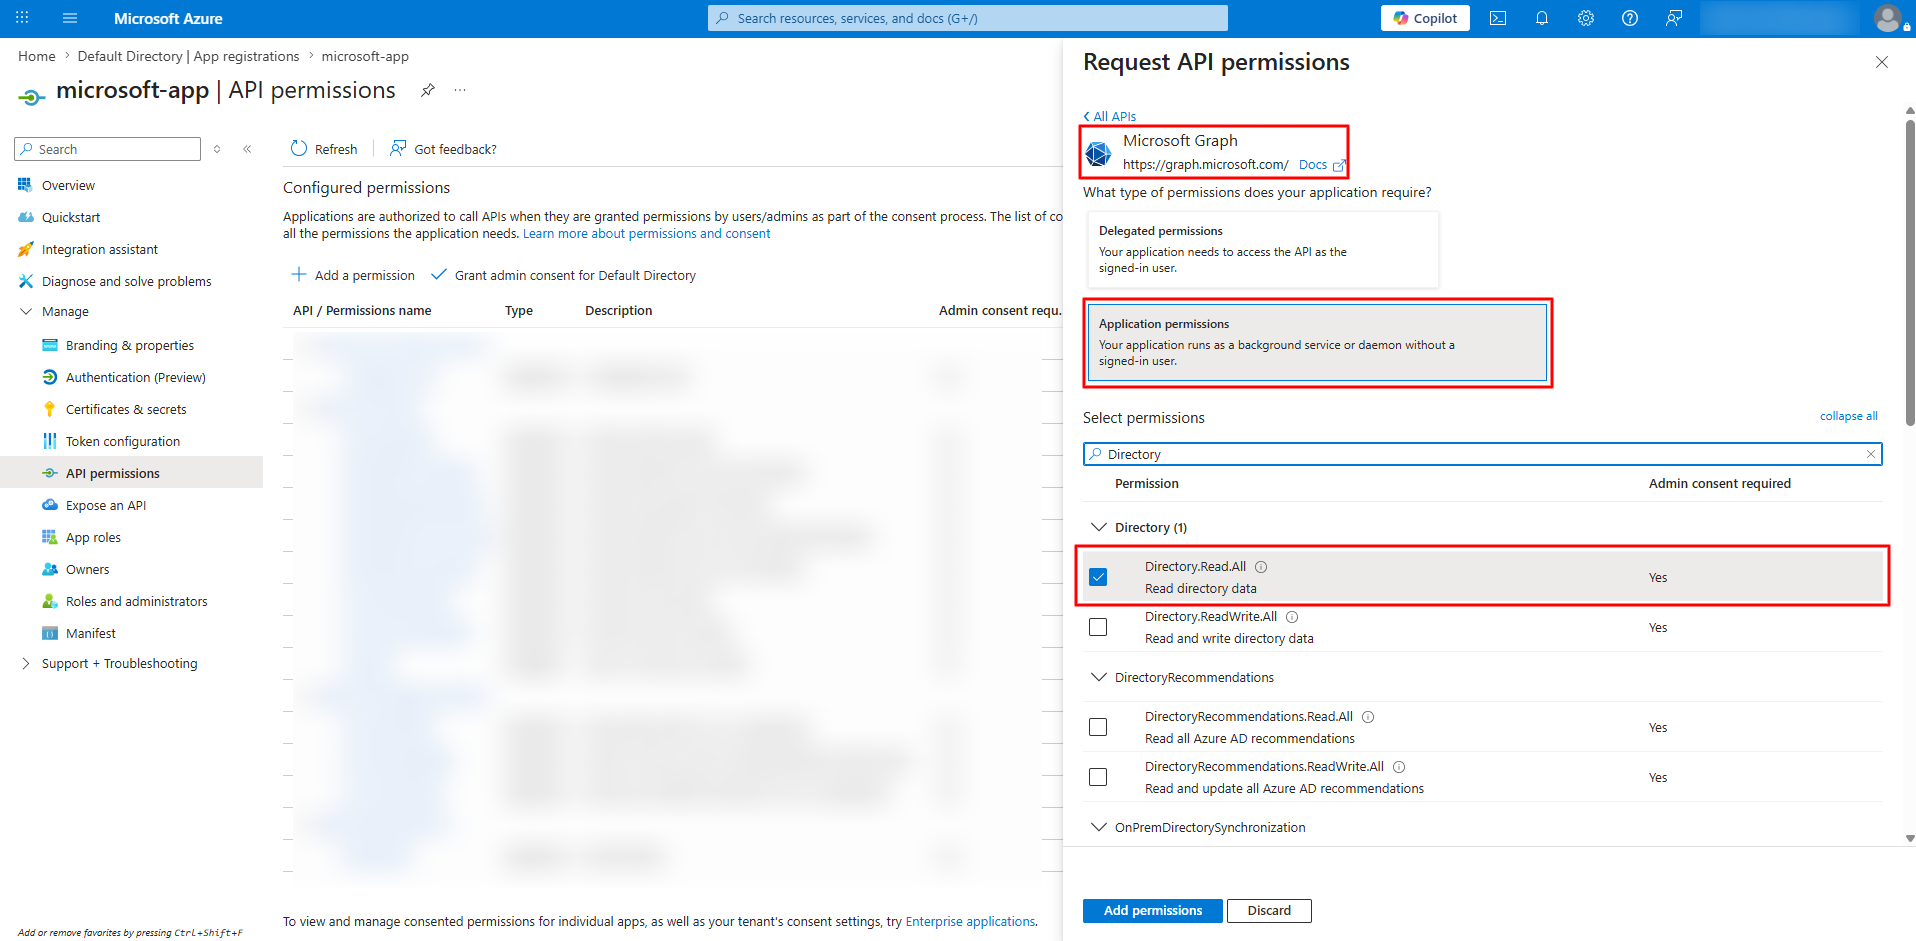
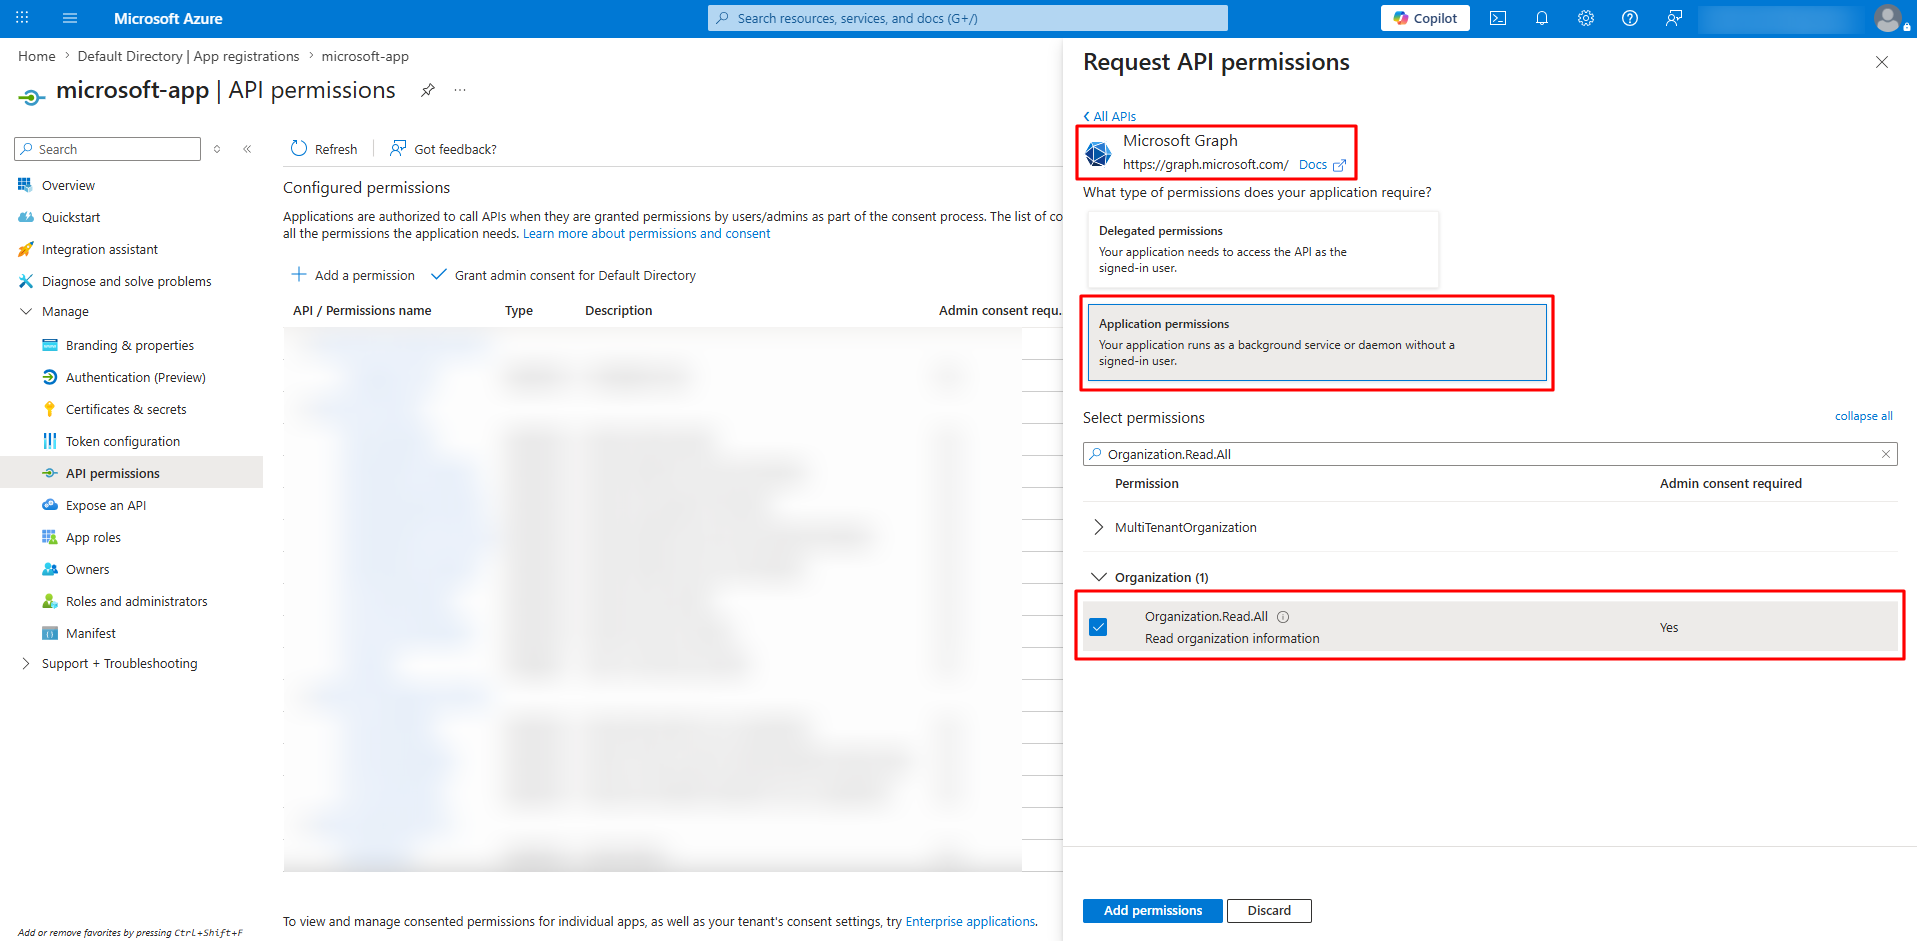
Click Add Permissions -> Microsoft APIs -> Microsoft Graph -> Application Permissions
-
Select the following permissions:
AuditLog.Read.AllDirectory.Read.AllOrganization.Read.All
Configuration Step B – Sign in (Office 365)
-
Click Add Permissions -> Microsoft APIs -> Office 365 Management APIs -> Application Permissions
-
Select
ActivityFeed.Read,ActivityFeed.ReadDlp, andServiceHealth.Readpermissions.
Provide Admin Consent
-
Click Grant admin consent for <Organization name> to provide admin approval for all selected API permissions.
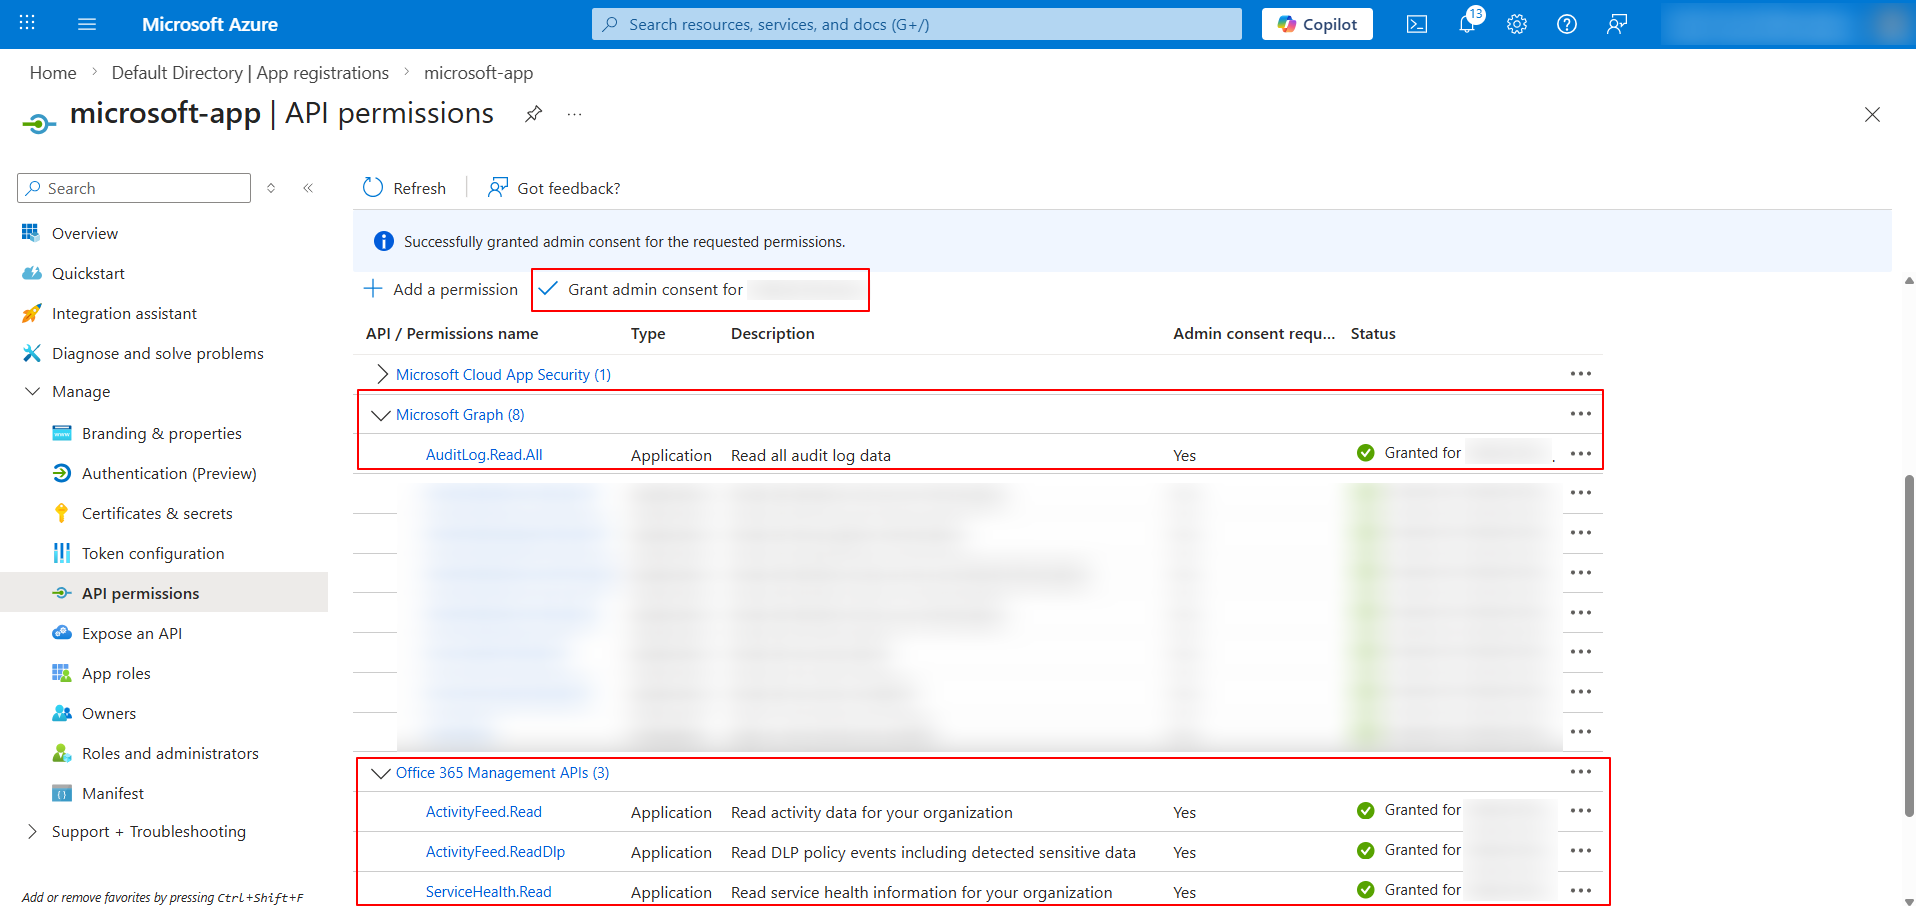
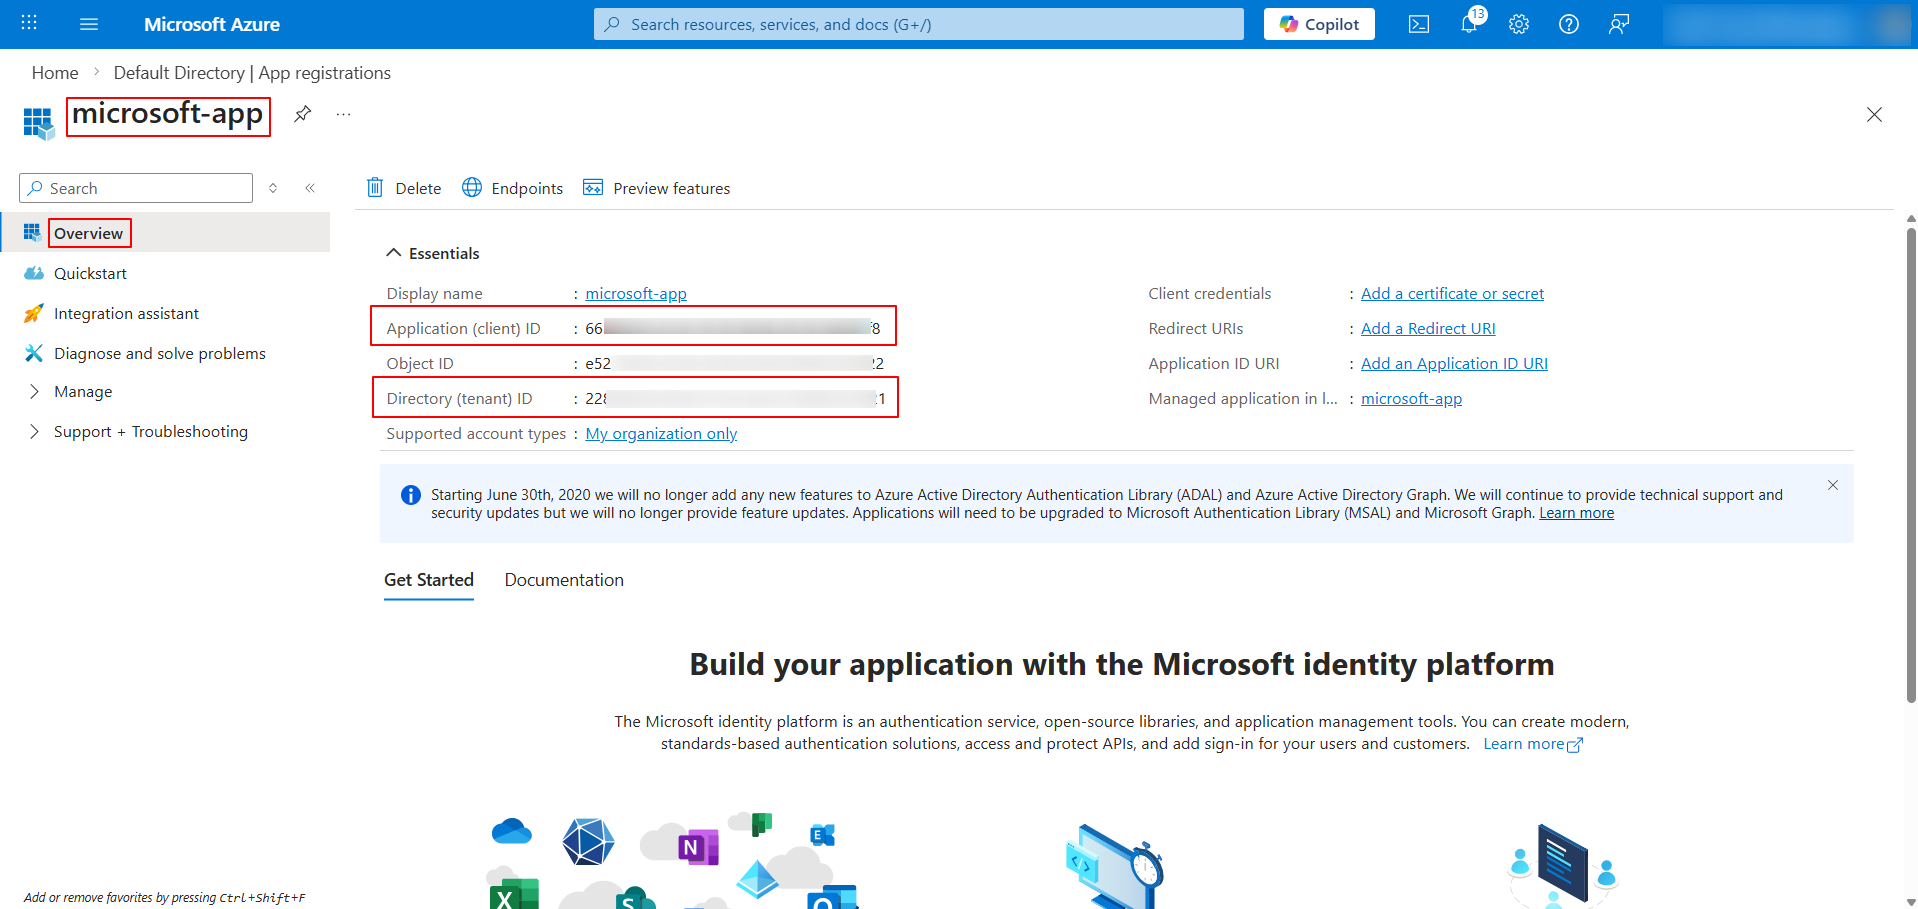
Step 3: Retrieve the Client ID & Tenant ID
-
From the Overview menu (Azure Portal -> Microsoft Entra ID -> Manage -> App registrations -> All applications -> Select the appropriate app -> Overview), note the Client ID and Tenant ID values.
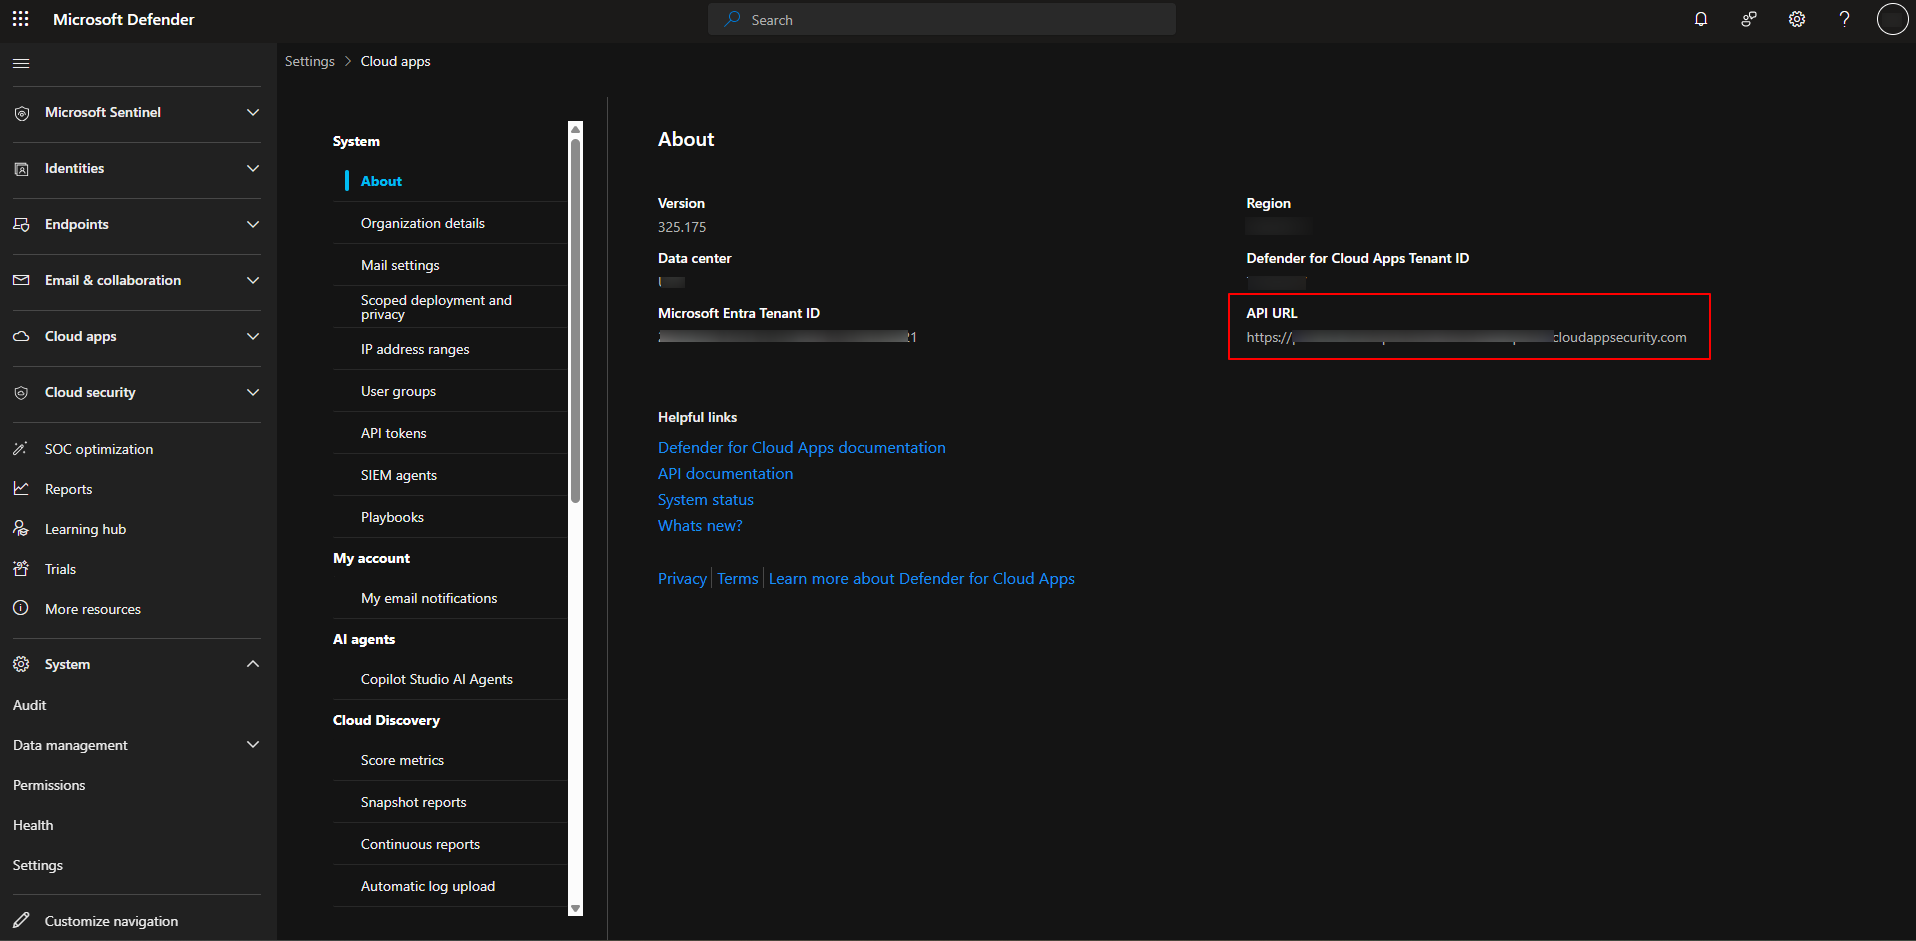
Step 4: Retrieve the API URL for Defender for Cloud Apps
Note: This step is mandatory only for ingesting Defender for Cloud Apps logs.
-
Navigate to the Cloud Apps Settings (Microsoft 365 security portal -> System -> Settings -> Cloud Apps -> About) in the associated Microsoft 365 security portal.
-
Note the API URL.
Step 5: Retrieve the Client Secret
Note: This step is required only if you choose the Client Secret authentication type while registring the Microsoft cloud source in Scope.
-
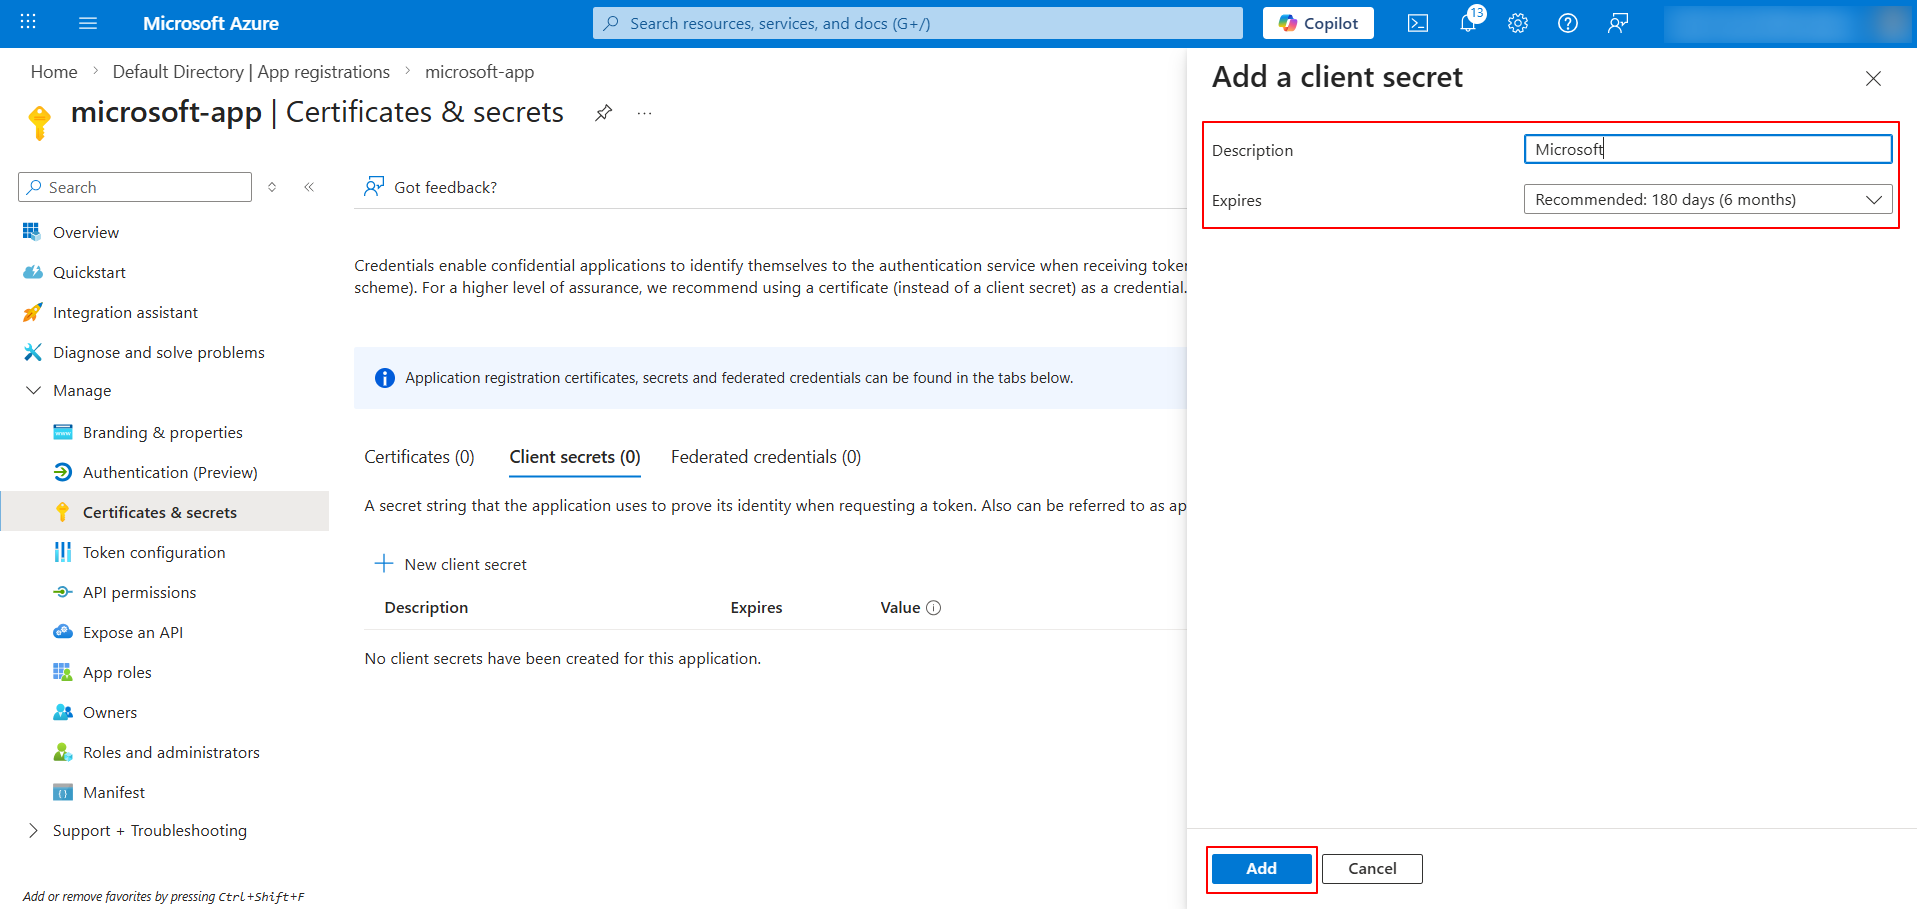
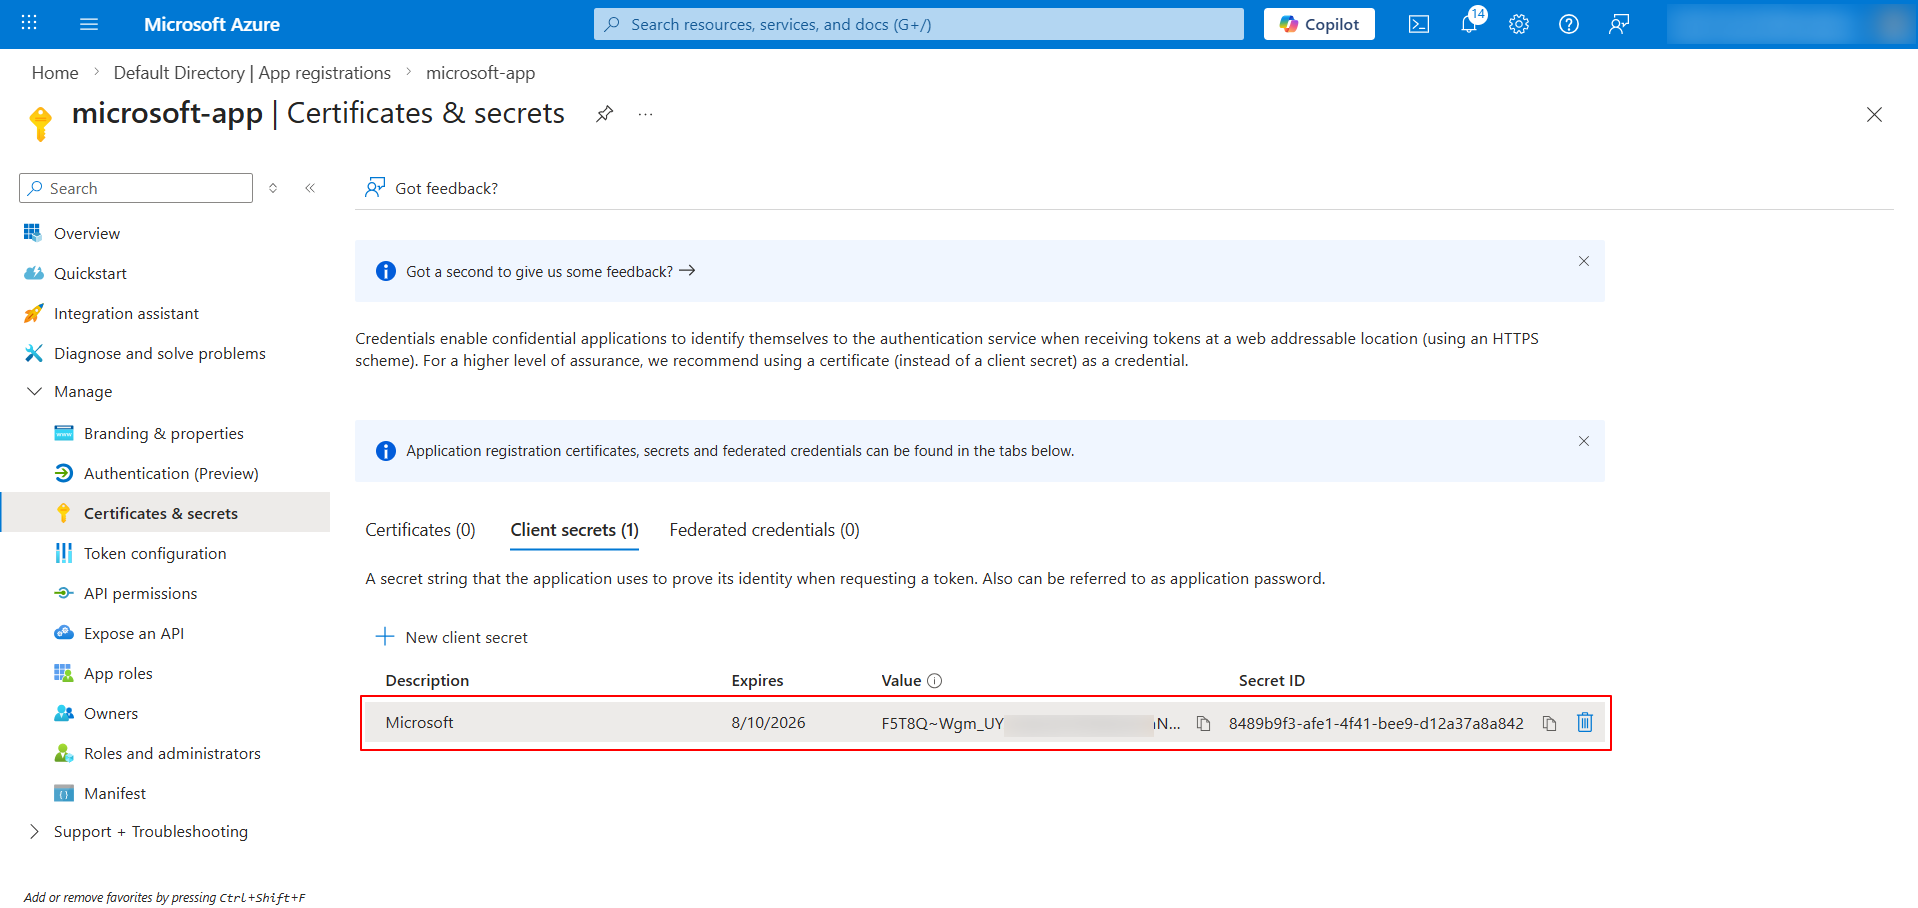
Navigate to Certificates & secrets (Azure Portal -> Microsoft Entra ID -> Manage -> App registrations -> All applications -> Select the required app -> Manage -> Certificates & secrets -> Client secrets tab).
-
Create a Client Secret using the New client secret option.
-
In the Add a client secret page, provide a Description and Expiry Date and Click Add.
-
Copy the Client Secret from the Value field immediately,
Note: Please make sure to copy the Client Secret from the Value field in the table as soon as it is created since it will not be available once you leave the Client Secret Creation Page.
Scope Setup
The Microsoft cloud source can be registered using the following authentication methods in Scope:
- Step 1.1 – Cloud Source Registration using Client Secret
- Step 1.2 – Cloud Source Registration using Existing Certificate Upload
- Step 1.3 – Cloud Source Registration using New Certificate Generation
Step 1.1: Microsoft Cloud Source Registration using Client Secret
In the Scope application, to register a Microsoft cloud source, navigate to the cloud source registration page –
-
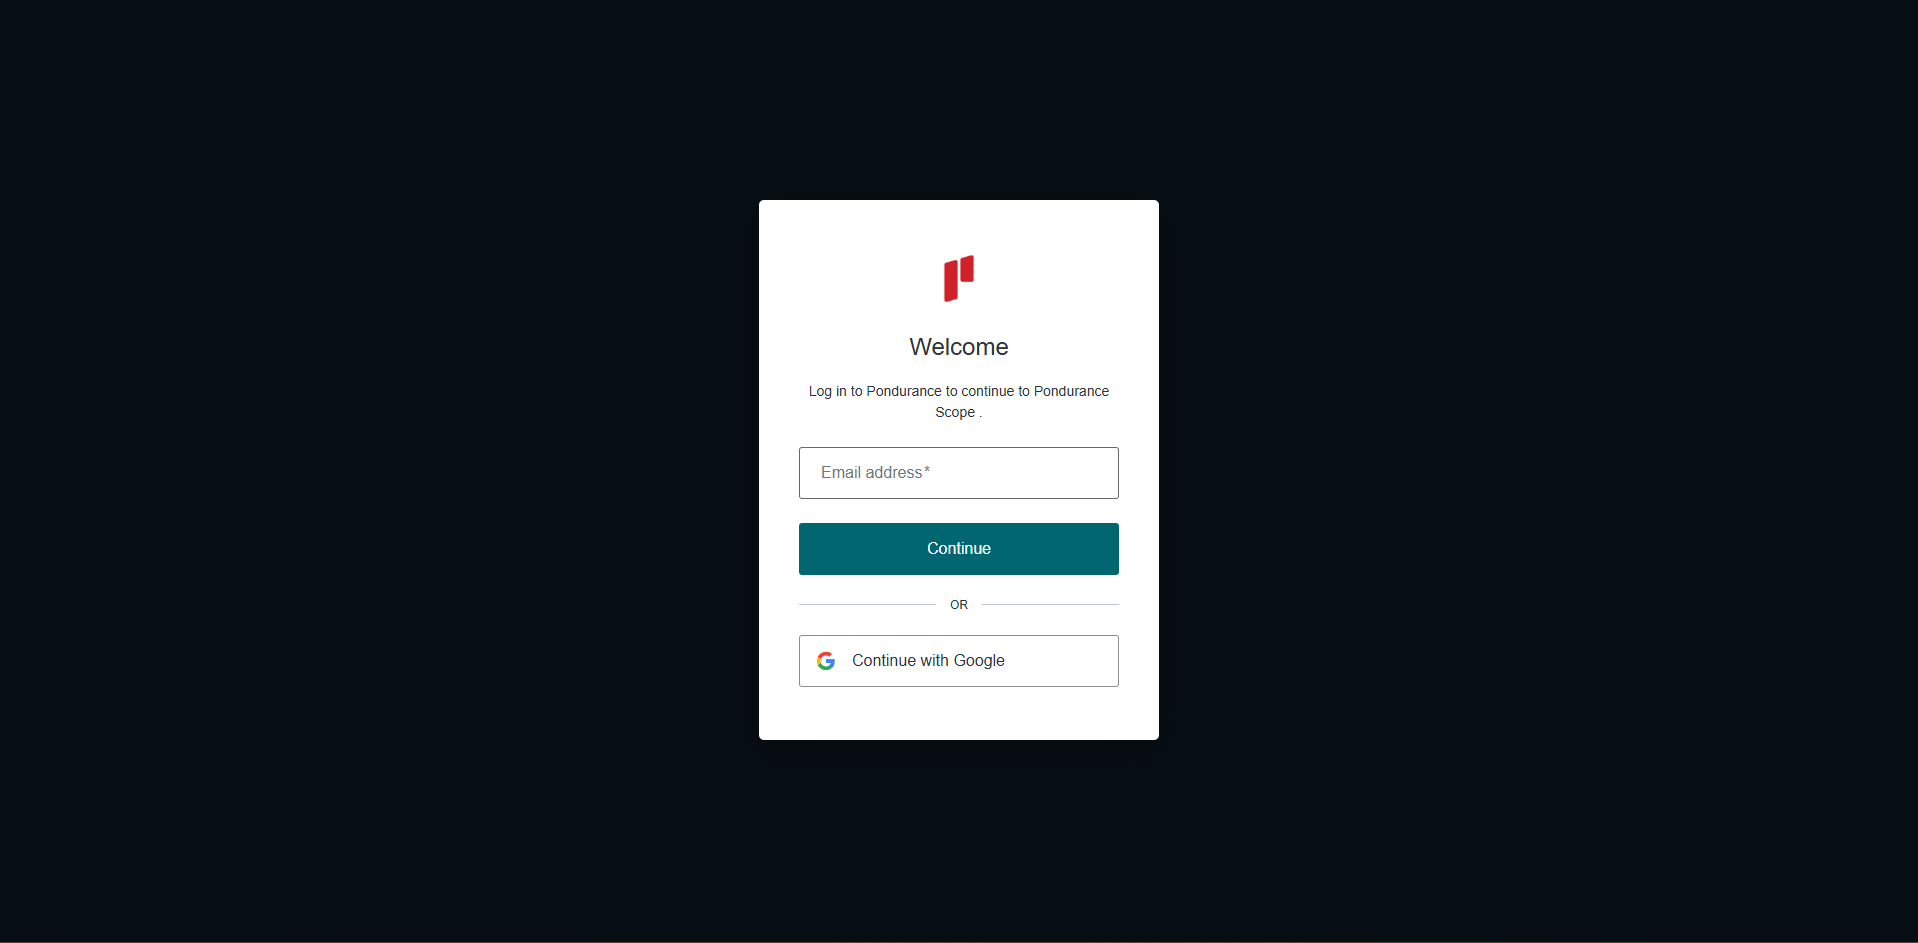
Log into the Scope application
-
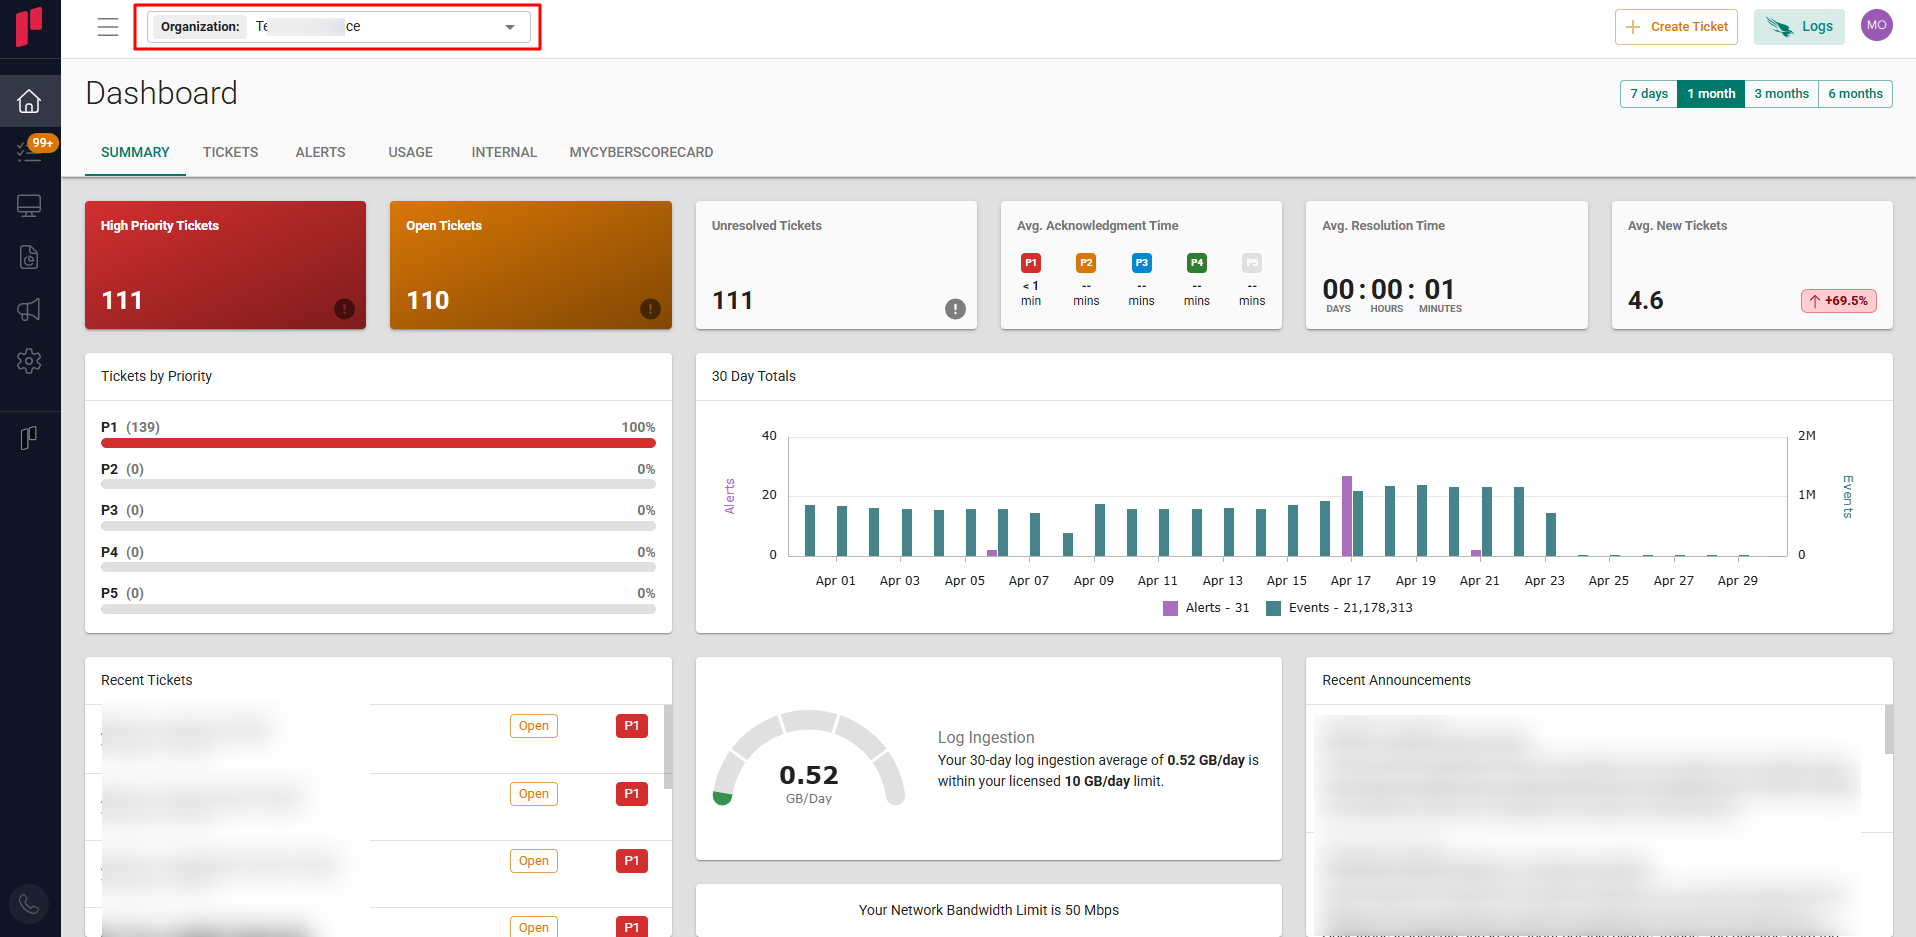
Select the required organization
-
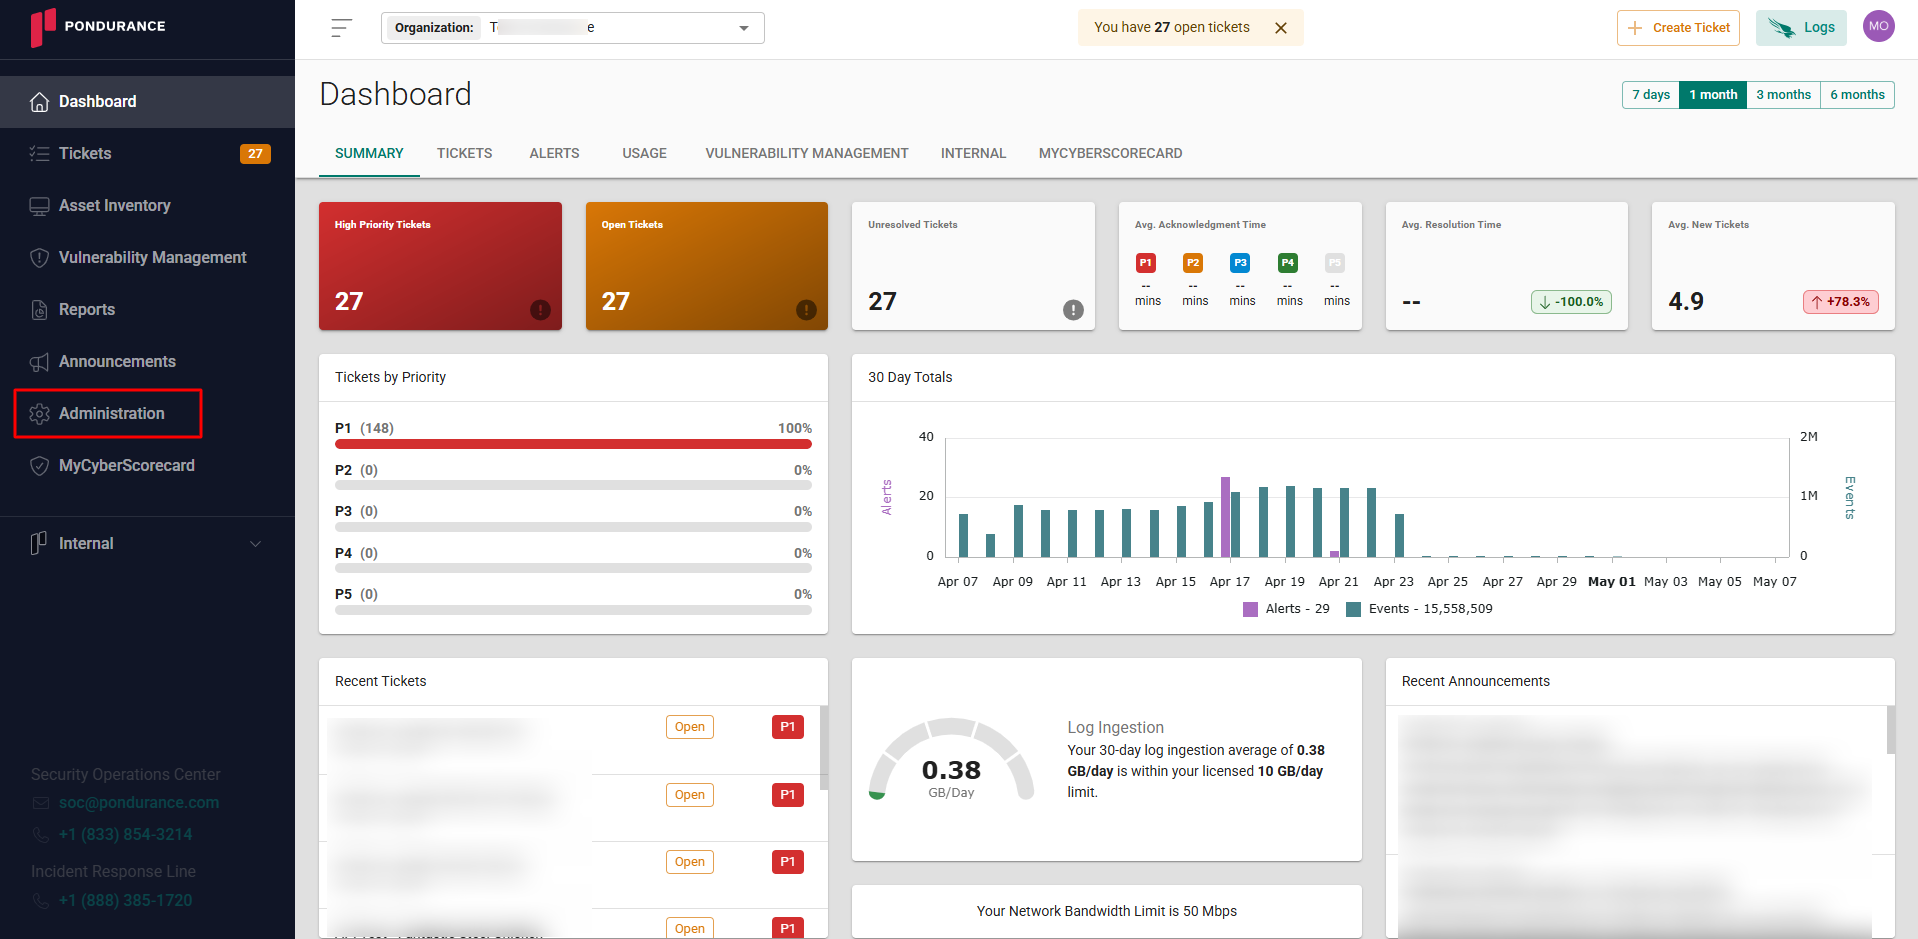
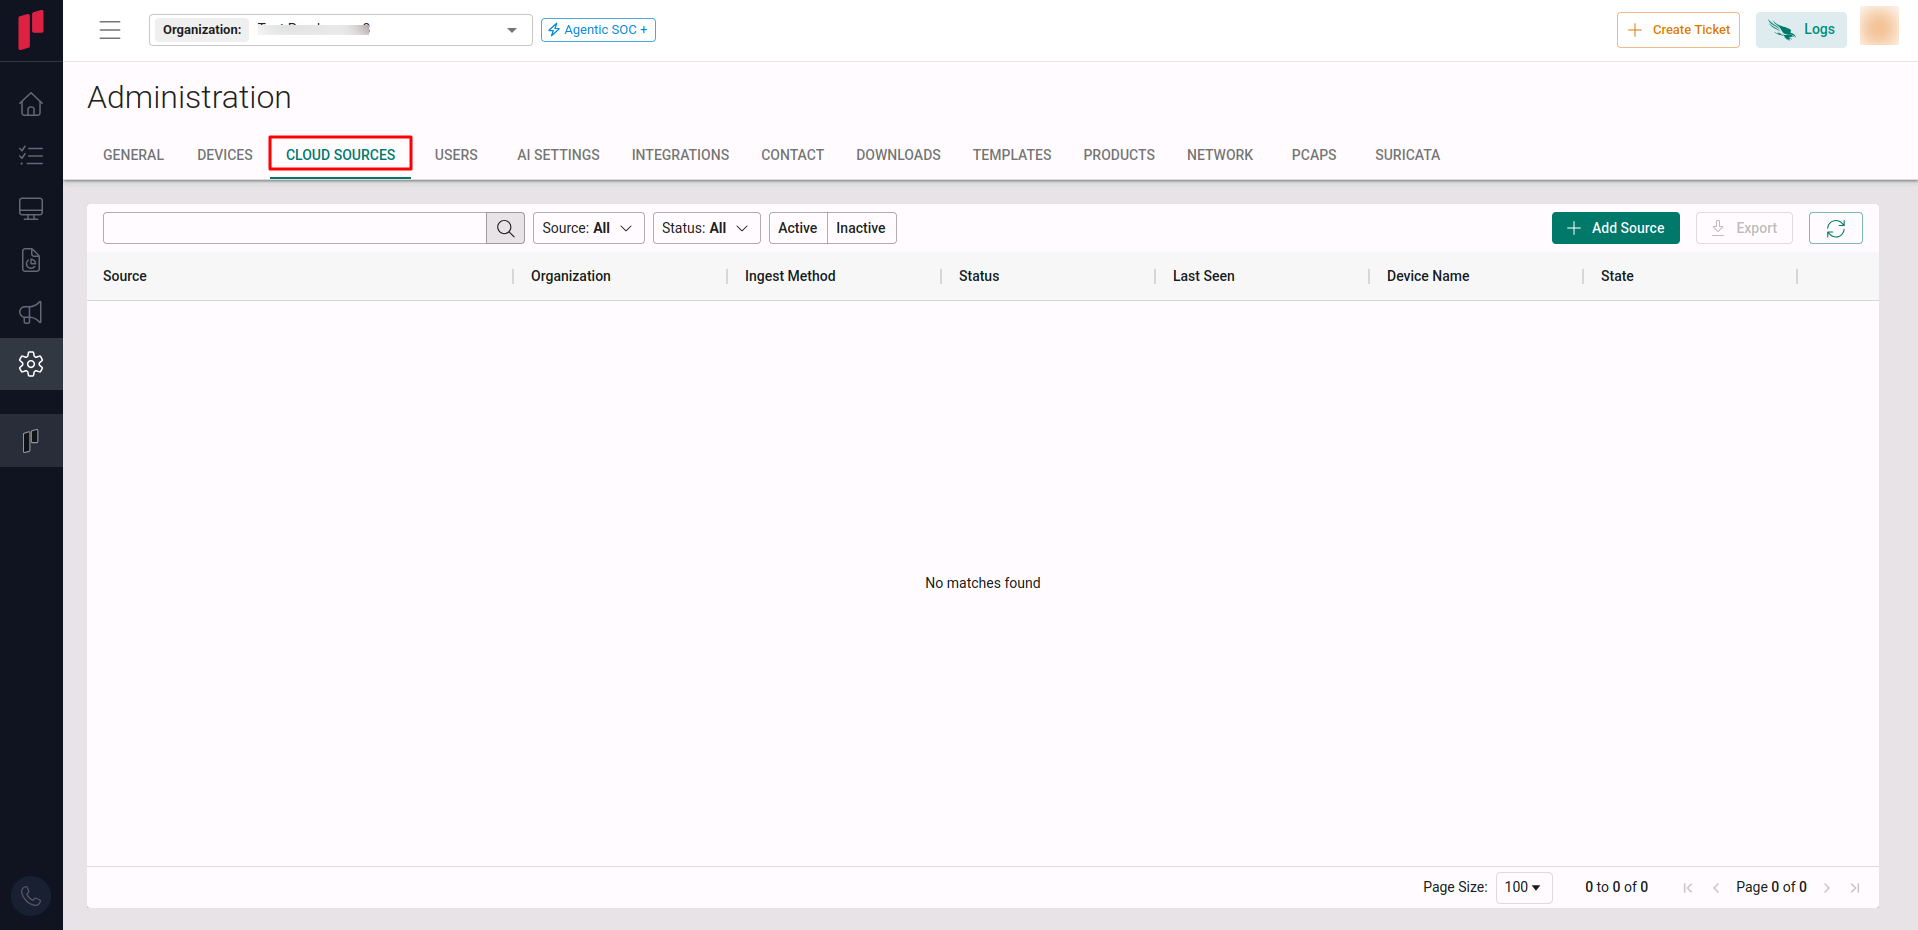
Navigate to the Side menu -> Administration
-
Navigate to the Cloud sources tab
-
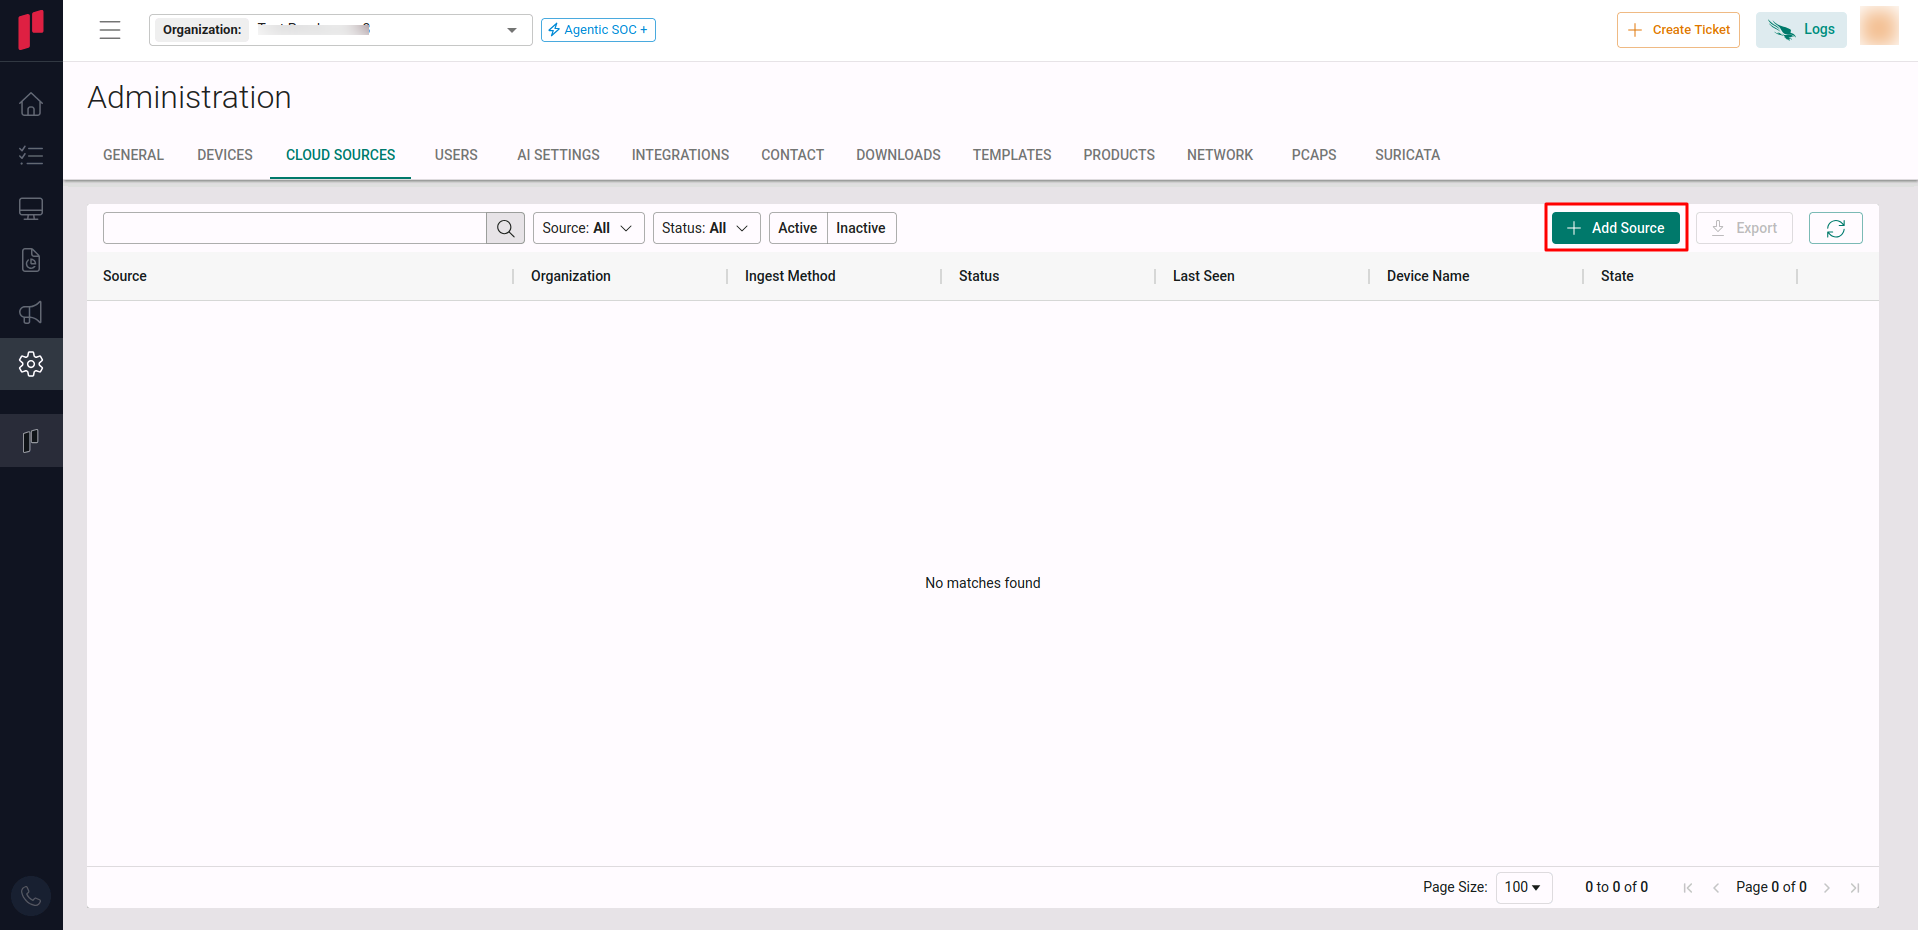
Click on the +Add Source button
-
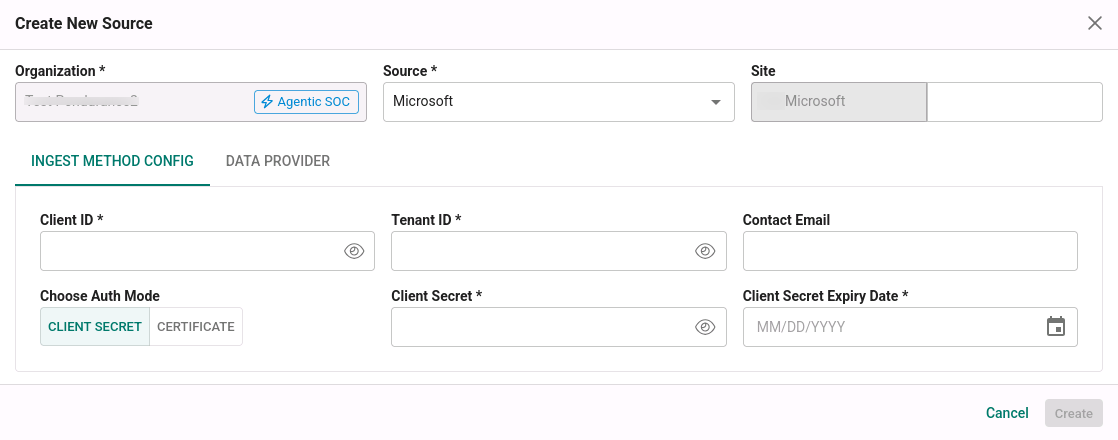
In the Create New Source pop-up, provide the parameters below.
- Source: Select “Microsoft” from the Source dropdown.
- Site: Provide a name for the Microsoft cloud source.
Input Method Config Tab:
- Client ID: The Client ID noted in Step 3.
- Tenant ID: The Tenant ID noted in Step 3.
- Contact Email: The email address of the person who registers the Microsoft cloud source in Scope.
- Auth Mode: Click the Client Secret tab.
- Client Secret: The Client Secret generated in Step 5.
- Client Secret Expiry Date: The expiry date of the Client Secret set in Step 5.
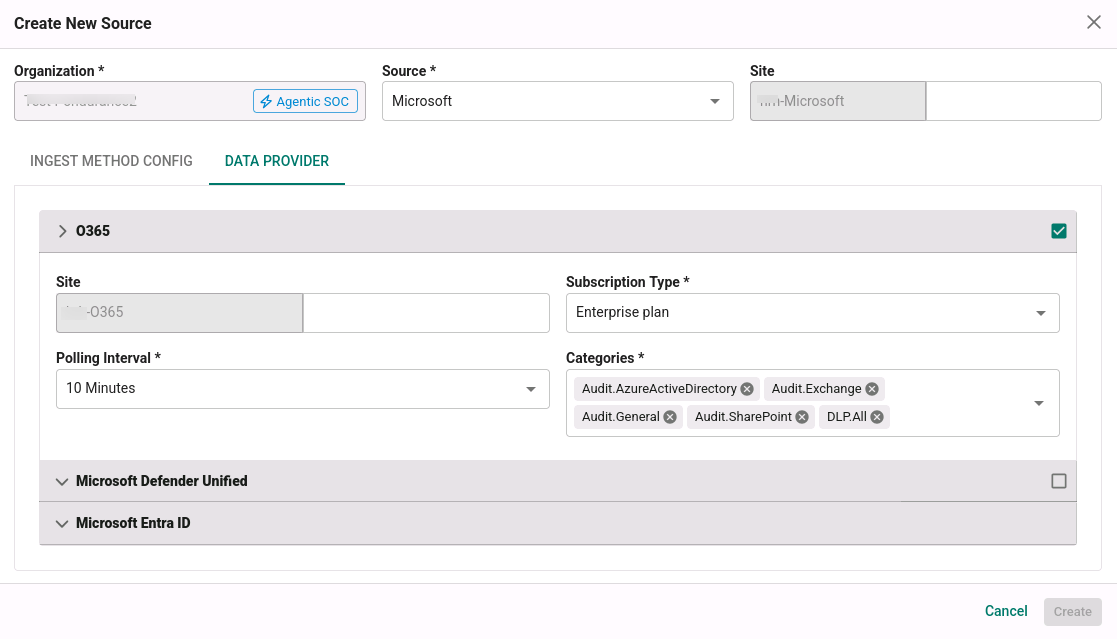
Data Provider Tab – O365:
- Select the O365 checkbox.
- Site: Automatically inherited from the Microsoft cloud source site name (editable if required).
- Subscription Type: Select the required subscription (Enterprise / GCC government / GCC High government / DoD government).
- Polling Interval: Select the required polling interval (5 / 10 / 15 / 30 / 60 minutes).
- Categories: Select the required categories. By default, all supported categories are selected.
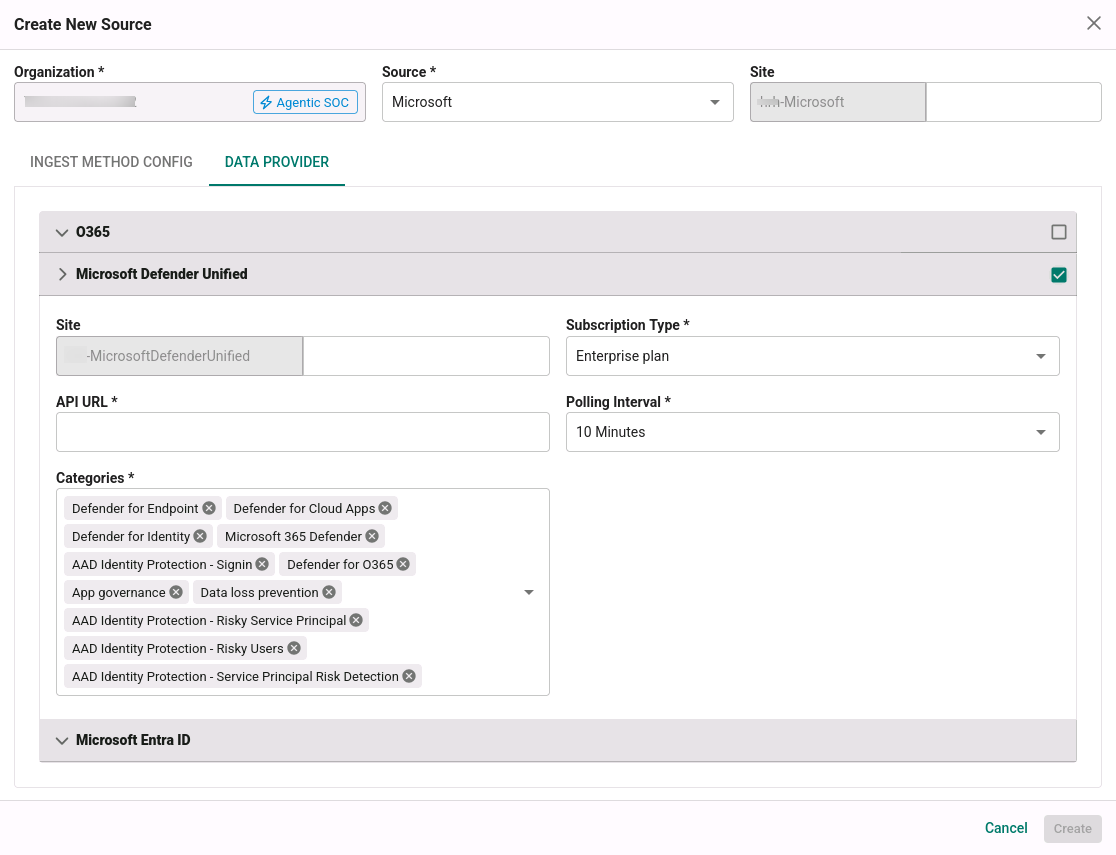
Data Provider Tab – Microsoft Defender Unified:
- Select the Microsoft Defender Unified checkbox.
- Site: Automatically inherited (editable if required).
- API URL: URL from the Microsoft 365 security portal (from Step 4). Mandatory only for MS Defender for Cloud Apps.
- Subscription Type: Select the required subscription.
- Polling Interval: Select the required polling interval.
- Categories: Select the required Defender categories. By default, all supported categories are selected.
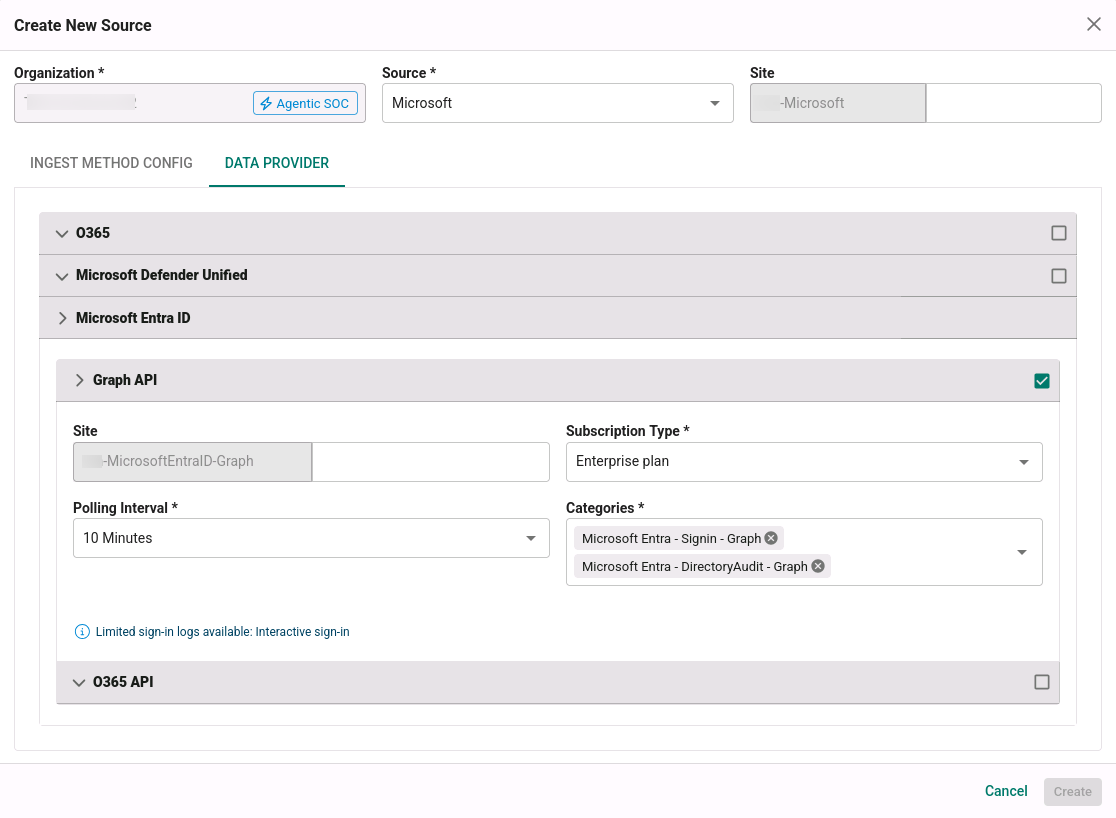
Data Provider Tab – Microsoft Entra ID (Graph API):
- Select the Graph API checkbox.
- Site: Automatically inherited (editable if required).
- Subscription Type: Select the required subscription.
- Polling Interval: Select the required polling interval.
- Categories: Select the required categories.
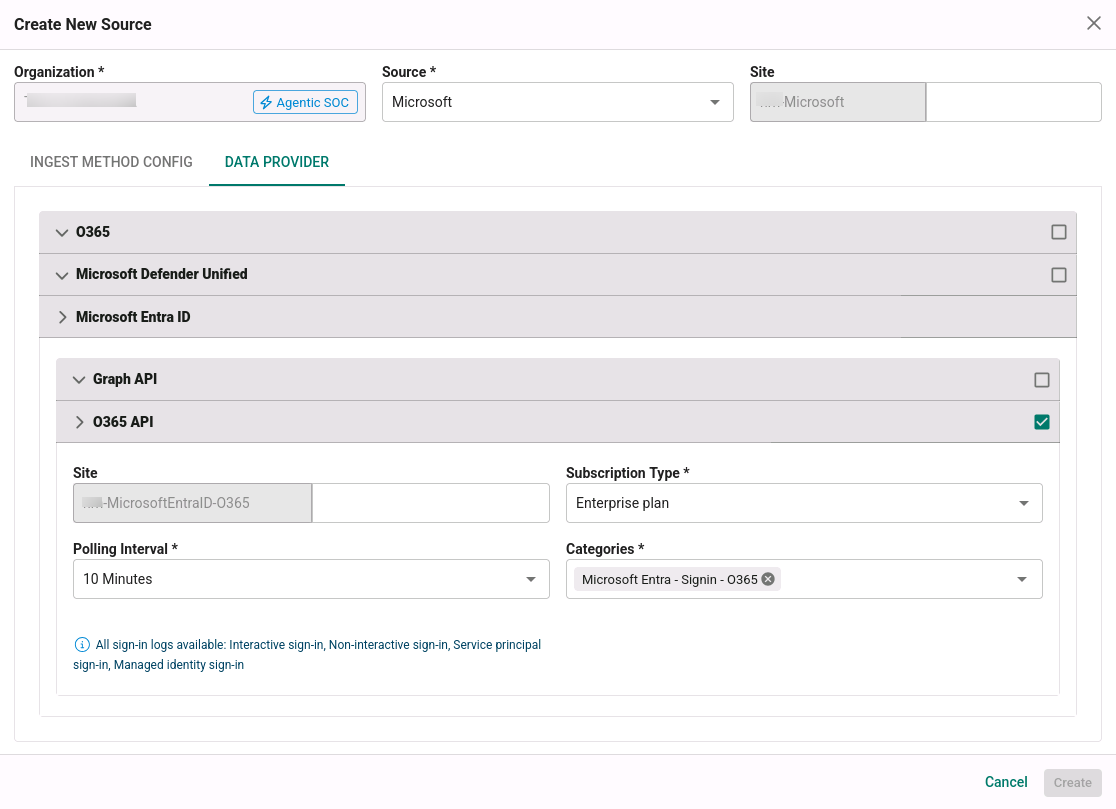
Data Provider Tab – Microsoft Entra ID (O365 API):
- Select the O365 API checkbox.
- Site: Automatically inherited (editable if required).
- Subscription Type: Select the required subscription.
- Polling Interval: Select the required polling interval.
- Categories: Select the required categories.
Once the application details are entered, the Microsoft registration is complete in Scope and is ready for ingestion of Microsoft logs.
Step 1.2: Microsoft Cloud Source Registration using Existing Certificate Upload
In the Scope application, navigate to the cloud source registration page (same navigation as Step 1.1).
-
In the Create New Source pop-up, configure the Source, and Site fields.
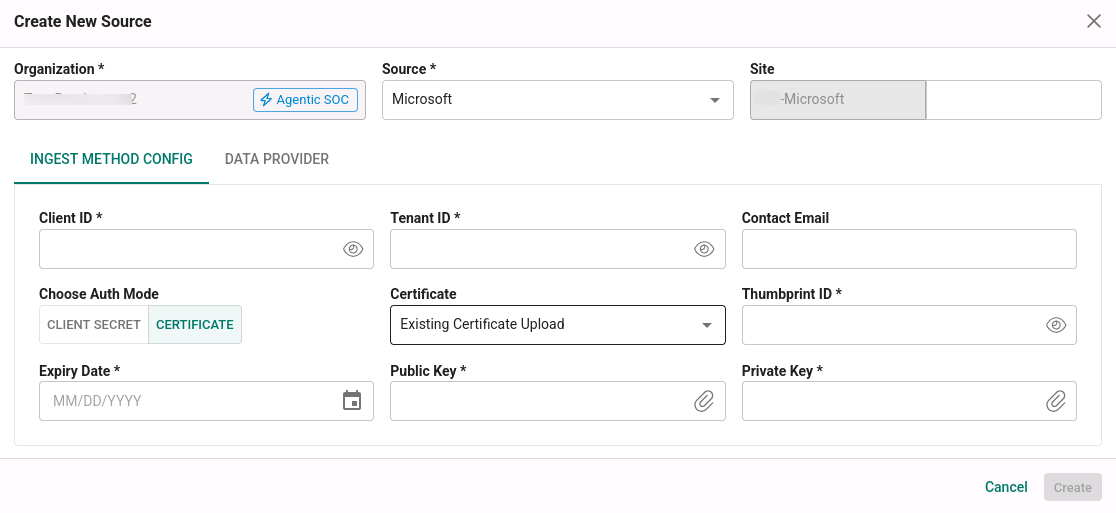
Input Method Config Tab:
- Client ID: The Client ID noted in Step 3.
- Tenant ID: The Tenant ID noted in Step 3.
- Contact Email: The email address of the person who registers the Microsoft cloud source in Scope.
- Auth Mode: Click the Certificate tab.
- Existing Certificate Upload / New Certificate Generation: Select Existing Certificate Upload from the dropdown.
- Thumbprint ID: The Thumbprint ID generated using the certificate uploaded in Azure AD portal.
- Expiry Date: Expiry date of the certificate.
- Public Key: Upload the available *.cer file.
- Private Key: Upload the available *.pem file.
Data Provider Tab – O365:
- Select the O365 checkbox.
- Site: Automatically inherited from the Microsoft cloud source site name (editable if required).
- Subscription Type: Select the required subscription (Enterprise / GCC government / GCC High government / DoD government).
- Polling Interval: Select the required polling interval (5 / 10 / 15 / 30 / 60 minutes).
- Categories: Select the required categories. By default, all supported categories are selected.
Data Provider Tab – Microsoft Defender Unified:
- Select the Microsoft Defender Unified checkbox.
- Site: Automatically inherited (editable if required).
- API URL: URL from the Microsoft 365 security portal (from Step 4). Mandatory only for MS Defender for Cloud Apps.
- Subscription Type: Select the required subscription.
- Polling Interval: Select the required polling interval.
- Categories: Select the required Defender categories. By default, all supported categories are selected.
Data Provider Tab – Microsoft Entra ID (Graph API):
- Select the Graph API checkbox.
- Site: Automatically inherited (editable if required).
- Subscription Type: Select the required subscription.
- Polling Interval: Select the required polling interval.
- Categories: Select the required categories.
Data Provider Tab – Microsoft Entra ID (O365 API):
- Select the O365 API checkbox.
- Site: Automatically inherited (editable if required).
- Subscription Type: Select the required subscription.
- Polling Interval: Select the required polling interval.
- Categories: Select the required categories.
Once the application details are entered, the Microsoft registration is complete in Scope and is ready for ingestion of Microsoft logs.
Step 1.3: Microsoft Cloud Source Registration using New Certificate Generation
In the Scope application, navigate to the cloud source registration page (same navigation as Step 1.1).
-
In the Create New Source pop-up, configure the same Source, and Site fields.
Input Method Config Tab:
- Client ID: The Client ID noted in Step 3.
- Tenant ID: The Tenant ID noted in Step 3.
- Contact Email: The email address of the person who registers the Microsoft cloud source in Scope.
- Auth Mode: Click the Certificate tab.
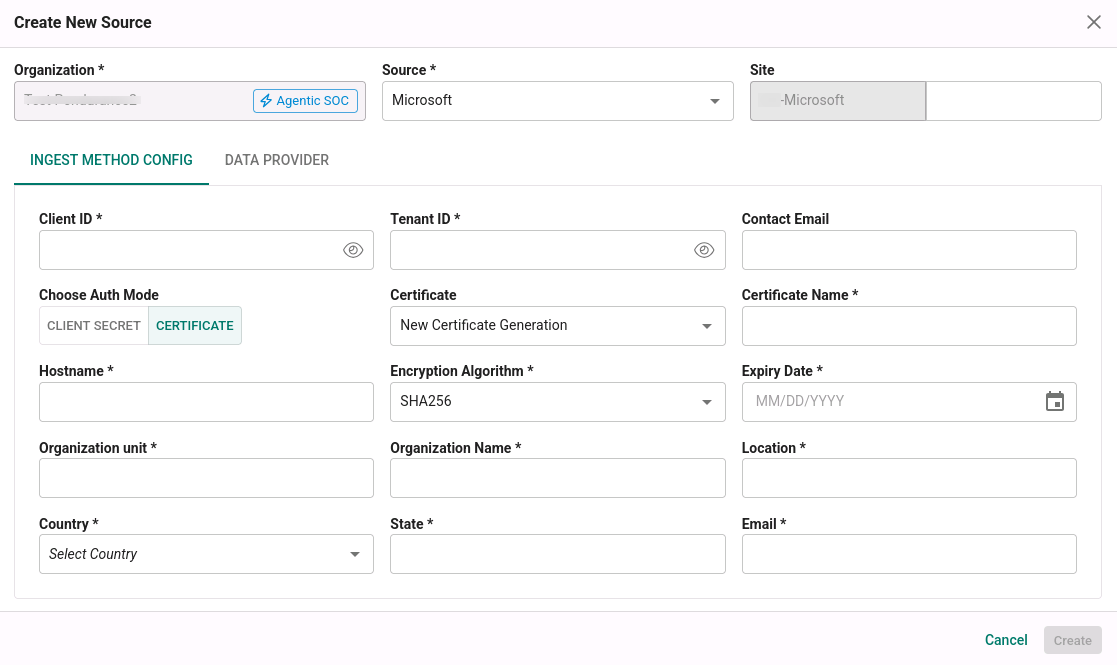
- Existing Certificate Upload / New Certificate Generation: Select New Certificate Generation from the dropdown. The Scope application gets input for generating Certificate and a certificate file gets generated. This Certificate (Public key - *.cer file) has to be used to generate the Thumbprint ID in the Azure portal.
- Certificate Name: User defined name for the certificate.
- Hostname: The hostname or domain name to be used by clients to access the server.
- Encryption Algorithm: Select the encryption algorithm (SHA256 or SHA512).
- Expiry Date: Select the expiry date for the certificate.
- Organization Unit: Name of the department within the organization.
- Organization Name: Name of the organization.
- Location: City where the organization unit is located.
- Country: Country where the organization unit is located.
- State: State/Province where the organization unit is located.
- Email: Email address of the user.
Data Provider Tab – O365:
- Select the O365 checkbox.
- Site: Automatically inherited from the Microsoft cloud source site name (editable if required).
- Subscription Type: Select the required subscription (Enterprise / GCC government / GCC High government / DoD government).
- Polling Interval: Select the required polling interval (5 / 10 / 15 / 30 / 60 minutes).
- Categories: Select the required categories. By default, all supported categories are selected.
Data Provider Tab – Microsoft Defender Unified:
- Select the Microsoft Defender Unified checkbox.
- Site: Automatically inherited (editable if required).
- API URL: URL from the Microsoft 365 security portal (from Step 4). Mandatory only for MS Defender for Cloud Apps.
- Subscription Type: Select the required subscription.
- Polling Interval: Select the required polling interval.
- Categories: Select the required Defender categories. By default, all supported categories are selected.
Data Provider Tab – Microsoft Entra ID (Graph API):
- Select the Graph API checkbox.
- Site: Automatically inherited (editable if required).
- Subscription Type: Select the required subscription.
- Polling Interval: Select the required polling interval.
- Categories: Select the required categories.
Data Provider Tab – Microsoft Entra ID (O365 API):
- Select the O365 API checkbox.
- Site: Automatically inherited (editable if required).
- Subscription Type: Select the required subscription.
- Polling Interval: Select the required polling interval.
- Categories: Select the required categories.
Once the source is created, a newly generated certificate will be available for download.
Step 1.3.1: Generate Thumbprint ID in Azure AD Account
-
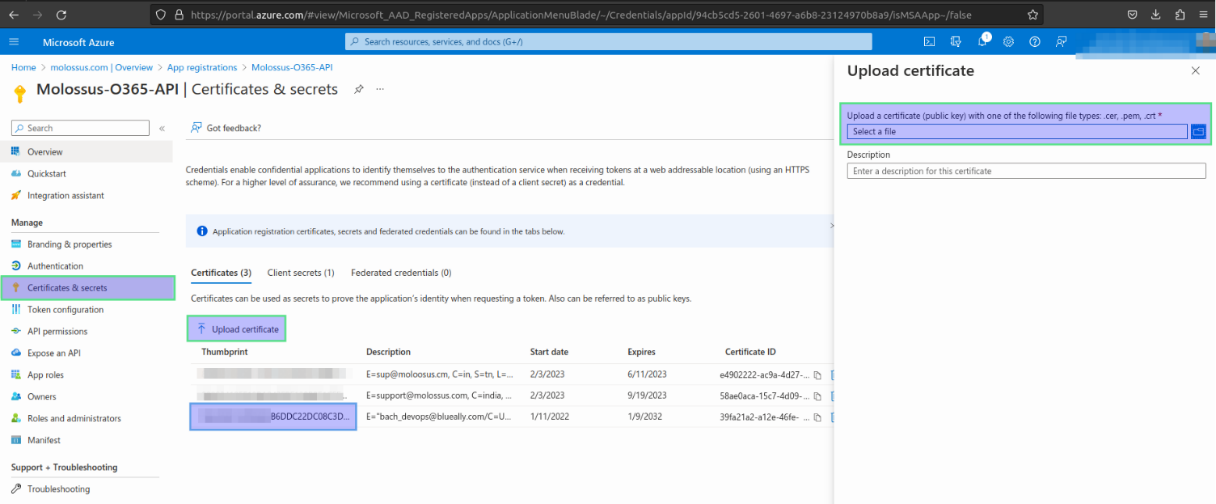
Upload the generated certificate file (
.cer) by clicking Upload certificate in the Certificates & Secrets menu (Azure Portal -> Microsoft Entra ID -> Manage -> App registrations -> All applications -> Select the app -> Manage -> Certificates & secrets -> Certificates tab). -
Once the certificate is uploaded, a Thumbprint ID will be generated (highlighted in blue). Note this thumbprint ID.
Step 1.3.2: Update Thumbprint ID in Scope Application
-
Provide the Thumbprint ID (generated above) in the cloud source created in Step 1.3 by editing the Microsoft cloud source via the edit option.
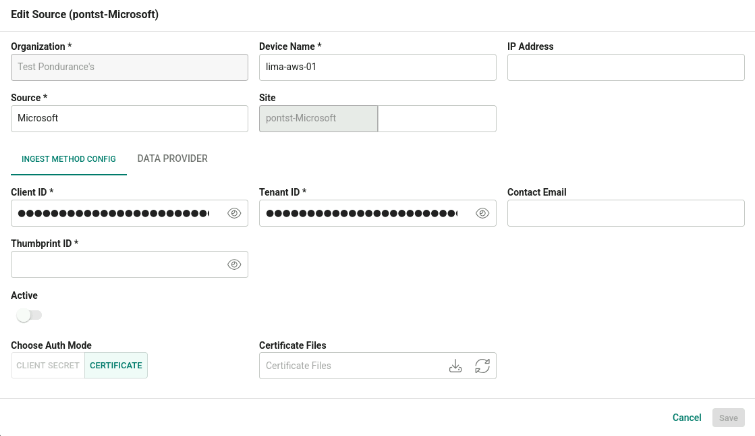
Once the Thumbprint ID is entered, the Microsoft registration is complete in Scope and is ready for ingestion of Microsoft logs.