Microsoft Sentinel
Overview
Configuring a cloud source in Scope is a two-step process.
-
Generating Microsoft Sentinel credentials in the Microsoft Azure Portal. Please refer to Section 1 – Microsoft Sentinel Setup
-
Setting up the Microsoft Sentinel cloud source in the Scope application. Please refer to Section 2 – Scope Setup
Prerequisites
- Active Azure Subscription
- Log Analytics Workspace. Click here to know more about Log Analytics workspaces.
Microsoft Sentinel Setup
To get started, you’ll need to gather the following information from the Microsoft Azure Portal –
- Tenant ID
- Client ID
- Client Secret (or Certificate)
- Subscription ID
- Resource Group Name
- Workspace Name (Log Analytics Workspace)
Step 1: Create an Application in Microsoft Entra ID
-
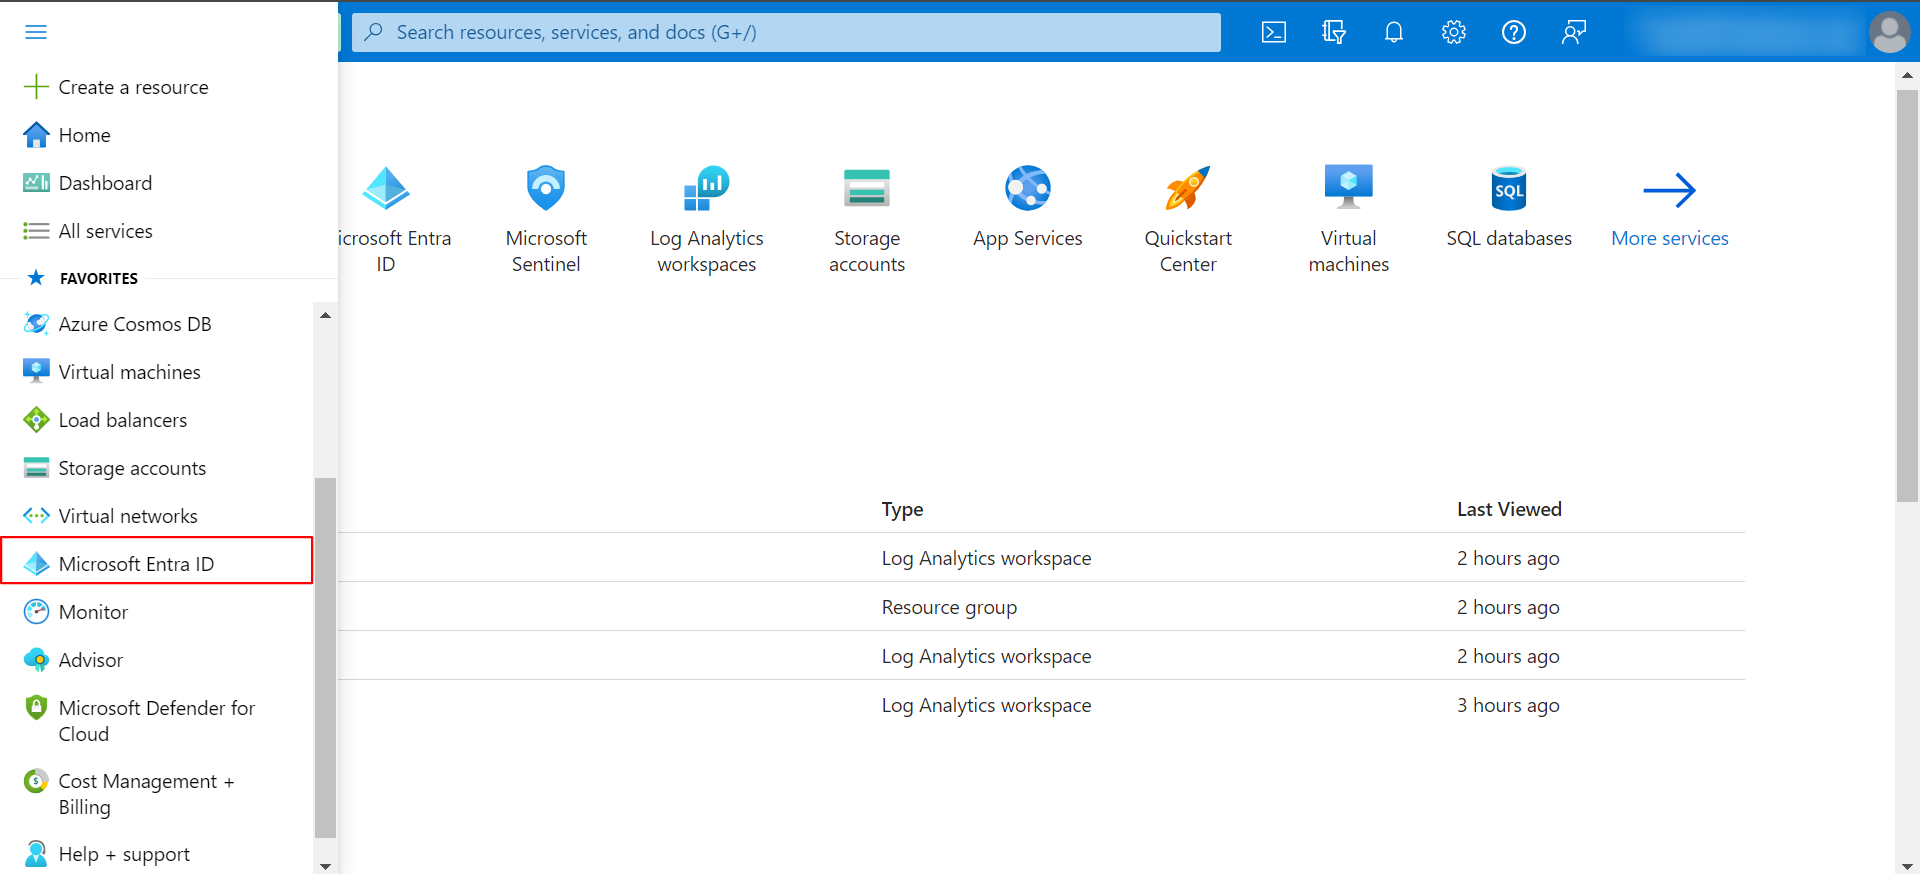
Log into the Microsoft Azure Portal and click on Microsoft Entra ID from the side menu.
-
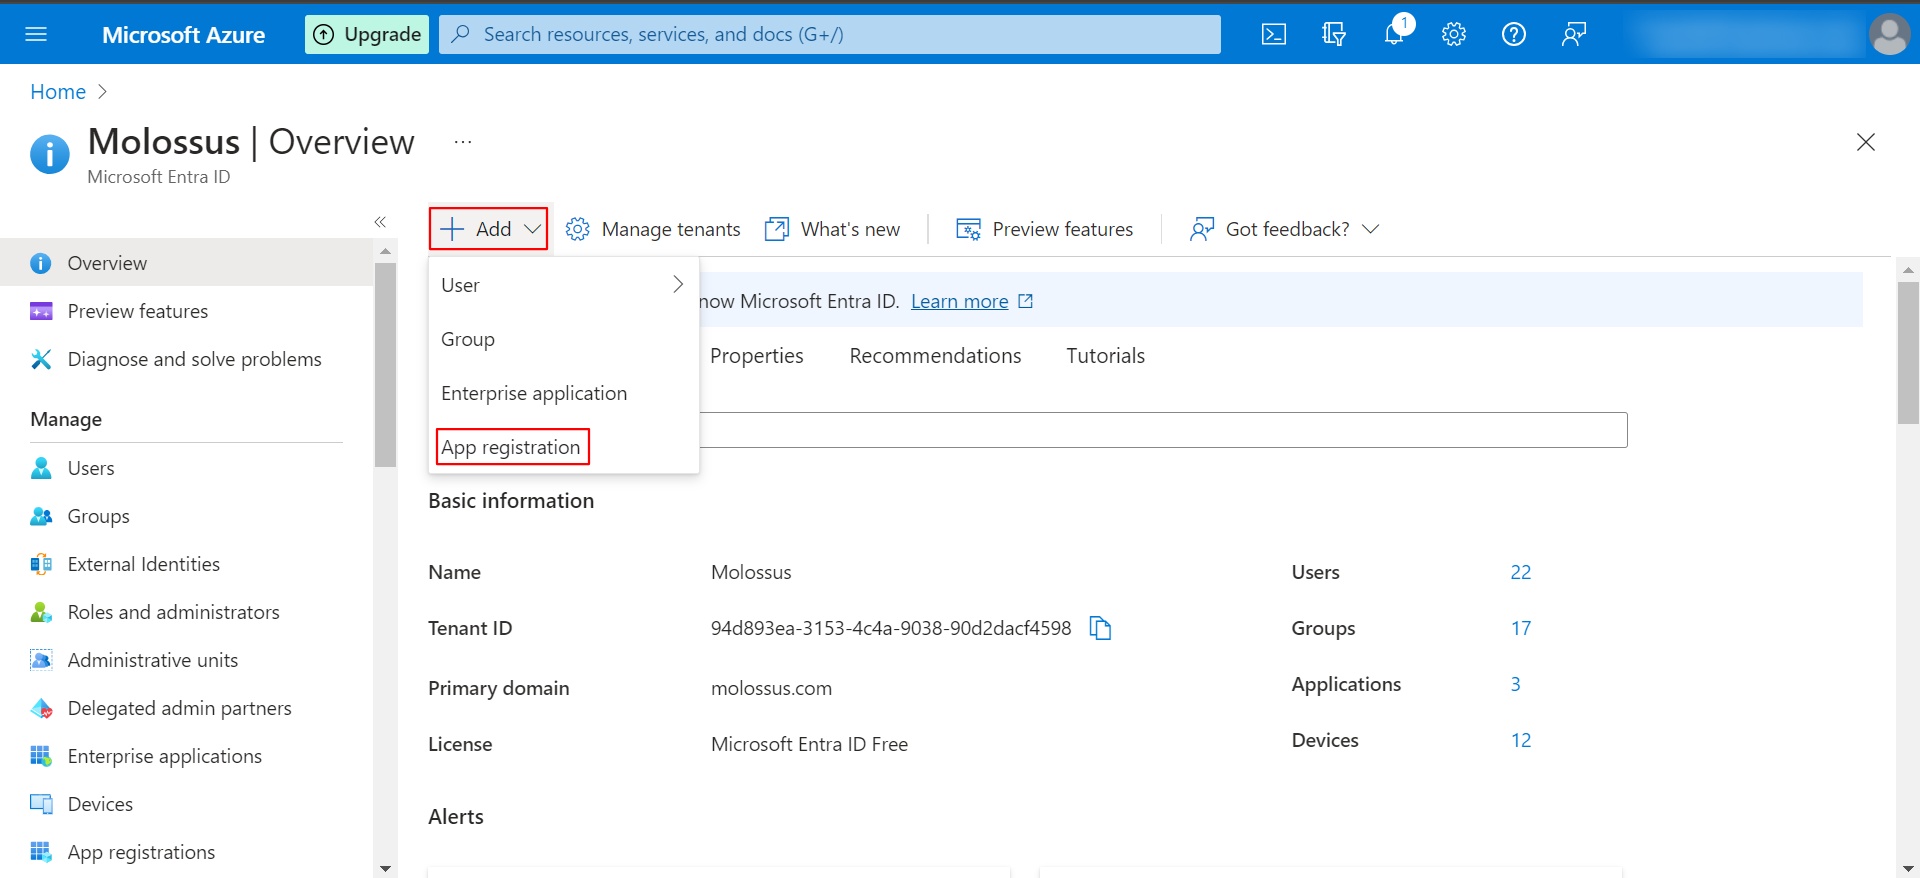
Navigate to New -> App registrations and click App registration.
-
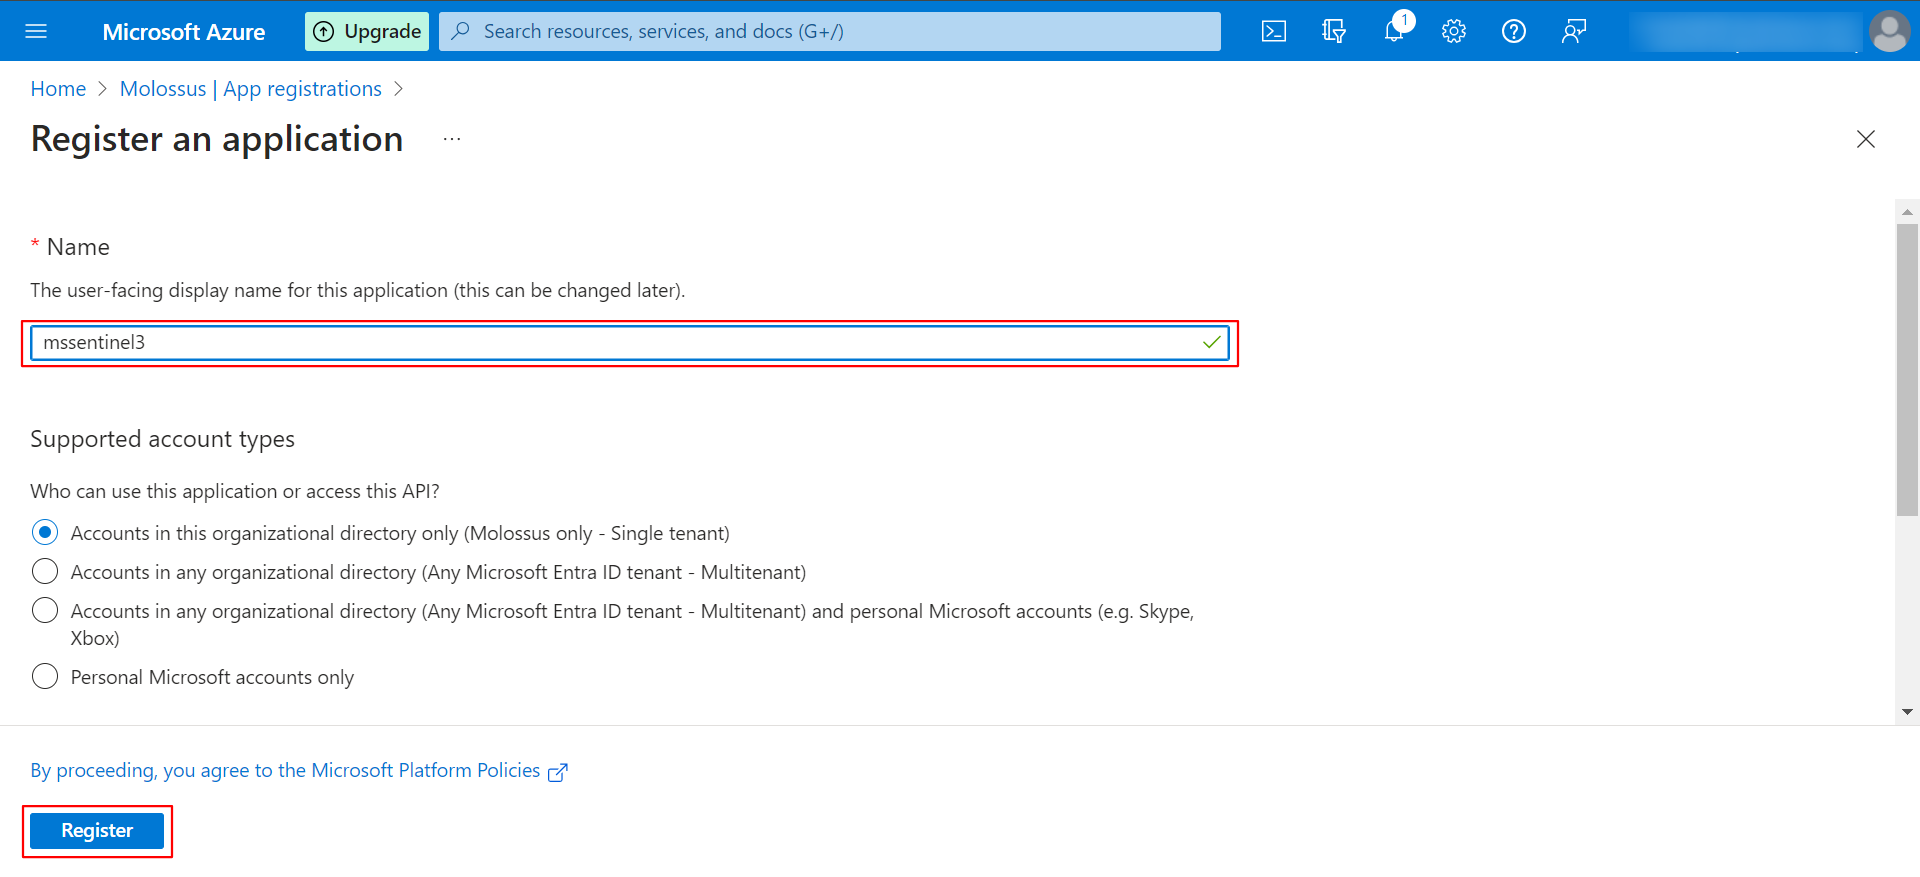
Provide a name (user defined) and the appropriate supported account type, then click Register.
-
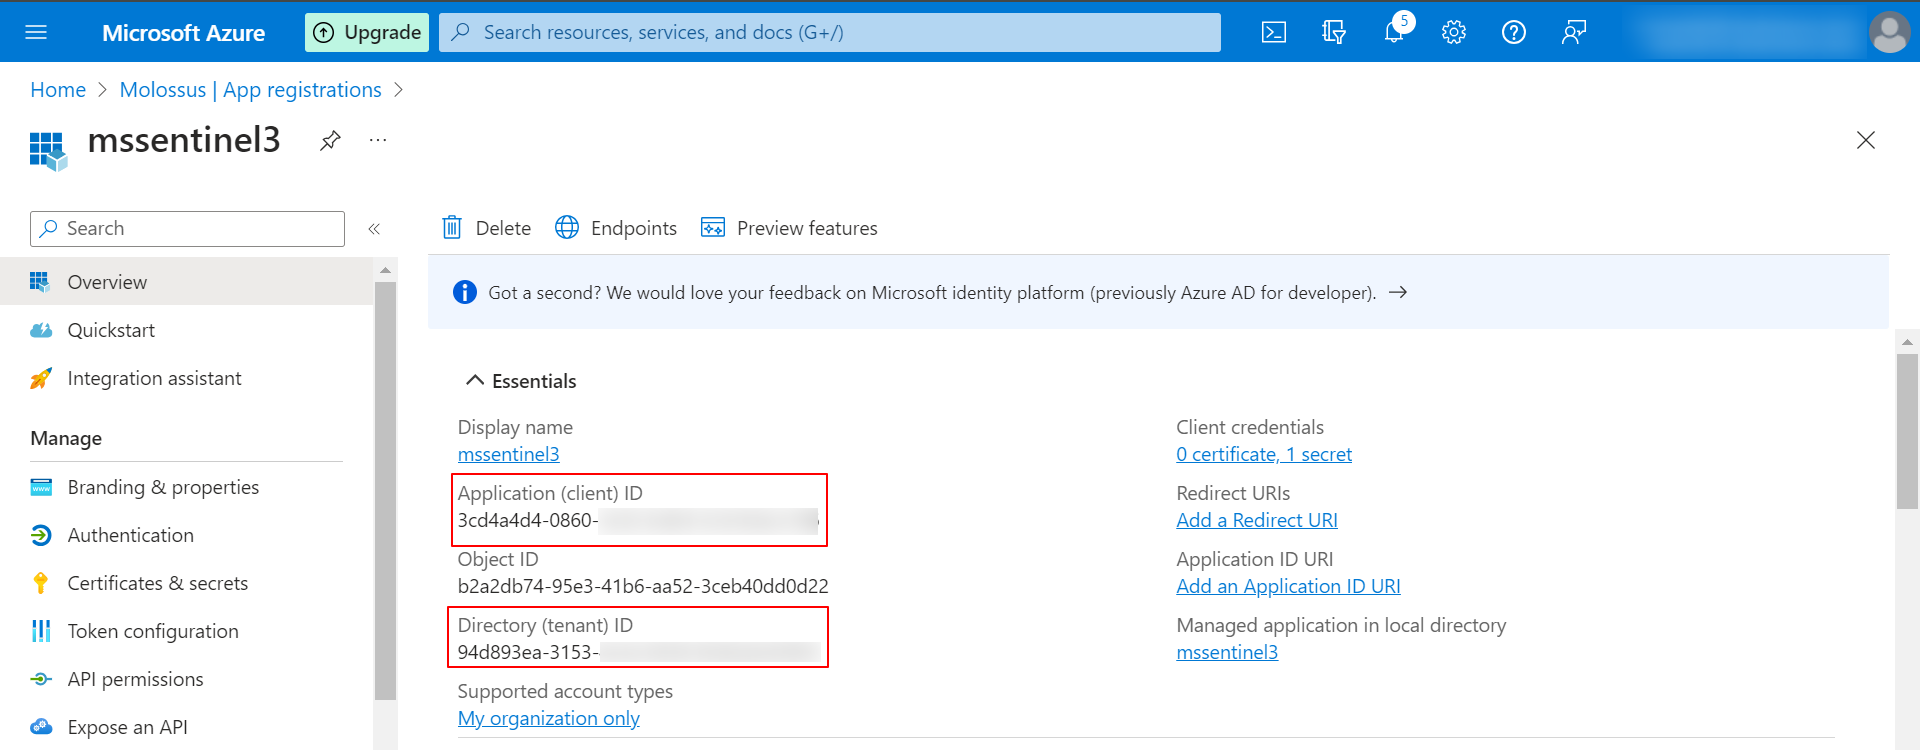
From the Overview page of the registered application, copy the Tenant ID (Directory ID) and Client ID (Application ID).
Step 2: Assign the Reader Role for the Created App Using Log Analytics Workspaces
-
Navigate to your Log Analytics Workspace (or Microsoft Sentinel workspace) in the Azure Portal.
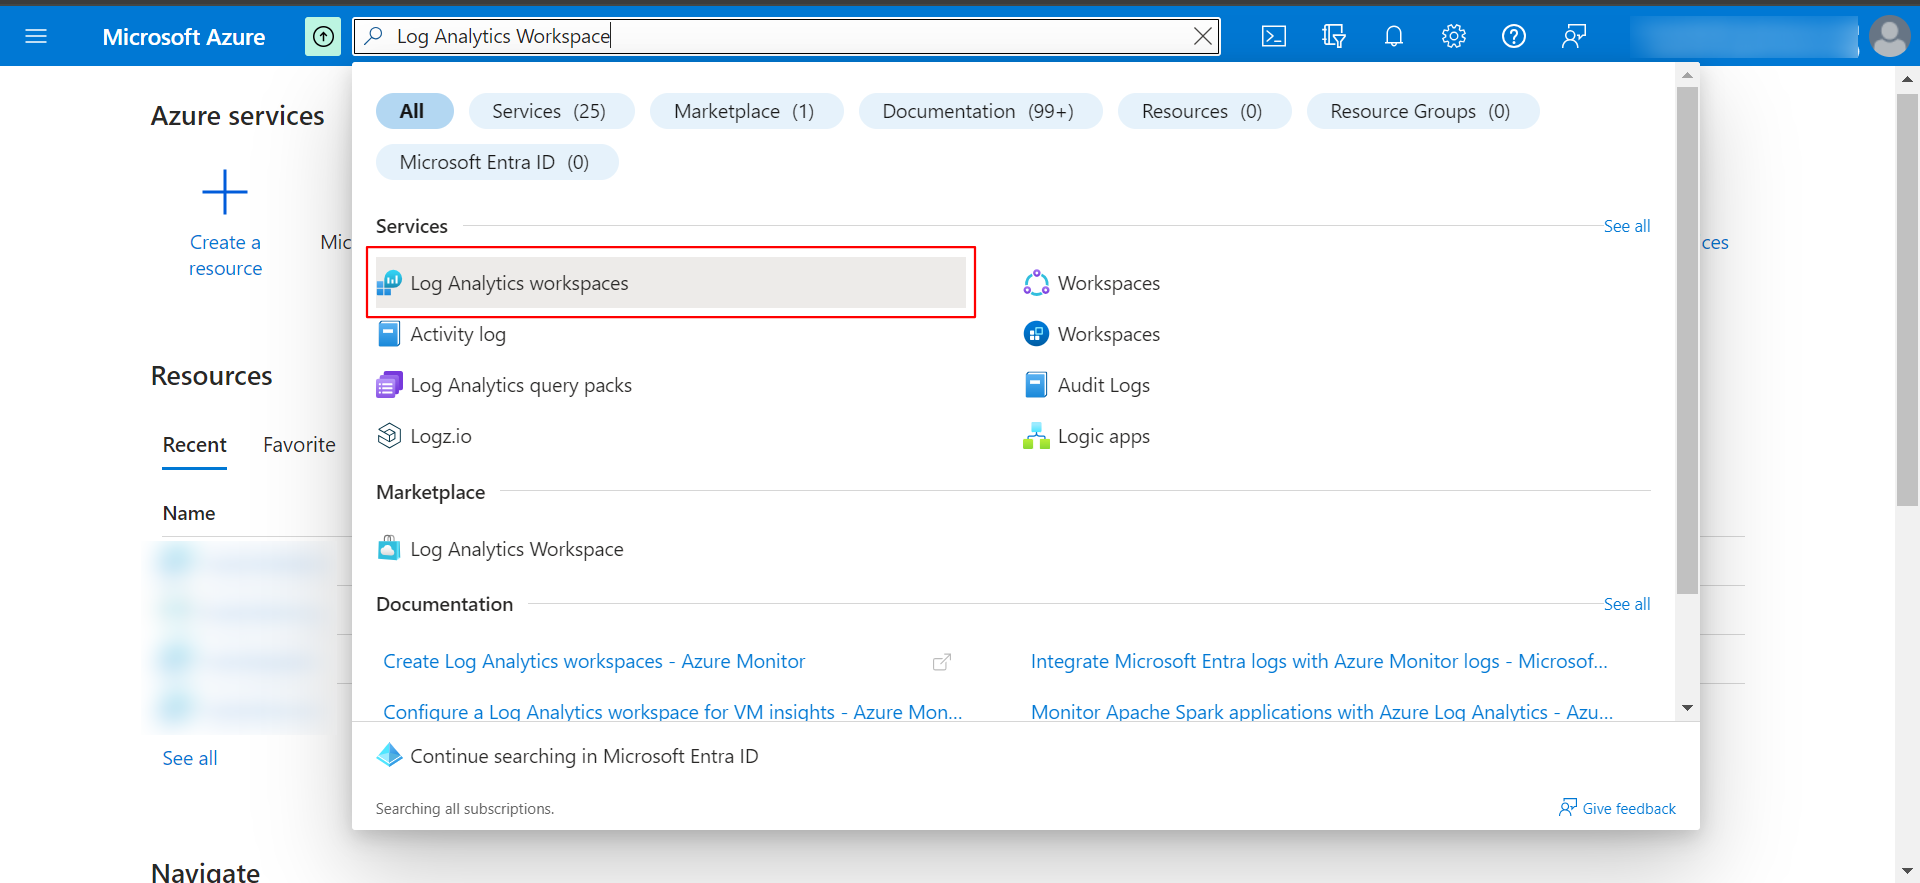
-
Click on the appropriate workspace. Click here to know more about Log Analytics Workspace / creation of Workspace.
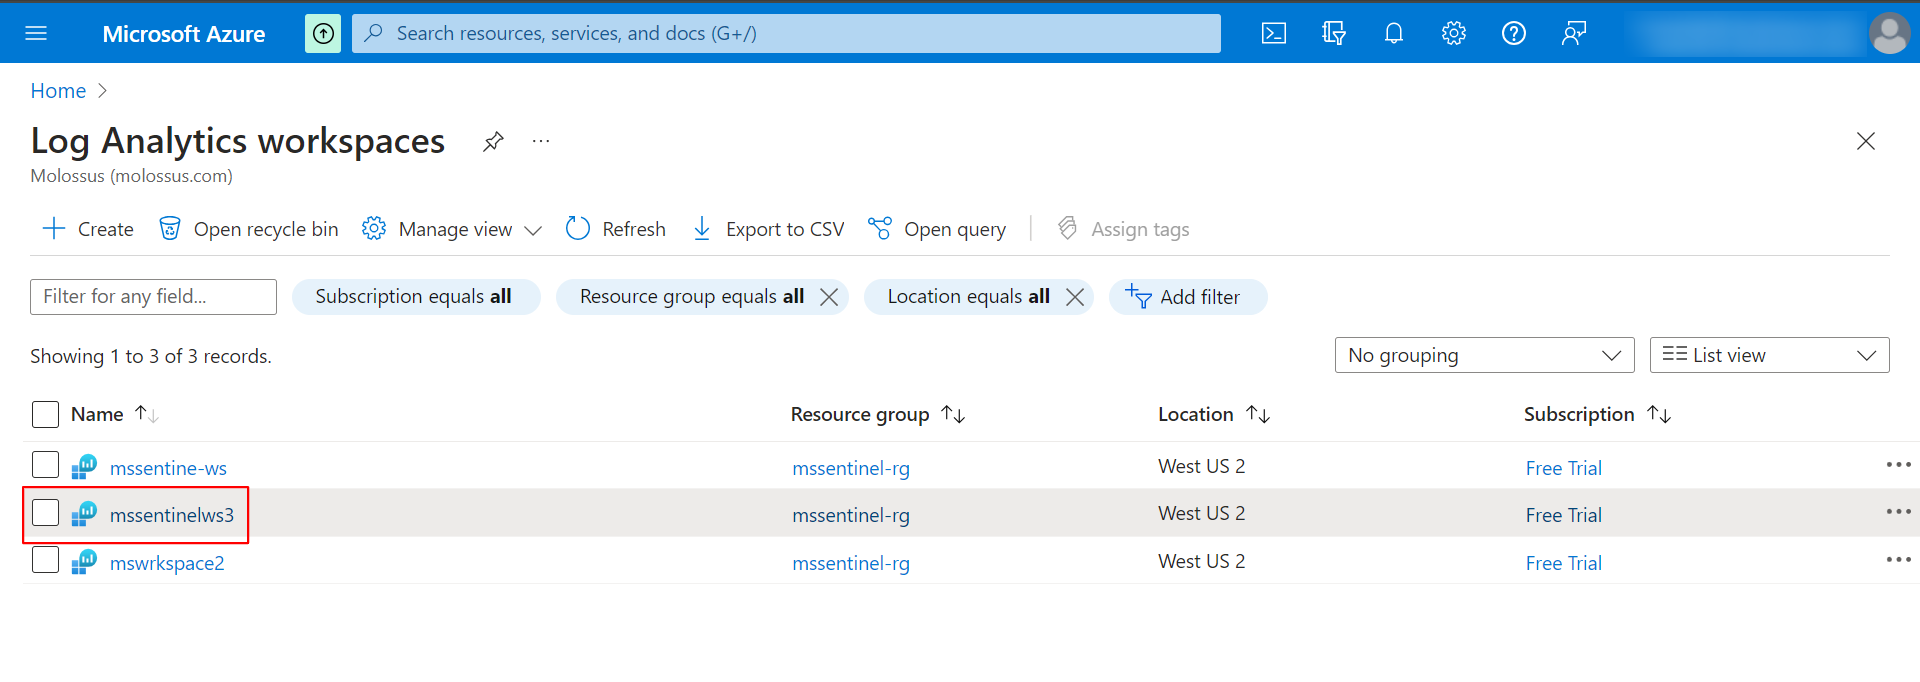
-
Go to Access control (IAM) -> Add -> Add role assignment.
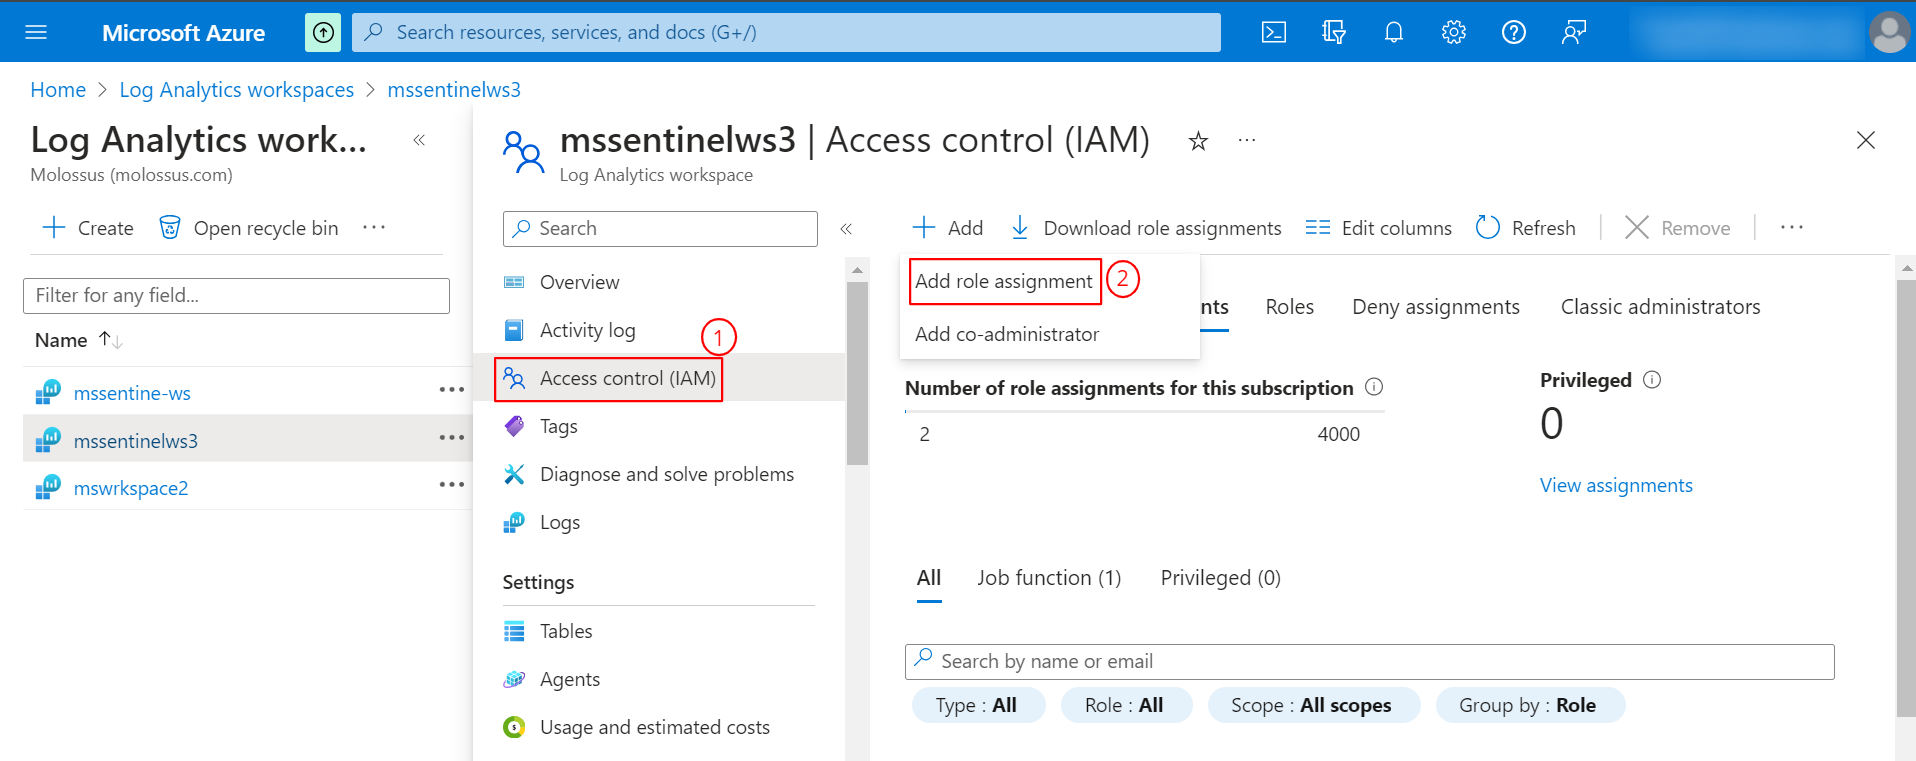
-
Assign the Microsoft Sentinel Reader role (or Reader role) to the registered application and Click Next.
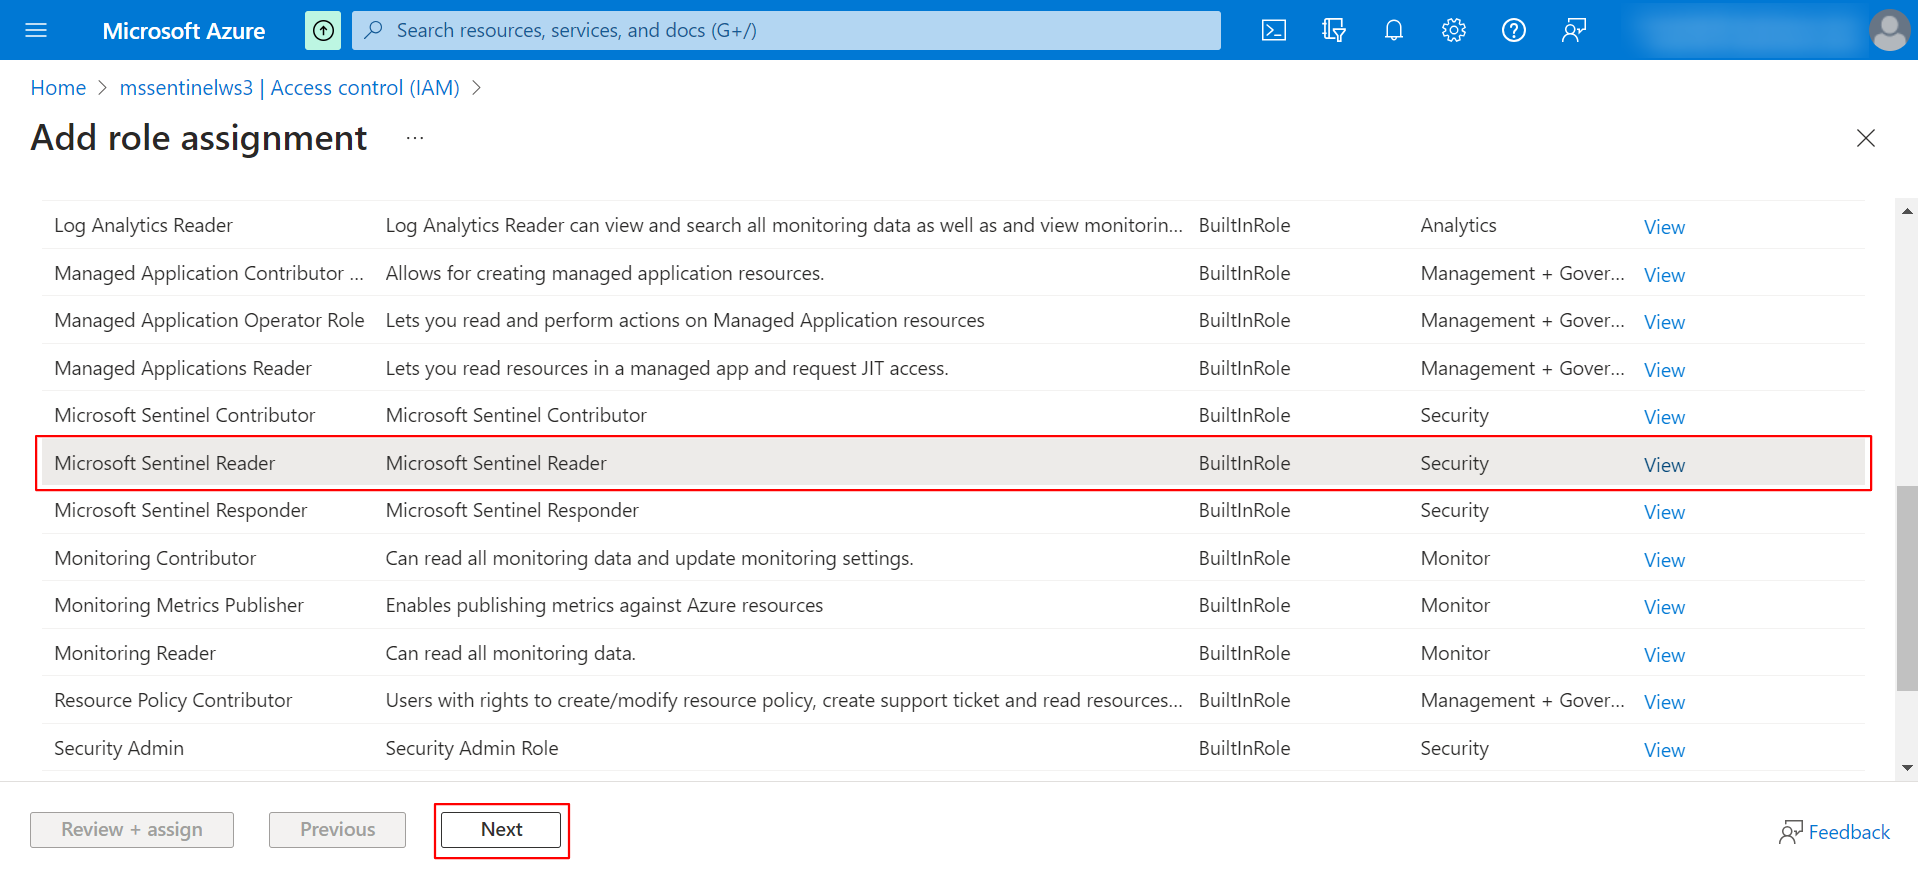
-
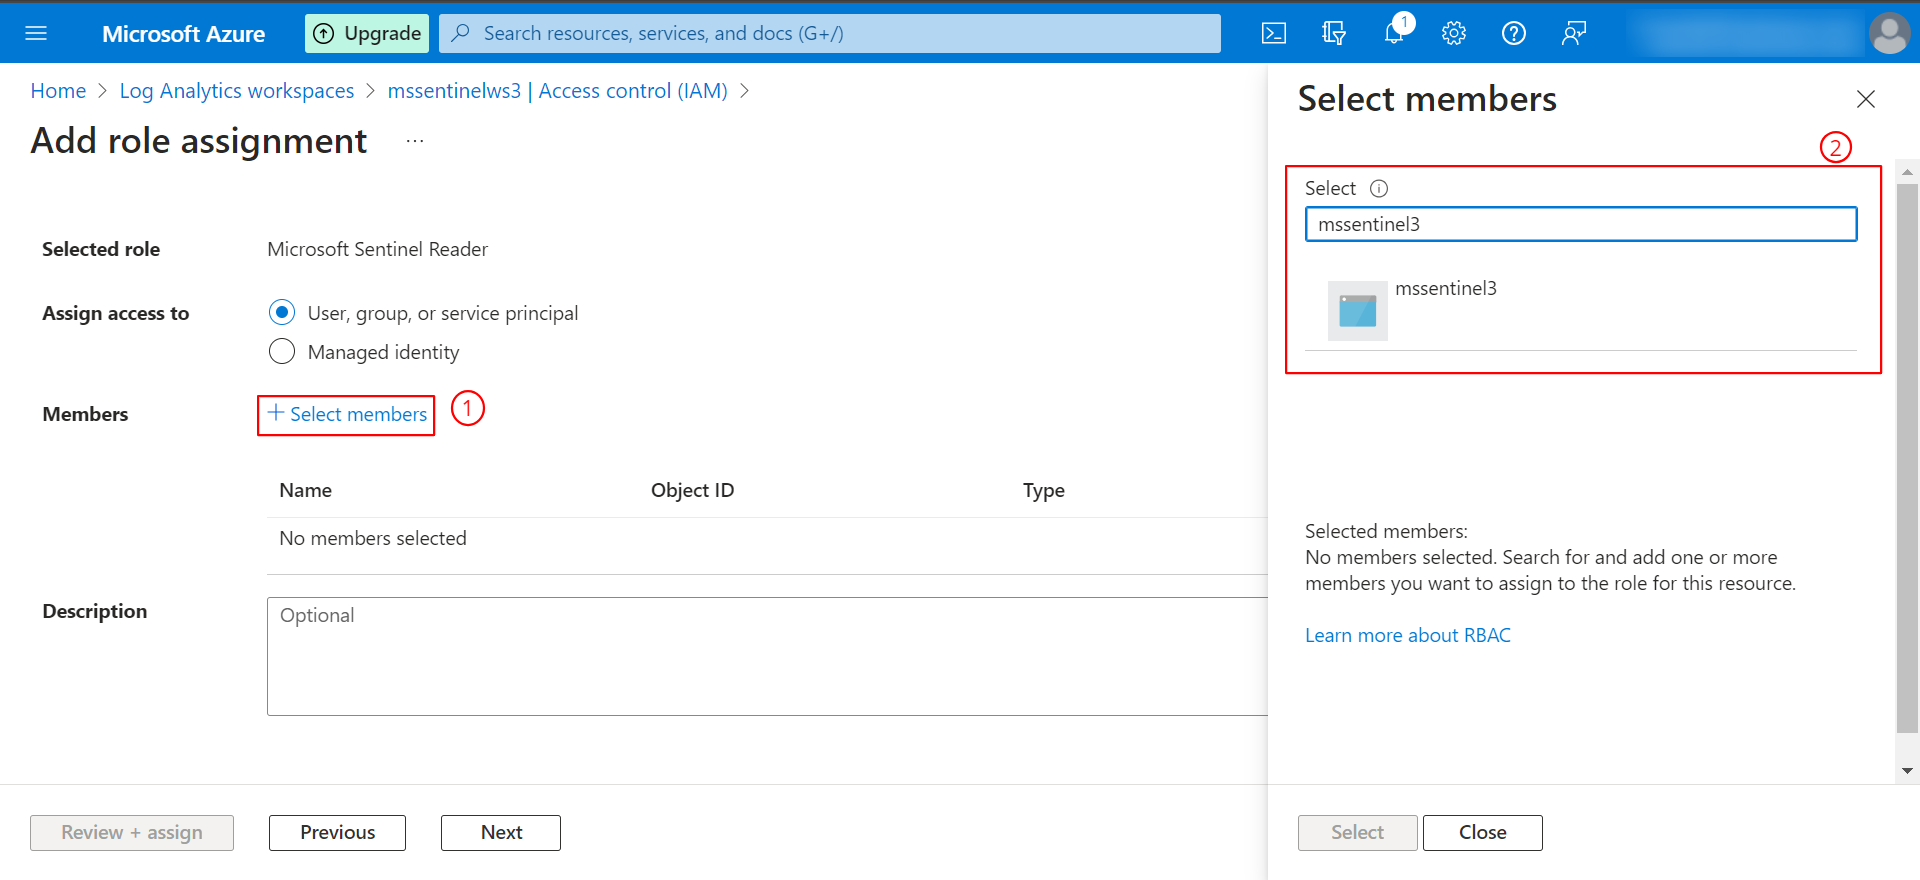
Click Select Members to choose the created application. Search for the created application in the search box and select it.
-
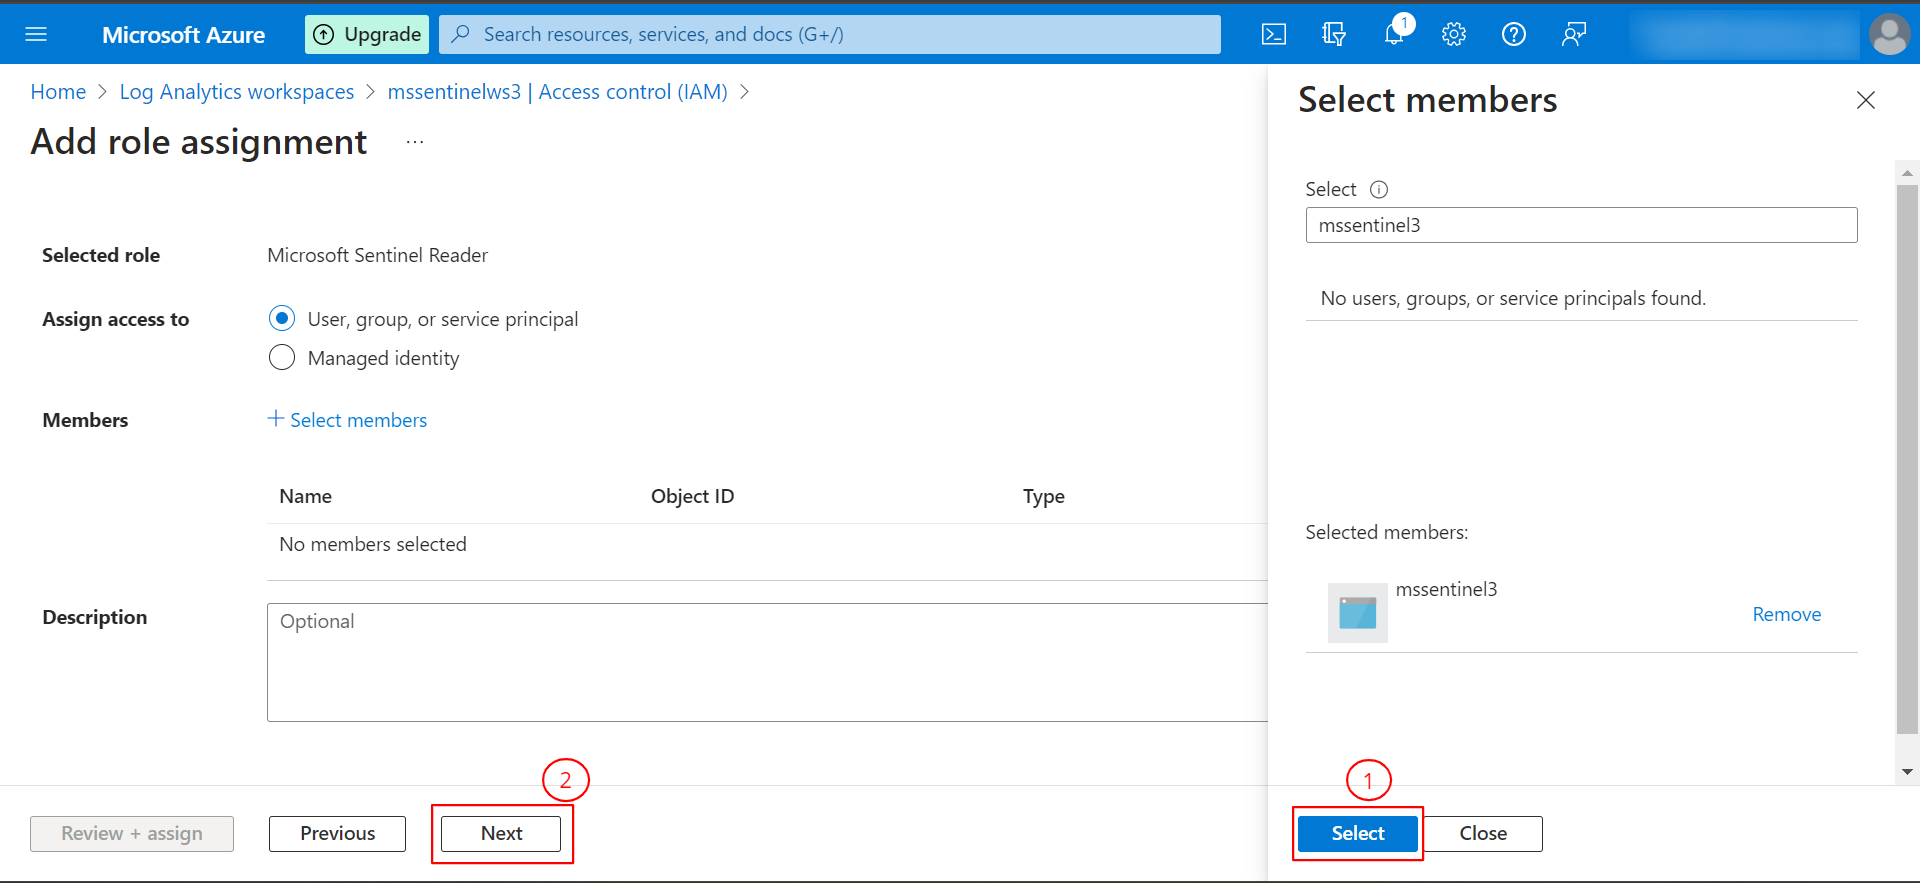
Click Select and then click Next.
-
Review the selected application and assigned permissions. Click Review + Assign.
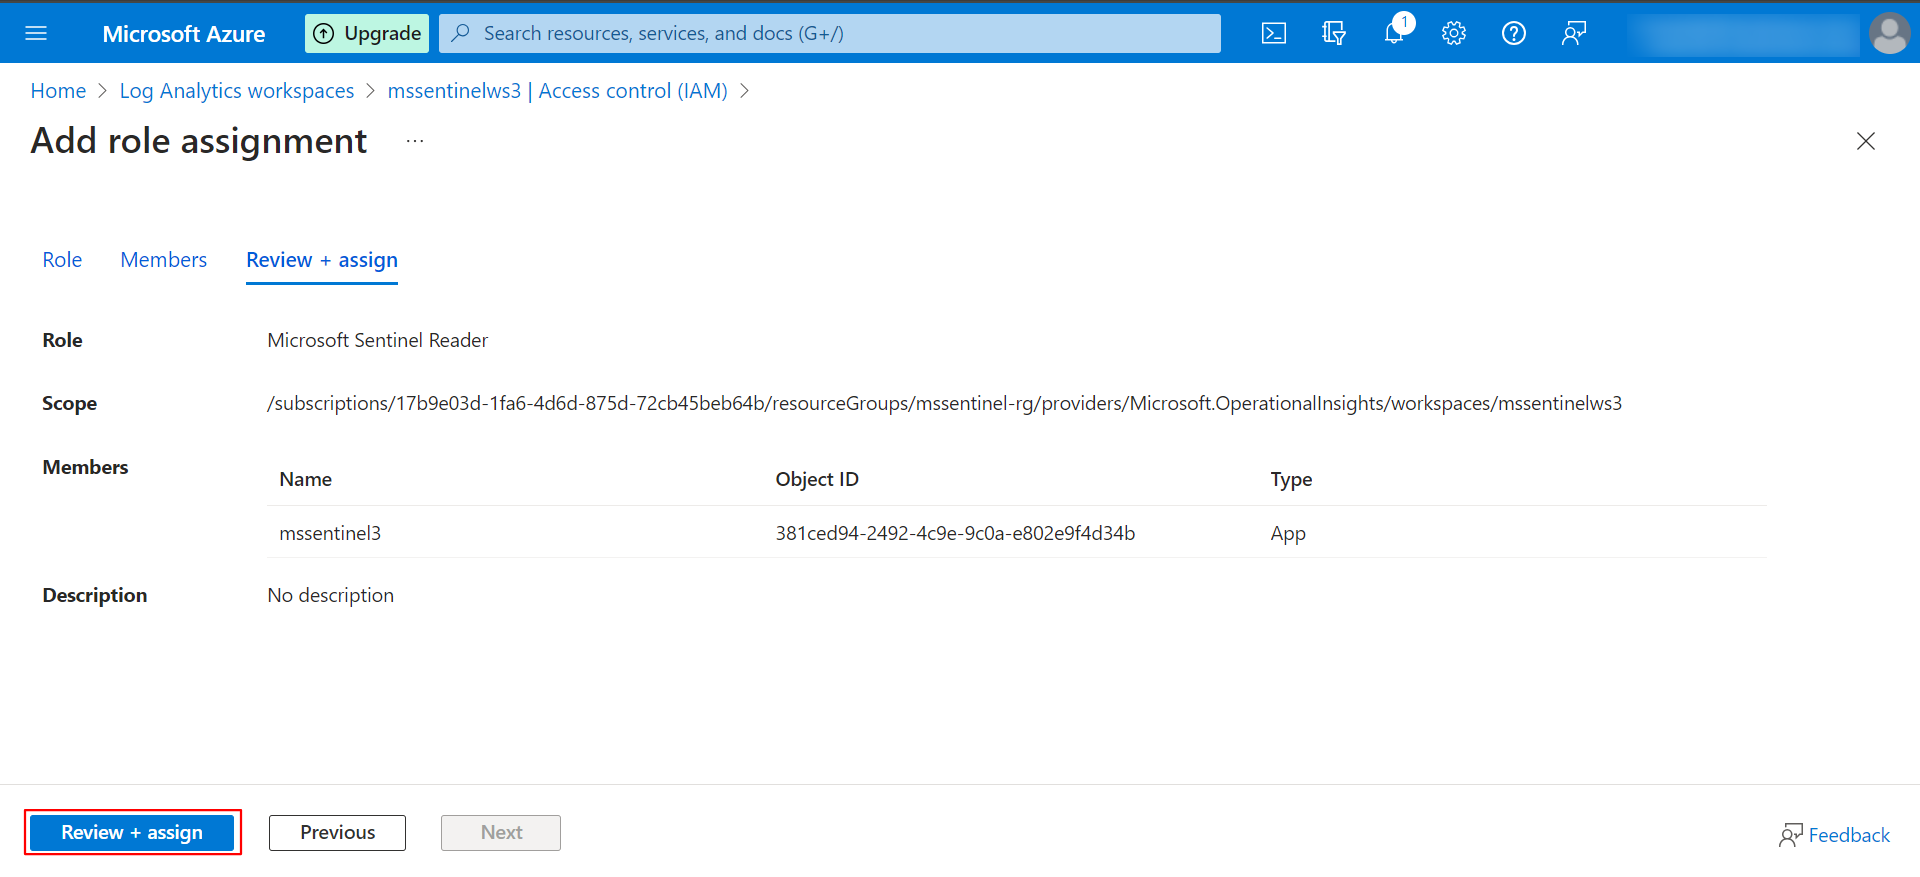
The required role will be assigned to the created Azure AD application for ingestion of Microsoft Sentinel events.
Step 3: Add Microsoft Sentinel to a Workspace
-
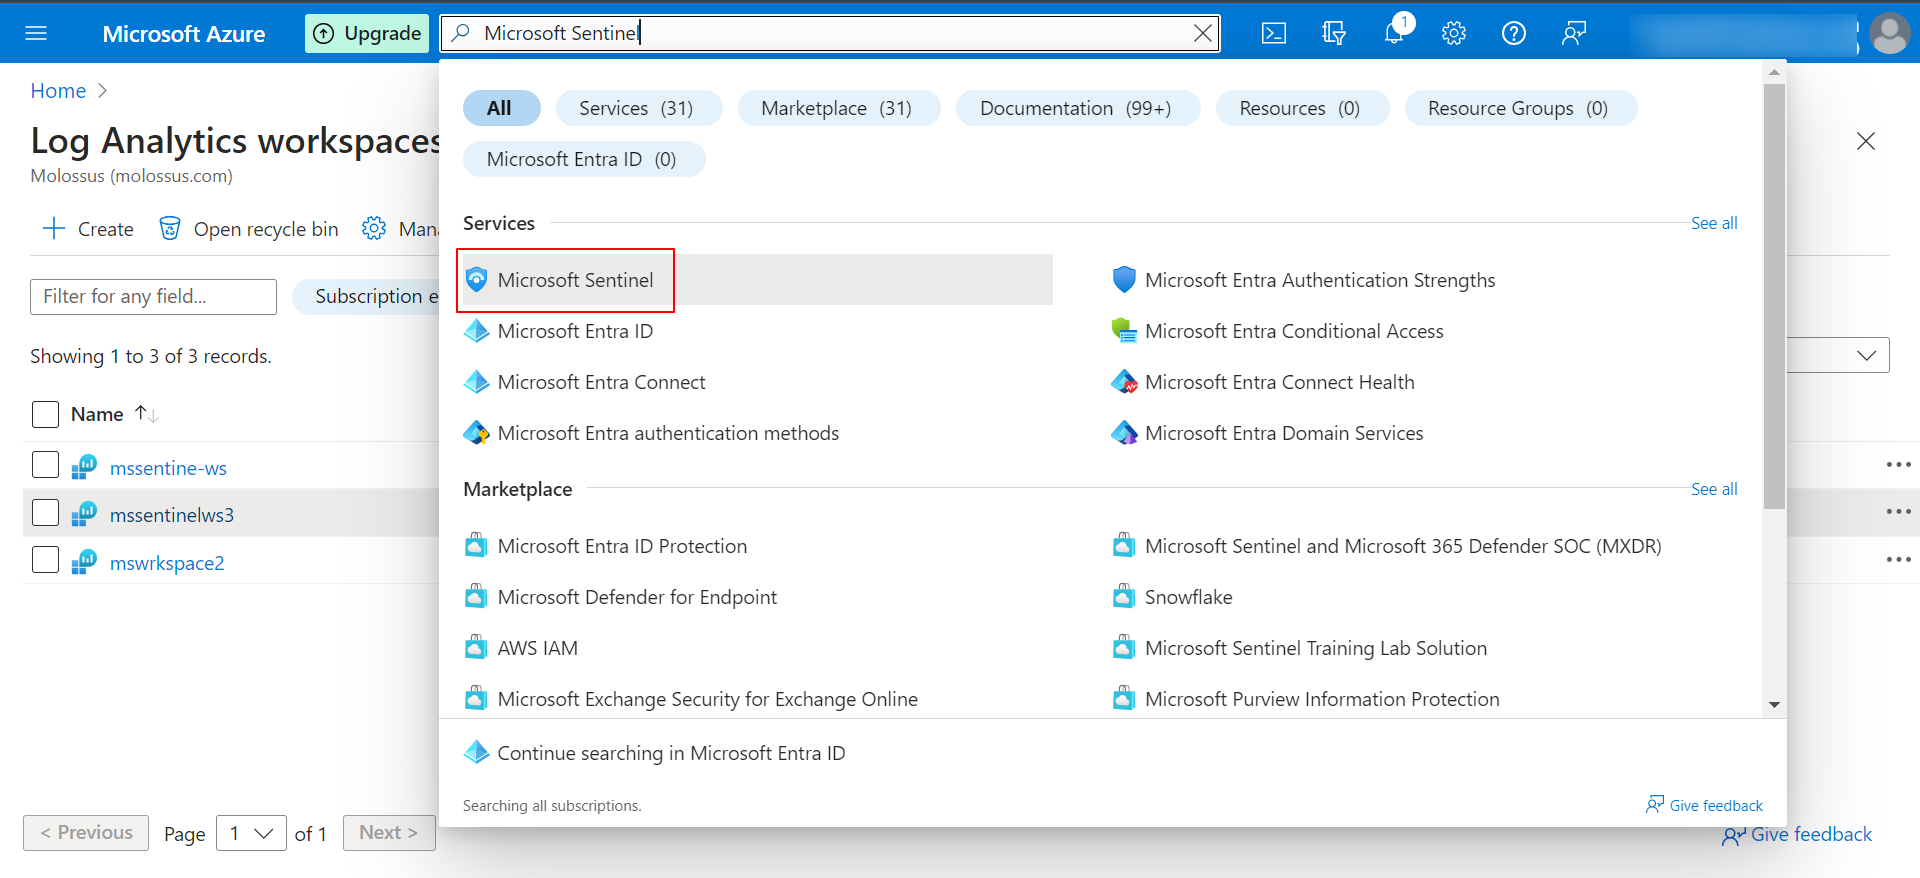
In the search box, search for Microsoft Sentinel and Select the Microsoft Sentinel from the services list.
-
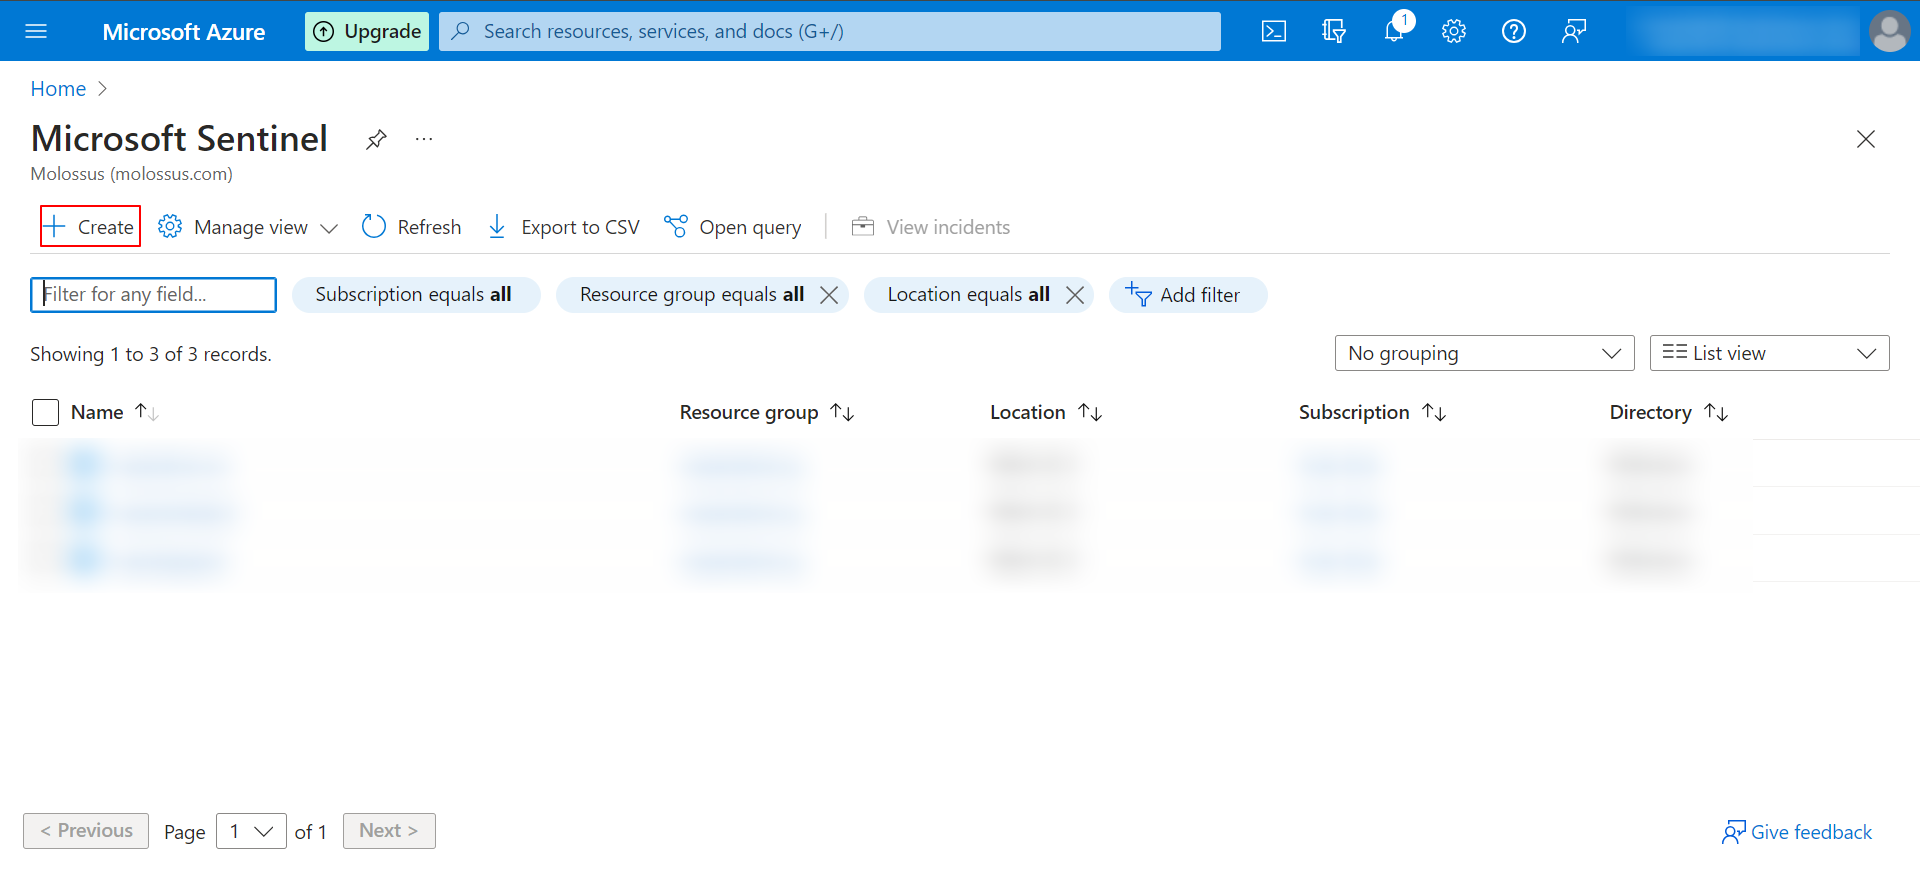
Click Create.
-
Select the required workspace & Click Add.
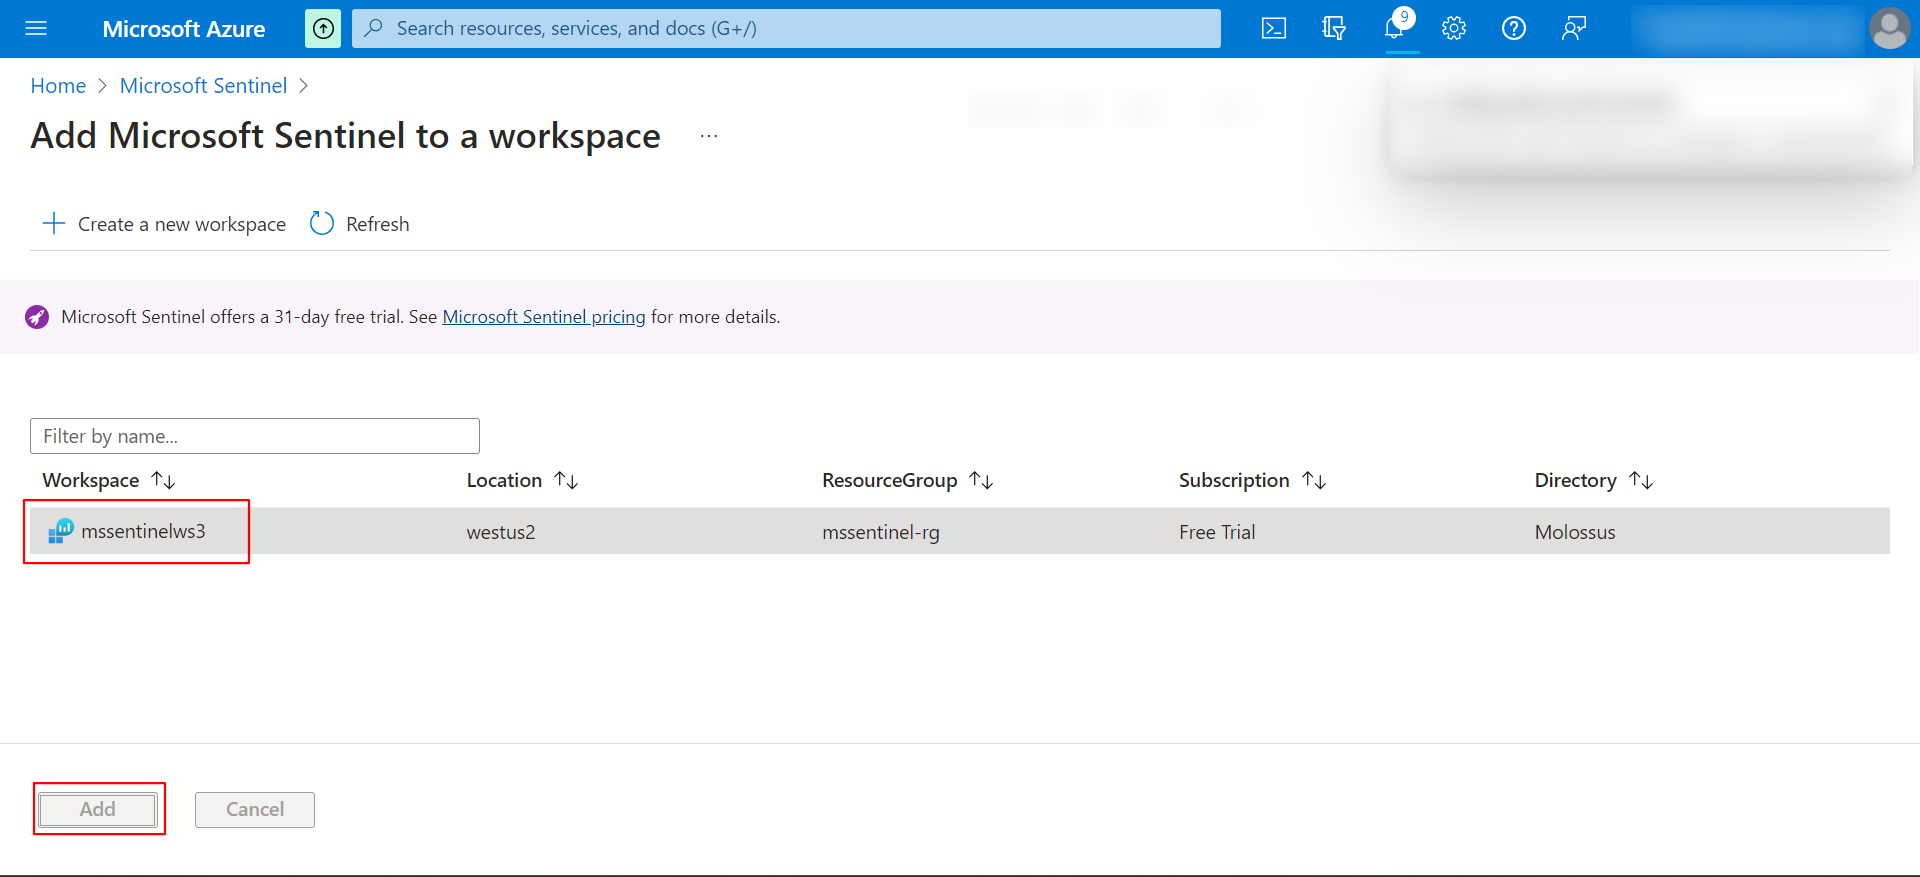
Microsoft Sentinel will now be added to the selected workspace.
Step 4: Retrieve Subscription ID, Resource Group, and Workspace Name
-
In the search box, search for Log Analytics Workspaces and Select Log Analytics Workspaces from the services list.
-
Click the appropriate workspace.
-
Under Overview, copy the following details:
- Resource Group
- Workspace Name
- Subscription ID
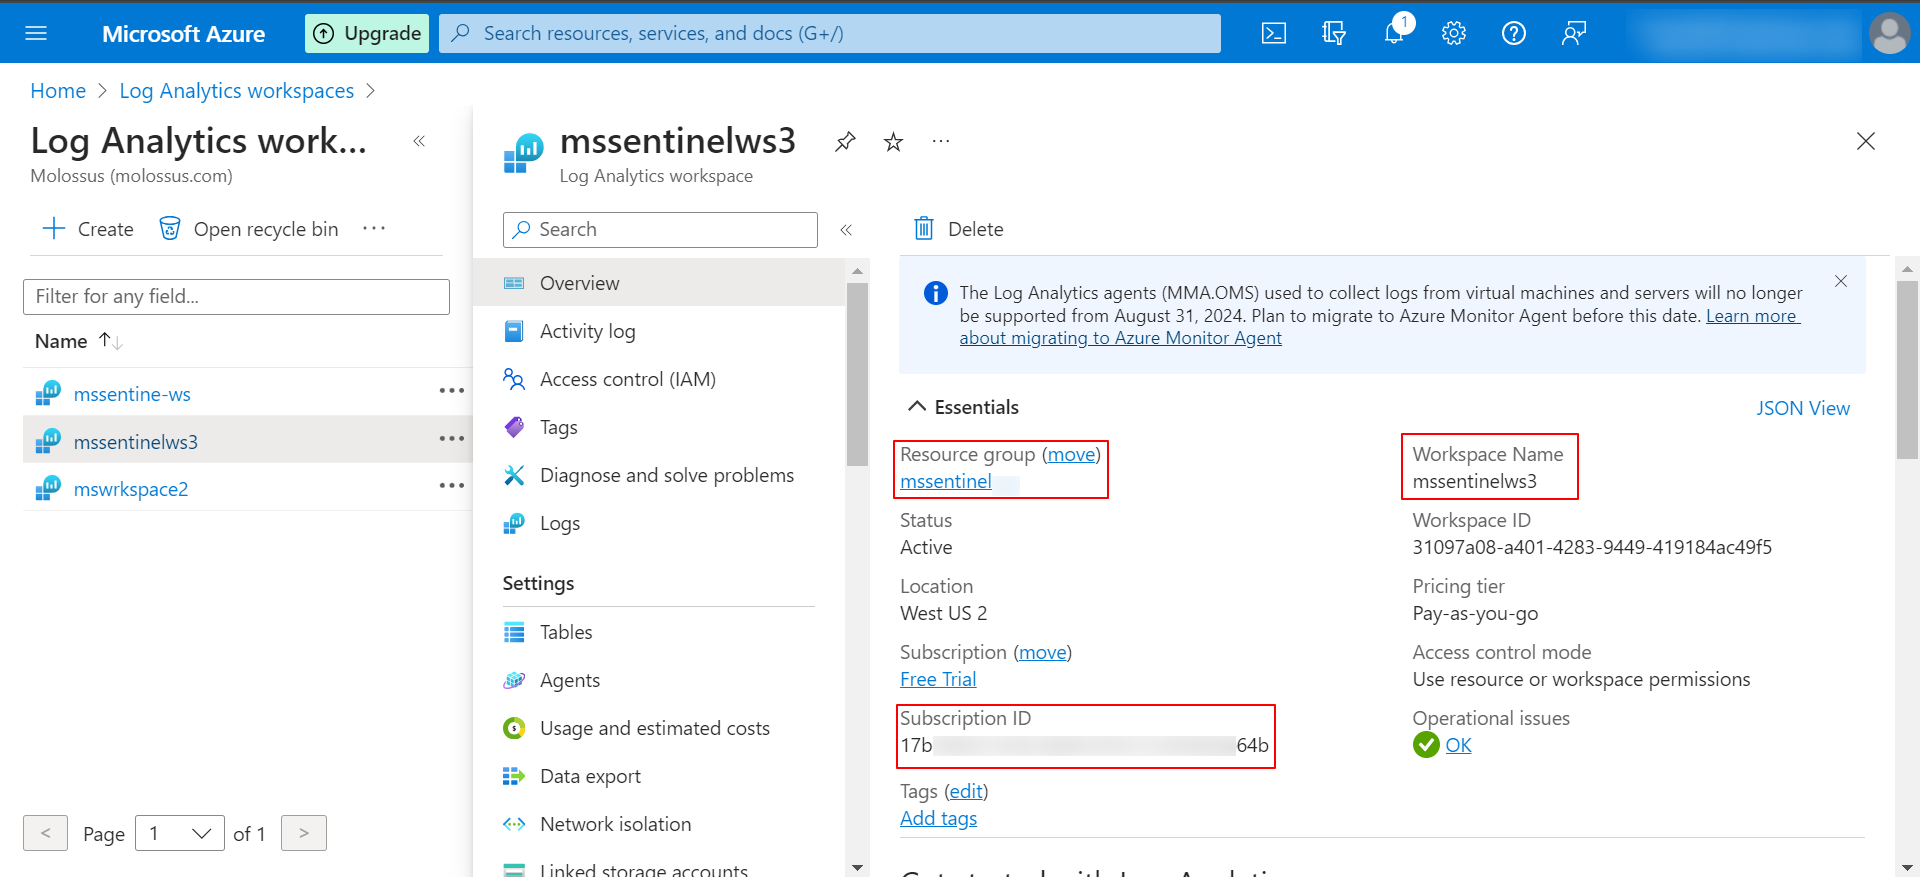
The identified Tenant ID, Subscription ID, Resource Group, and Workspace Name are to be configured in Scope Setup: Step 1 for initiating the Microsoft Sentinel log ingestion.
Step 5: Generate a Client Secret
Note: This step is required only if you choose the Client Secret authentication type.
-
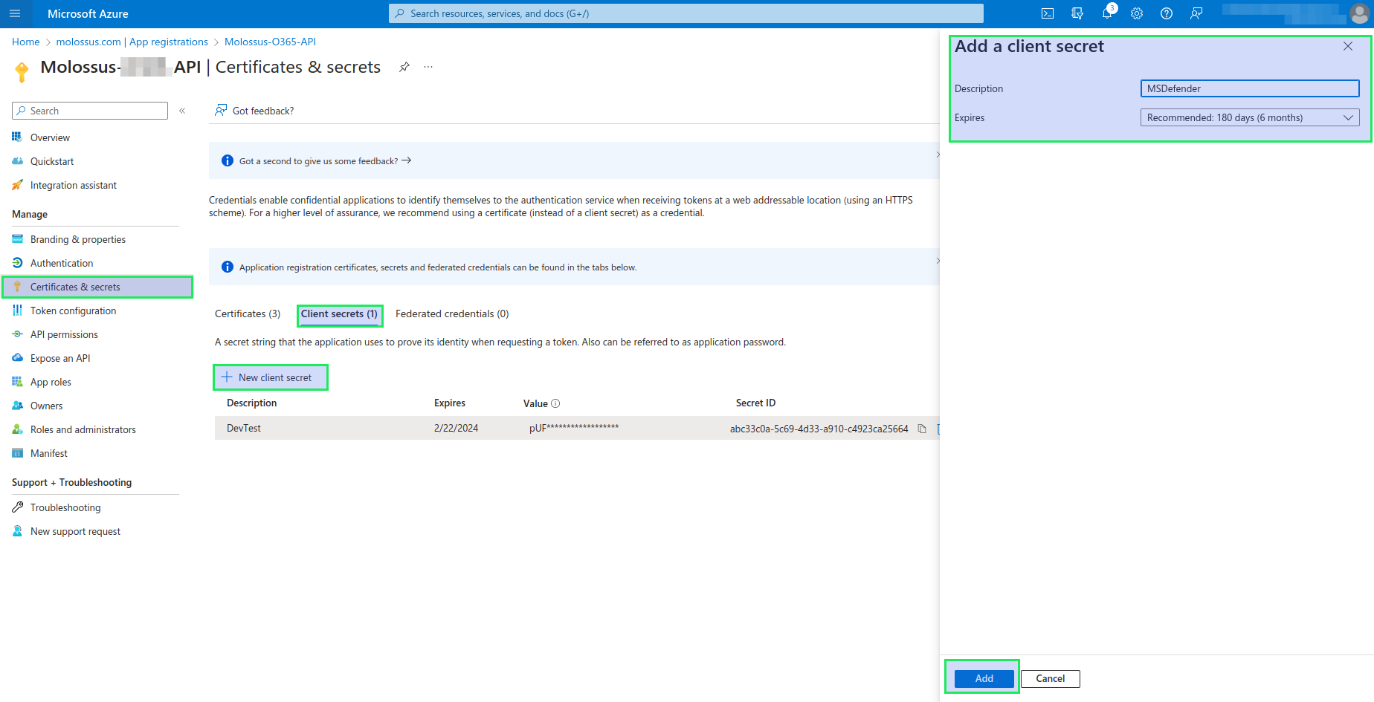
Navigate to Manage -> Certificates & secrets -> New client secret.
-
Enter a Description and select an Expiry period, then click Add.
-
Copy the Value of the newly created secret immediately.
Note: The client secret value is only shown once. Copy and store it in a secure location before navigating away from the page.
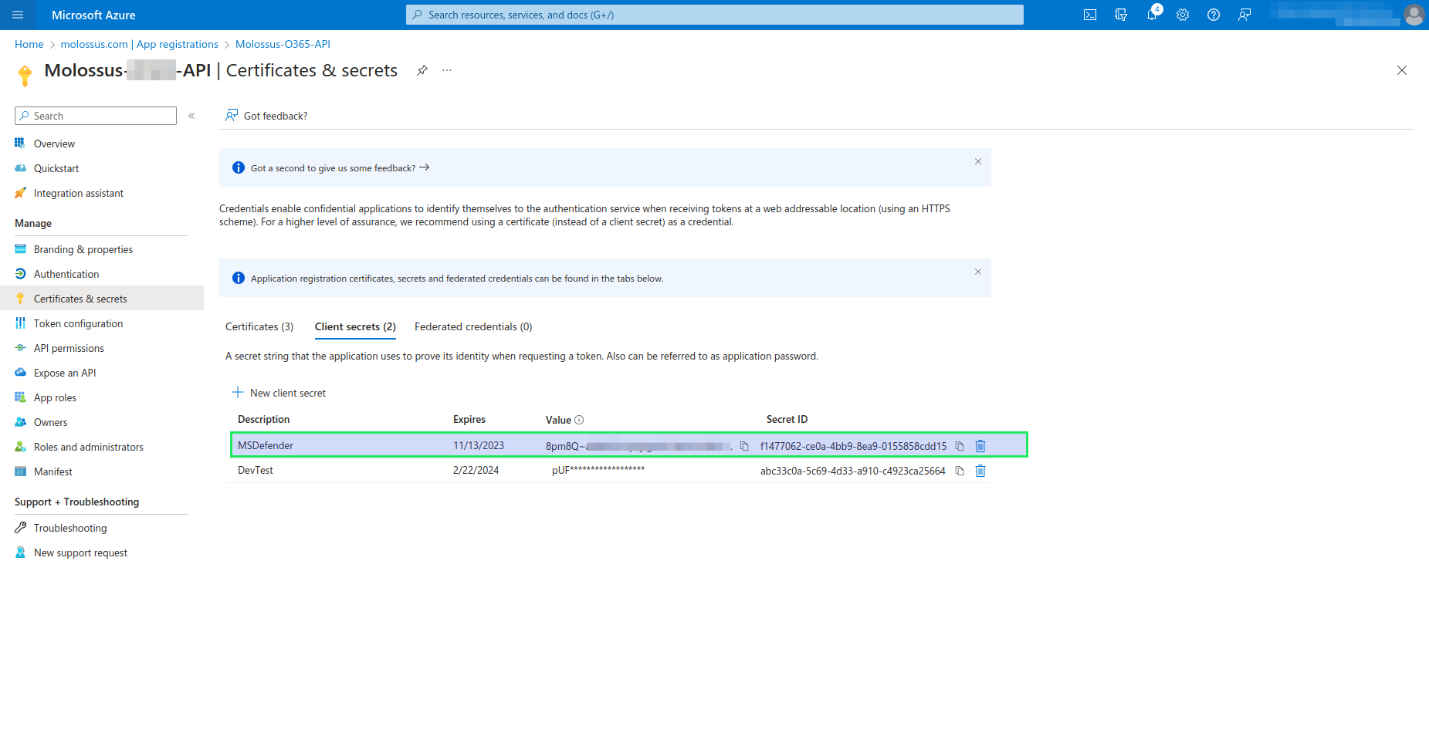
The generated Client ID and Client Secret are to be configured in Scope Setup: Step 1 for initiating the Microsoft Sentinel log ingestion.
Scope Setup
The Microsoft Sentinel cloud source can be registered using the following authentication methods in Scope:
- Step 1.1 – Cloud Source Registration using Client Secret
- Step 1.2 – Cloud Source Registration using Existing Certificate Upload
- Step 1.3 – Cloud Source Registration using New Certificate Generation
Step 1.1: Microsoft Sentinel Cloud Source Registration using Client Secret
In the Scope application, to register a Microsoft Sentinel cloud source, navigate to the cloud source registration page –
-
Log into the Scope application
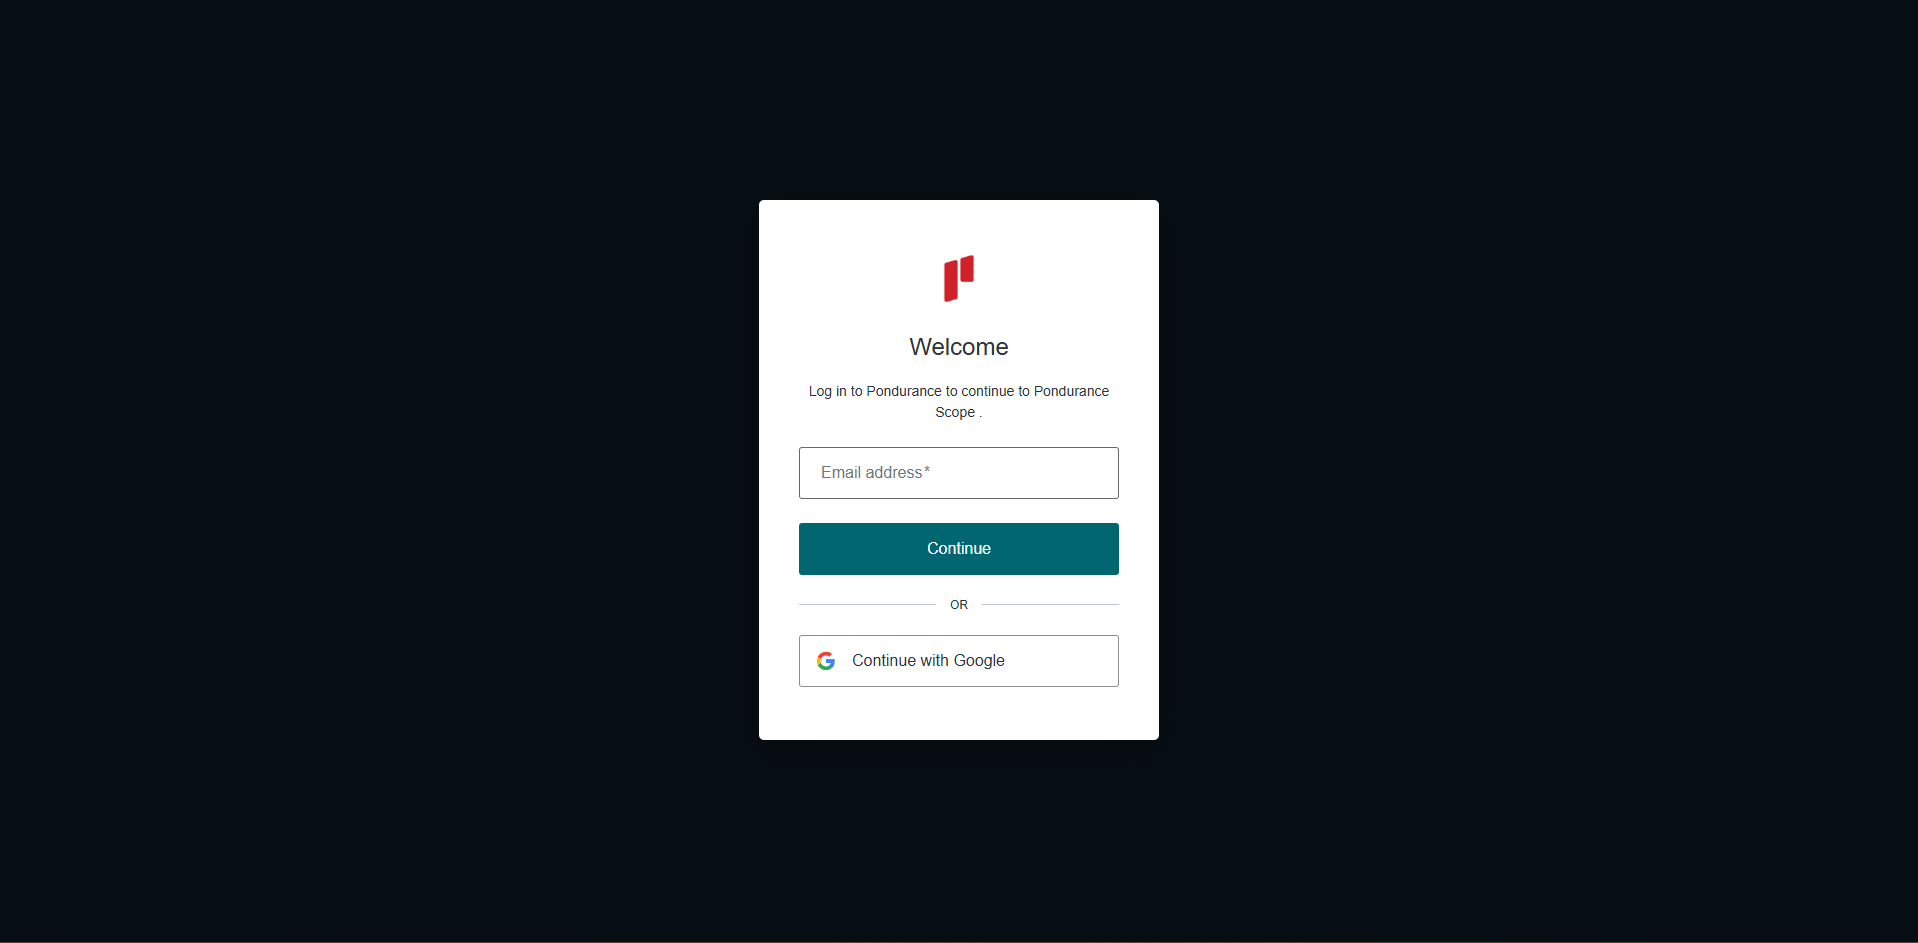
-
Select the required organization
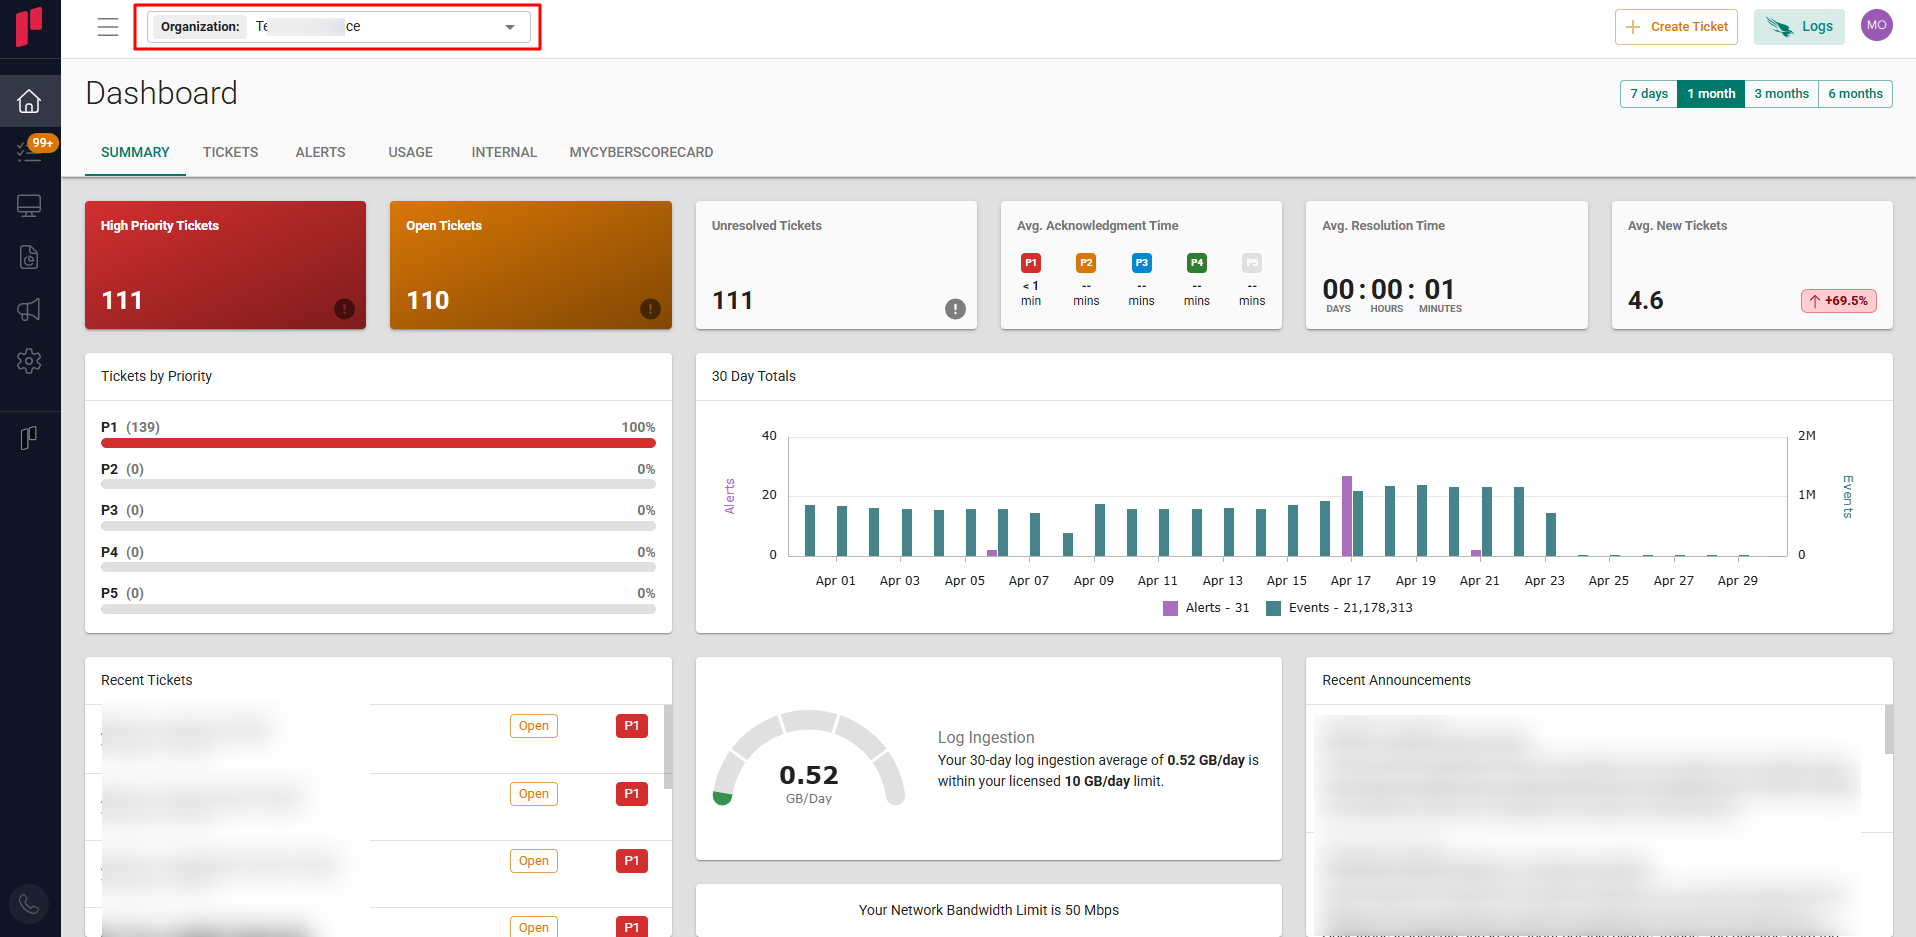
-
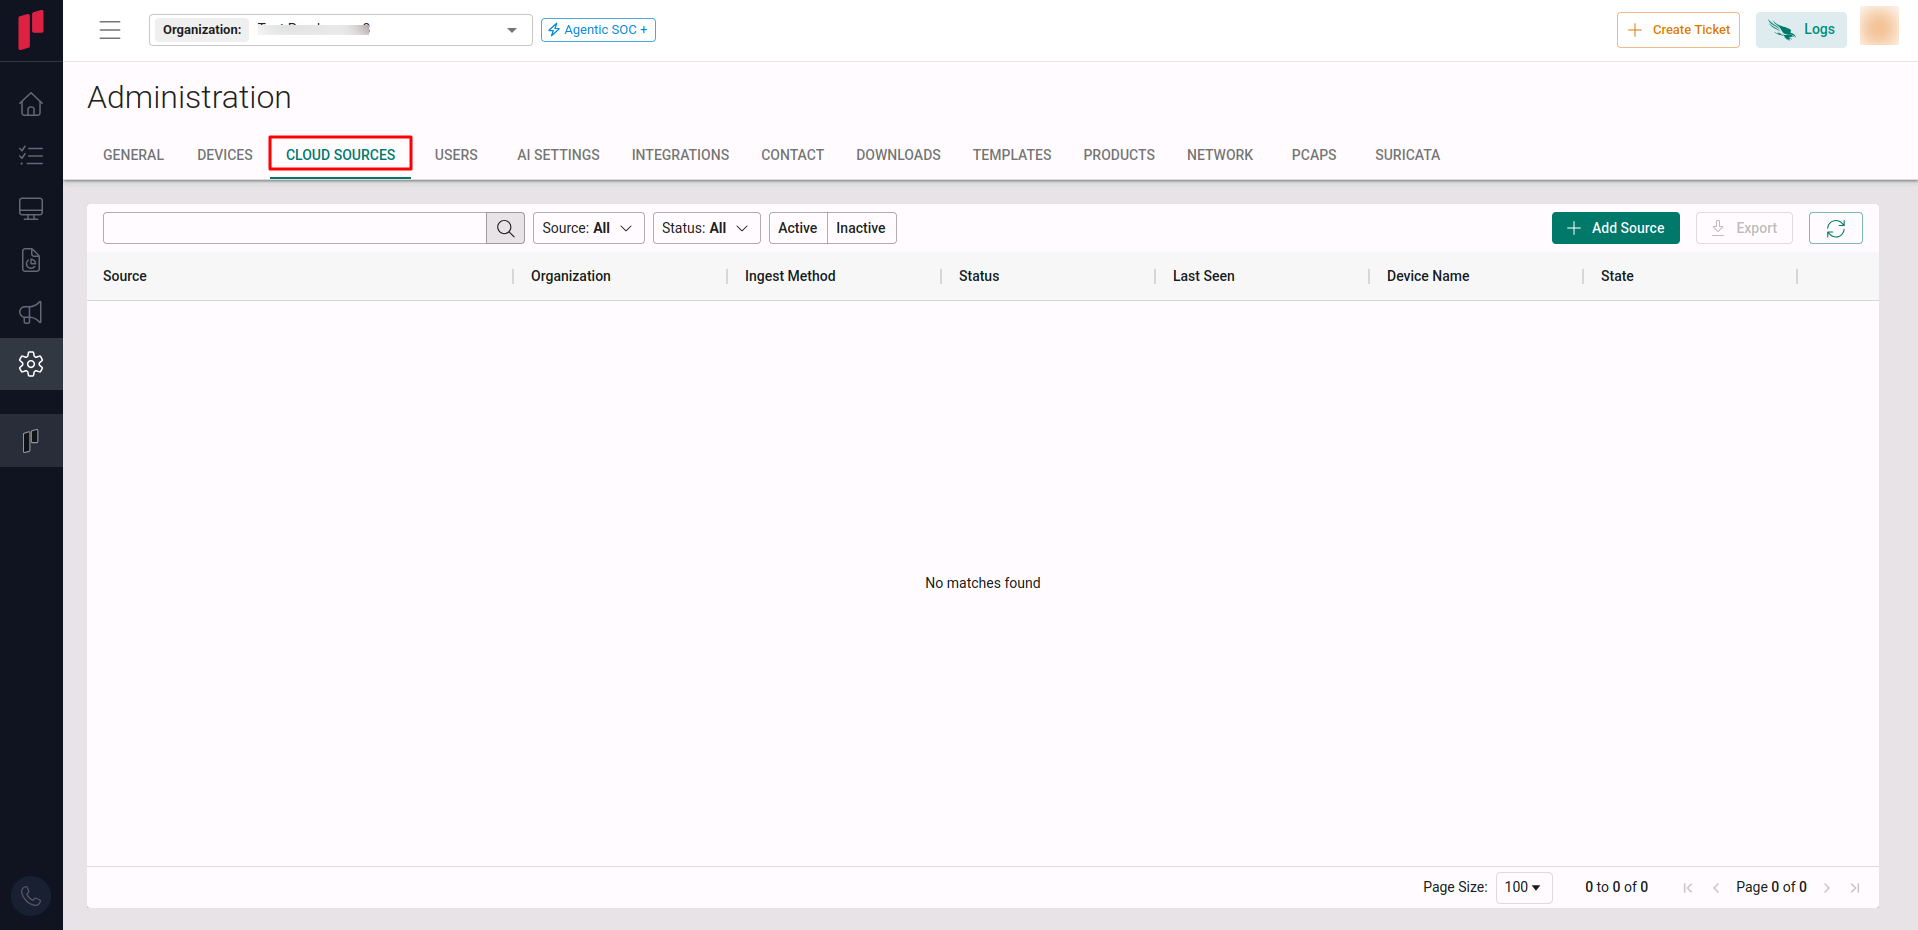
Navigate to the Side menu -> Administration
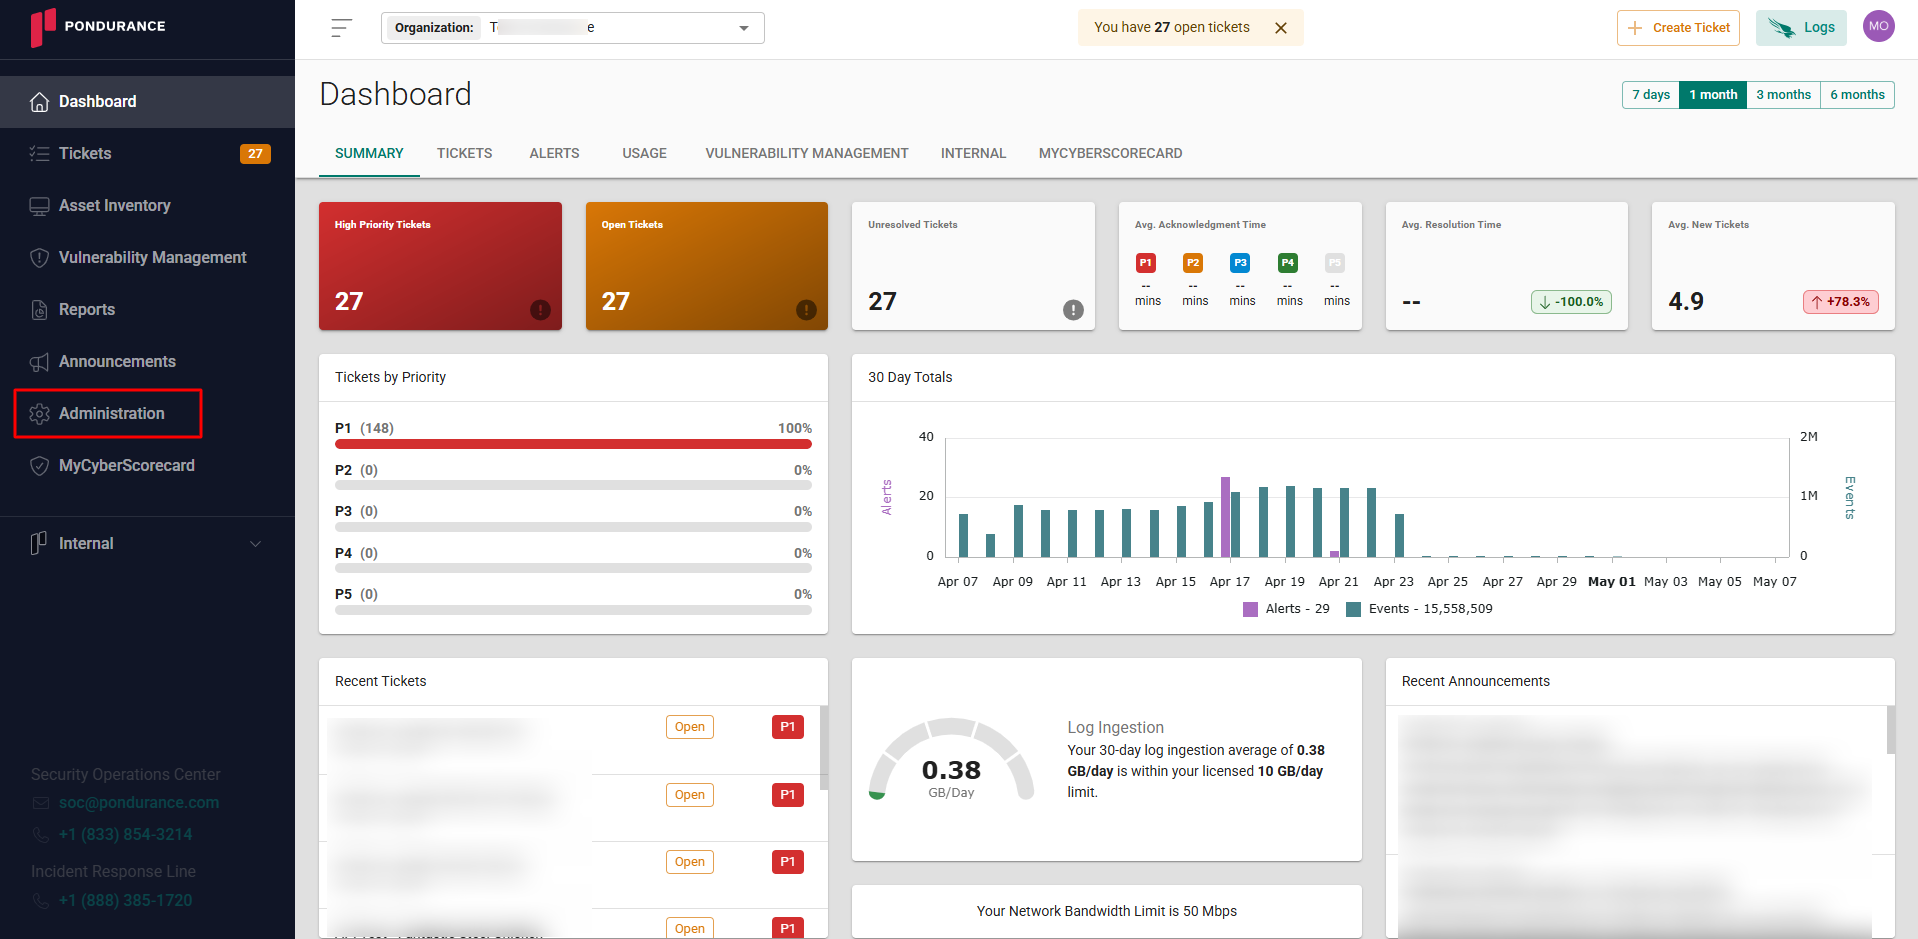
-
Navigate to the Cloud sources tab
-
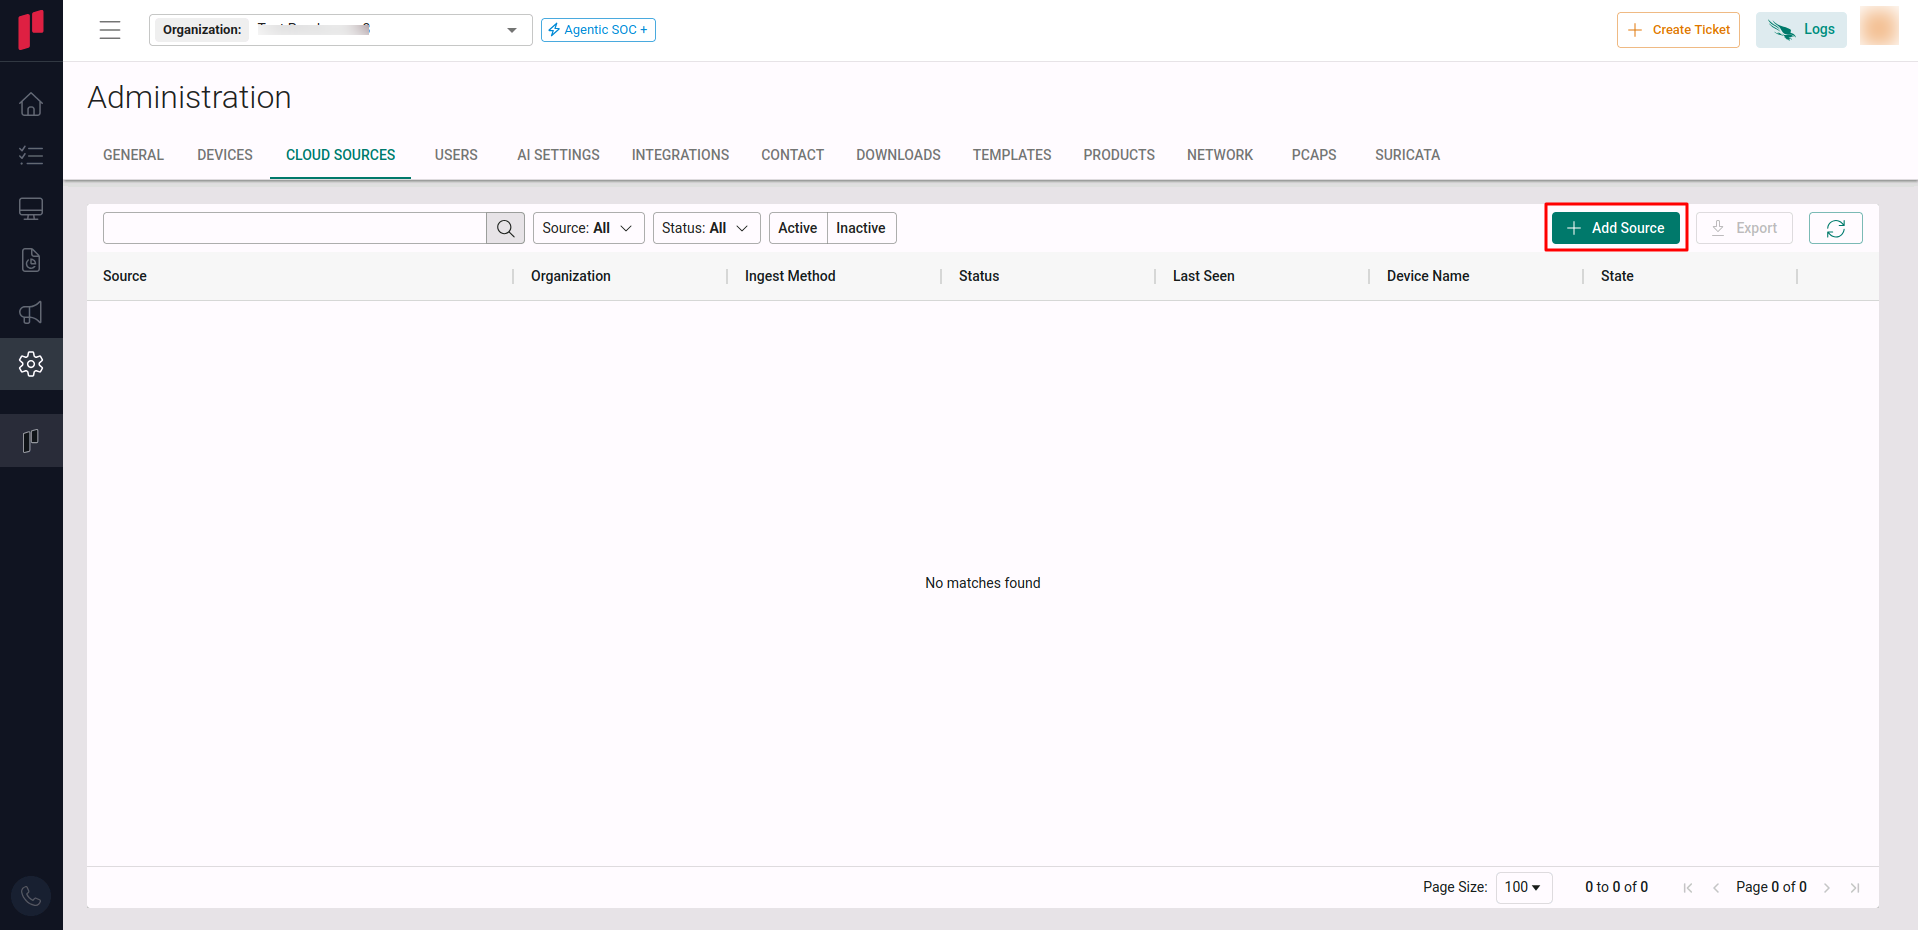
Click on the +Add Source button
-
In the Create New Source pop-up, provide the parameters below.
- Source: Select “Microsoft Sentinel” from the Source dropdown.
- Site: Provide a user-defined name for the Microsoft Sentinel cloud source.
- Client ID: The Client (Application) ID noted in Step 1.
- Tenant ID: The Tenant (Directory) ID noted in Step 1.
- Subscription ID: The Azure Subscription ID from Step 4.
- Resource Group: The Resource Group name containing the Sentinel workspace from Step 4.
- Workspace Name: The Log Analytics Workspace name linked to Microsoft Sentinel from Step 4.
- Polling Interval: Select the required polling interval for making periodic API calls to the Microsoft Sentinel API.
- Contact Email: The email address of the person who registers the Microsoft Sentinel cloud source in Scope.
- Auth Mode: Click the Client Secret tab.
- Client Secret: The Client Secret generated in Step 5.
- Client Secret Expiry Date: The expiry date of the Client Secret set in Step 5.
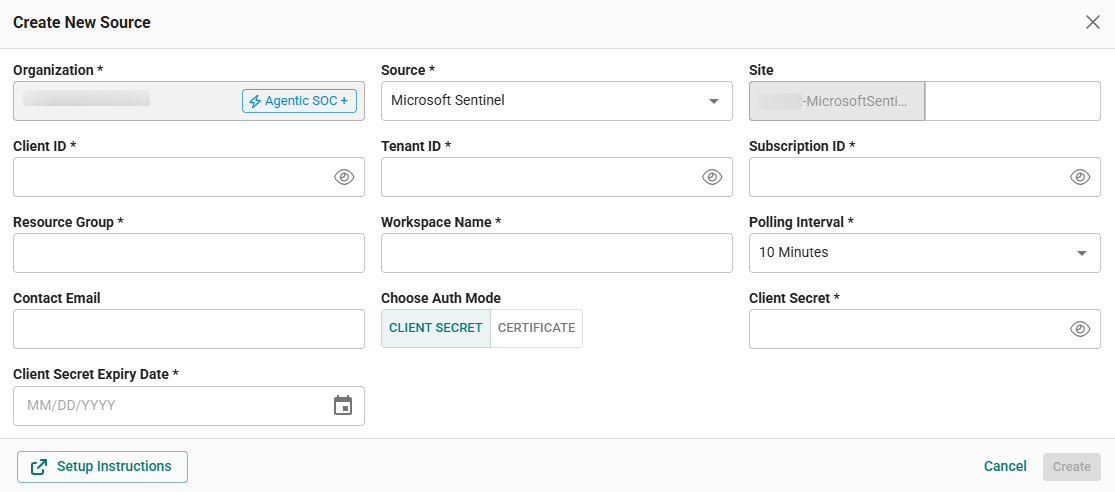
Once the required connection parameters are entered, the Microsoft Sentinel cloud source registration is complete in Scope and is ready for ingestion of Microsoft Sentinel logs.
Step 1.2: Microsoft Sentinel Cloud Source Registration using Existing Certificate Upload
In the Scope application, navigate to the cloud source registration page (same navigation as Step 1.1).
-
In the Create New Source pop-up, provide the parameters below.
- Source: Select “Microsoft Sentinel” from the Source dropdown.
- Site: Provide a user-defined name for the Microsoft Sentinel cloud source.
- Client ID: The Client (Application) ID noted in Step 1.
- Tenant ID: The Tenant (Directory) ID noted in Step 1.
- Subscription ID: The Azure Subscription ID from Step 4.
- Resource Group: The Resource Group name containing the Sentinel workspace from Step 4.
- Workspace Name: The Log Analytics Workspace name linked to Microsoft Sentinel from Step 4.
- Polling Interval: Select the required polling interval for making periodic API calls to the Microsoft Sentinel API.
- Contact Email: The email address of the person who registers the Microsoft Sentinel cloud source in Scope.
- Auth Mode: Click the Certificate tab.
- Existing Certificate Upload / New Certificate Generation: Select Existing Certificate Upload from the dropdown.
- Thumbprint ID: The Thumbprint ID generated using the certificate uploaded in the Azure portal.
- Expiry Date: The expiry date of the certificate.
- Public Key: Upload the available *.cer file.
- Private Key: Upload the available *.pem file.
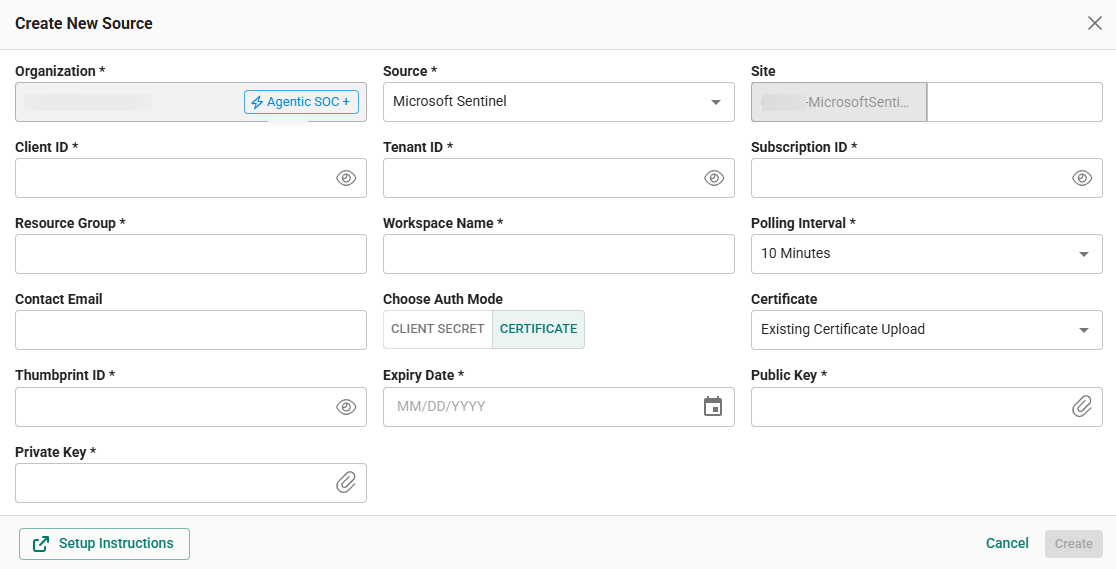
Once the required connection parameters are entered, the Microsoft Sentinel cloud source registration is complete in Scope and is ready for ingestion of Microsoft Sentinel logs.
Step 1.3: Microsoft Sentinel Cloud Source Registration using New Certificate Generation
In the Scope application, navigate to the cloud source registration page (same navigation as Step 1.1).
-
In the Create New Source pop-up, provide the parameters below.
- Source: Select “Microsoft Sentinel” from the Source dropdown.
- Site: Provide a user-defined name for the Microsoft Sentinel cloud source.
- Client ID: The Client (Application) ID noted in Step 1.
- Tenant ID: The Tenant (Directory) ID noted in Step 1.
- Subscription ID: The Azure Subscription ID from Step 4.
- Resource Group: The Resource Group name containing the Sentinel workspace from Step 4.
- Workspace Name: The Log Analytics Workspace name linked to Microsoft Sentinel from Step 4.
- Polling Interval: Select the required polling interval for making periodic API calls to the Microsoft Sentinel API.
- Contact Email: The email address of the person who registers the Microsoft Sentinel cloud source in Scope.
- Auth Mode: Click the Certificate tab.
- Existing Certificate Upload / New Certificate Generation: Select New Certificate Generation from the dropdown. The Scope application gets input for generating a certificate and a certificate file gets generated. This certificate (Public key - *.cer file) has to be used to generate the Thumbprint ID in the Azure portal.
- Certificate Name: User-defined name for the certificate.
- Hostname: The hostname or domain name to be used by clients to access the server.
- Encryption Algorithm: Select the encryption algorithm (SHA256 or SHA512).
- Expiry Date: Select the expiry date for the certificate.
- Organization Unit: Name of the department within the organization.
- Organization Name: Name of the organization.
- Location: City where the organization unit is located.
- Country: Country where the organization unit is located.
- State: State/Province where the organization unit is located.
- Email: Email address of the user.
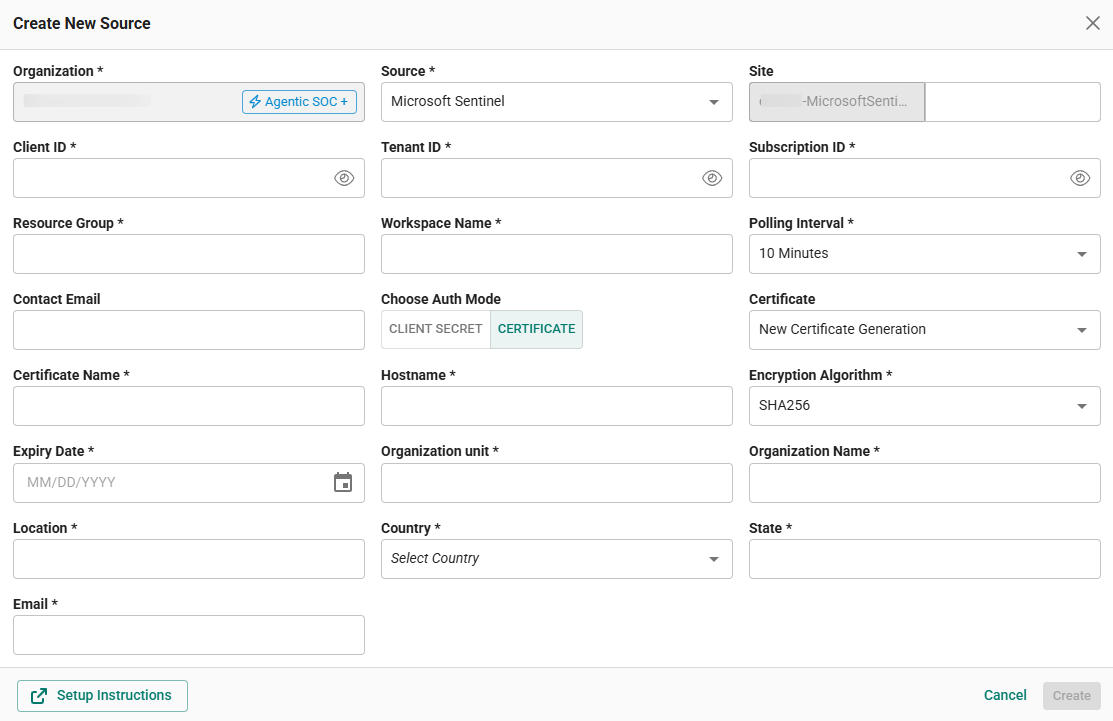
Once the source is created, a newly generated certificate will be available for download.
Step 1.3.1: Generate Thumbprint ID in Azure Portal
-
Upload the generated certificate file (
.cer) by clicking Upload certificate in the Certificates & Secrets menu (Azure Portal -> Microsoft Entra ID -> Manage -> App registrations -> All applications -> Select the app -> Manage -> Certificates & secrets -> Certificates tab). -
Once the certificate is uploaded, a Thumbprint ID will be generated. Note this Thumbprint ID.

Step 1.3.2: Update Thumbprint ID in Scope Application
-
In Scope, edit the Microsoft Sentinel cloud source that you have created (in Step 1.3) and provide the Thumbprint ID (generated in Step 1.3.1).
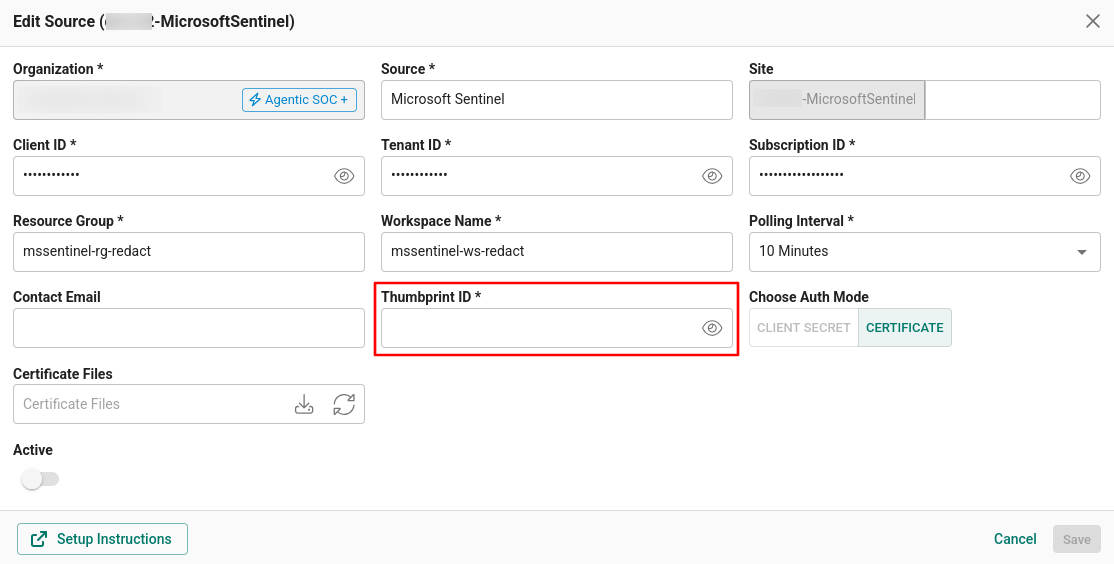
Once the Thumbprint ID is entered, the Microsoft Sentinel registration is complete in Scope and is ready for ingestion of Microsoft Sentinel logs.