Google Cloud Storage
Overview
Configuring a cloud source in Scope is a two-step process.
-
Generating Google Cloud Storage service account credentials in the Google Cloud Console. Please refer to Section 1 – Google Cloud Storage Setup
-
Setting up the Google Cloud Storage cloud source in the Scope application. Please refer to Section 2 – Scope Setup
Google Cloud Storage Setup
To get started, you’ll need to generate the following credentials in the Google Cloud Console –
- Service Account Key (JSON key file)
- Bucket Name
- Directory Path (for individual data providers)
Step 1: Enable the Cloud Storage API
-
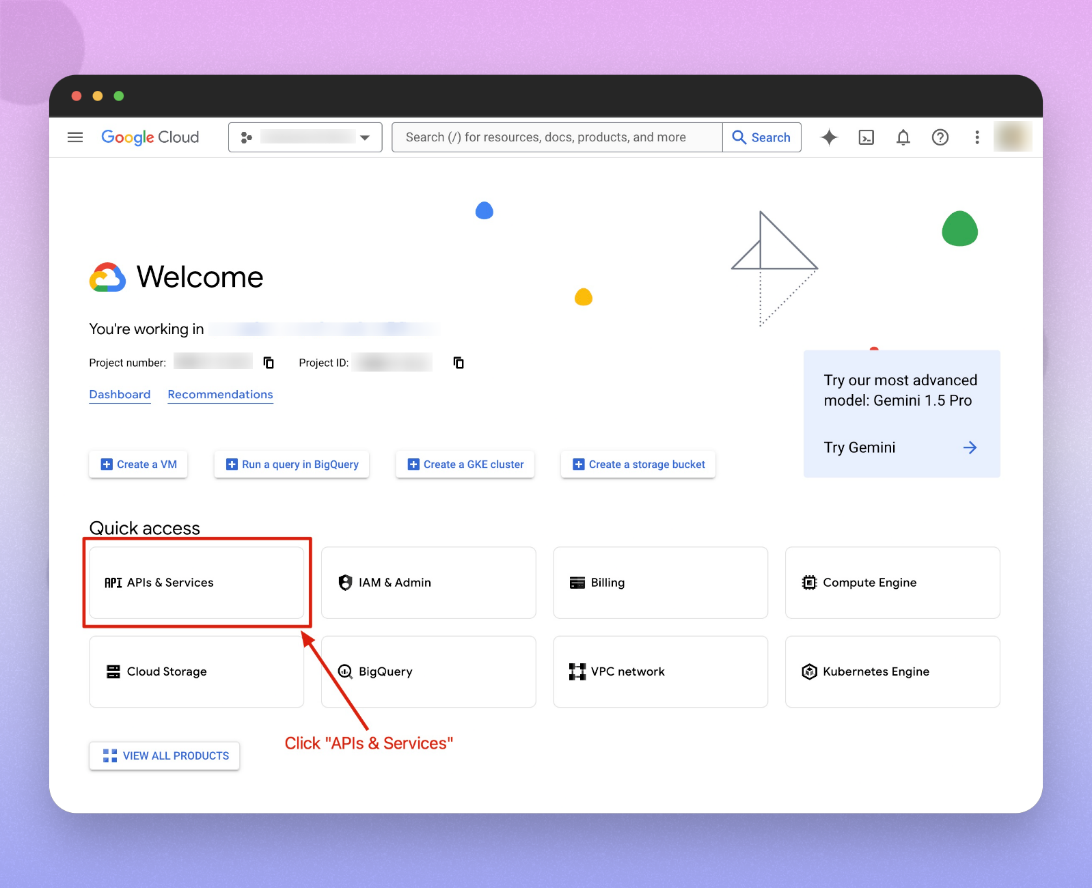
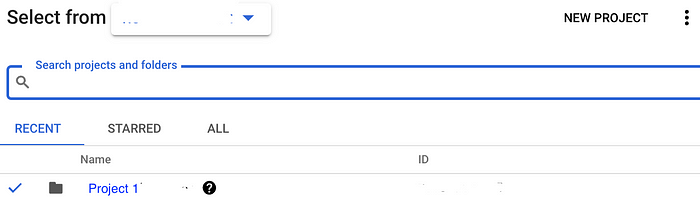
Open the Google Cloud Console and make sure you are working in the correct project.
-
From the dashboard, navigate to APIs & Services.
-
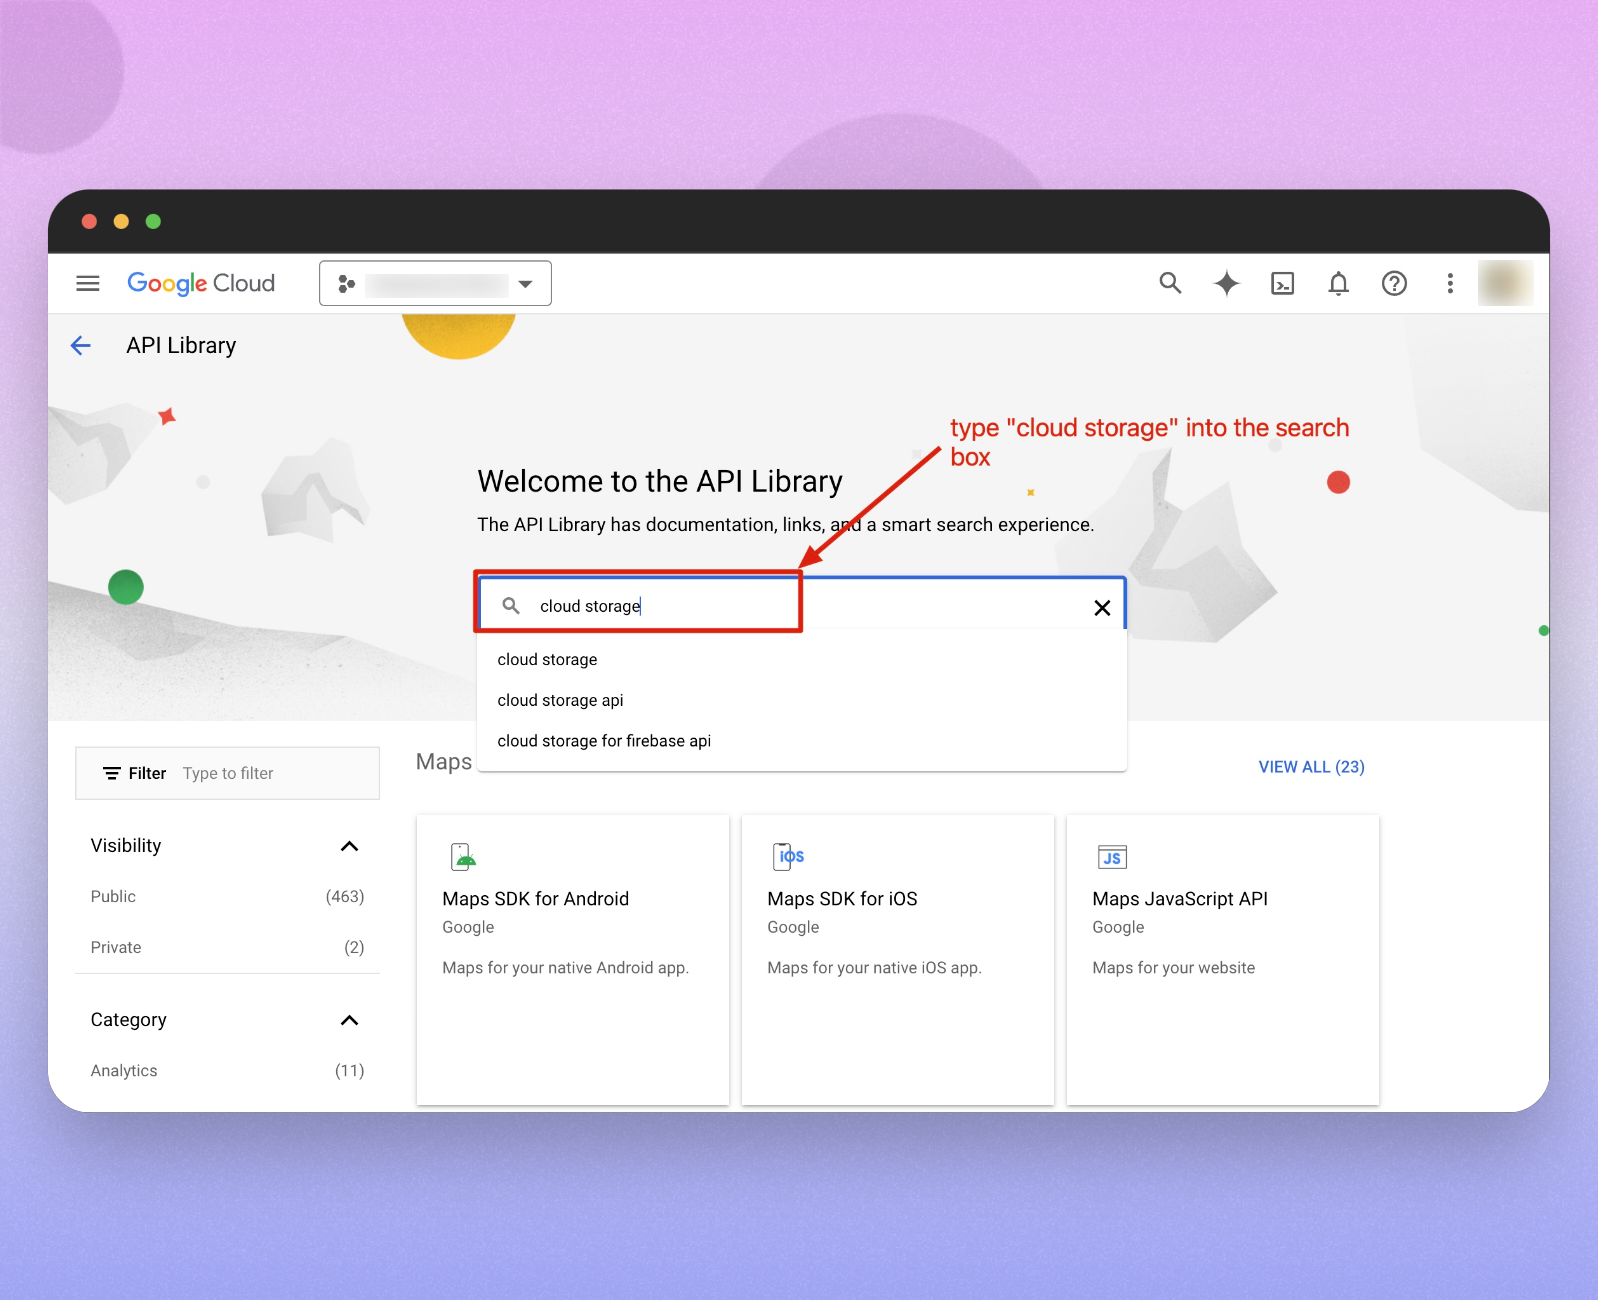
Click on ENABLE APIS AND SERVICES.

-
In the API library, use the search box and search for Cloud Storage.
-
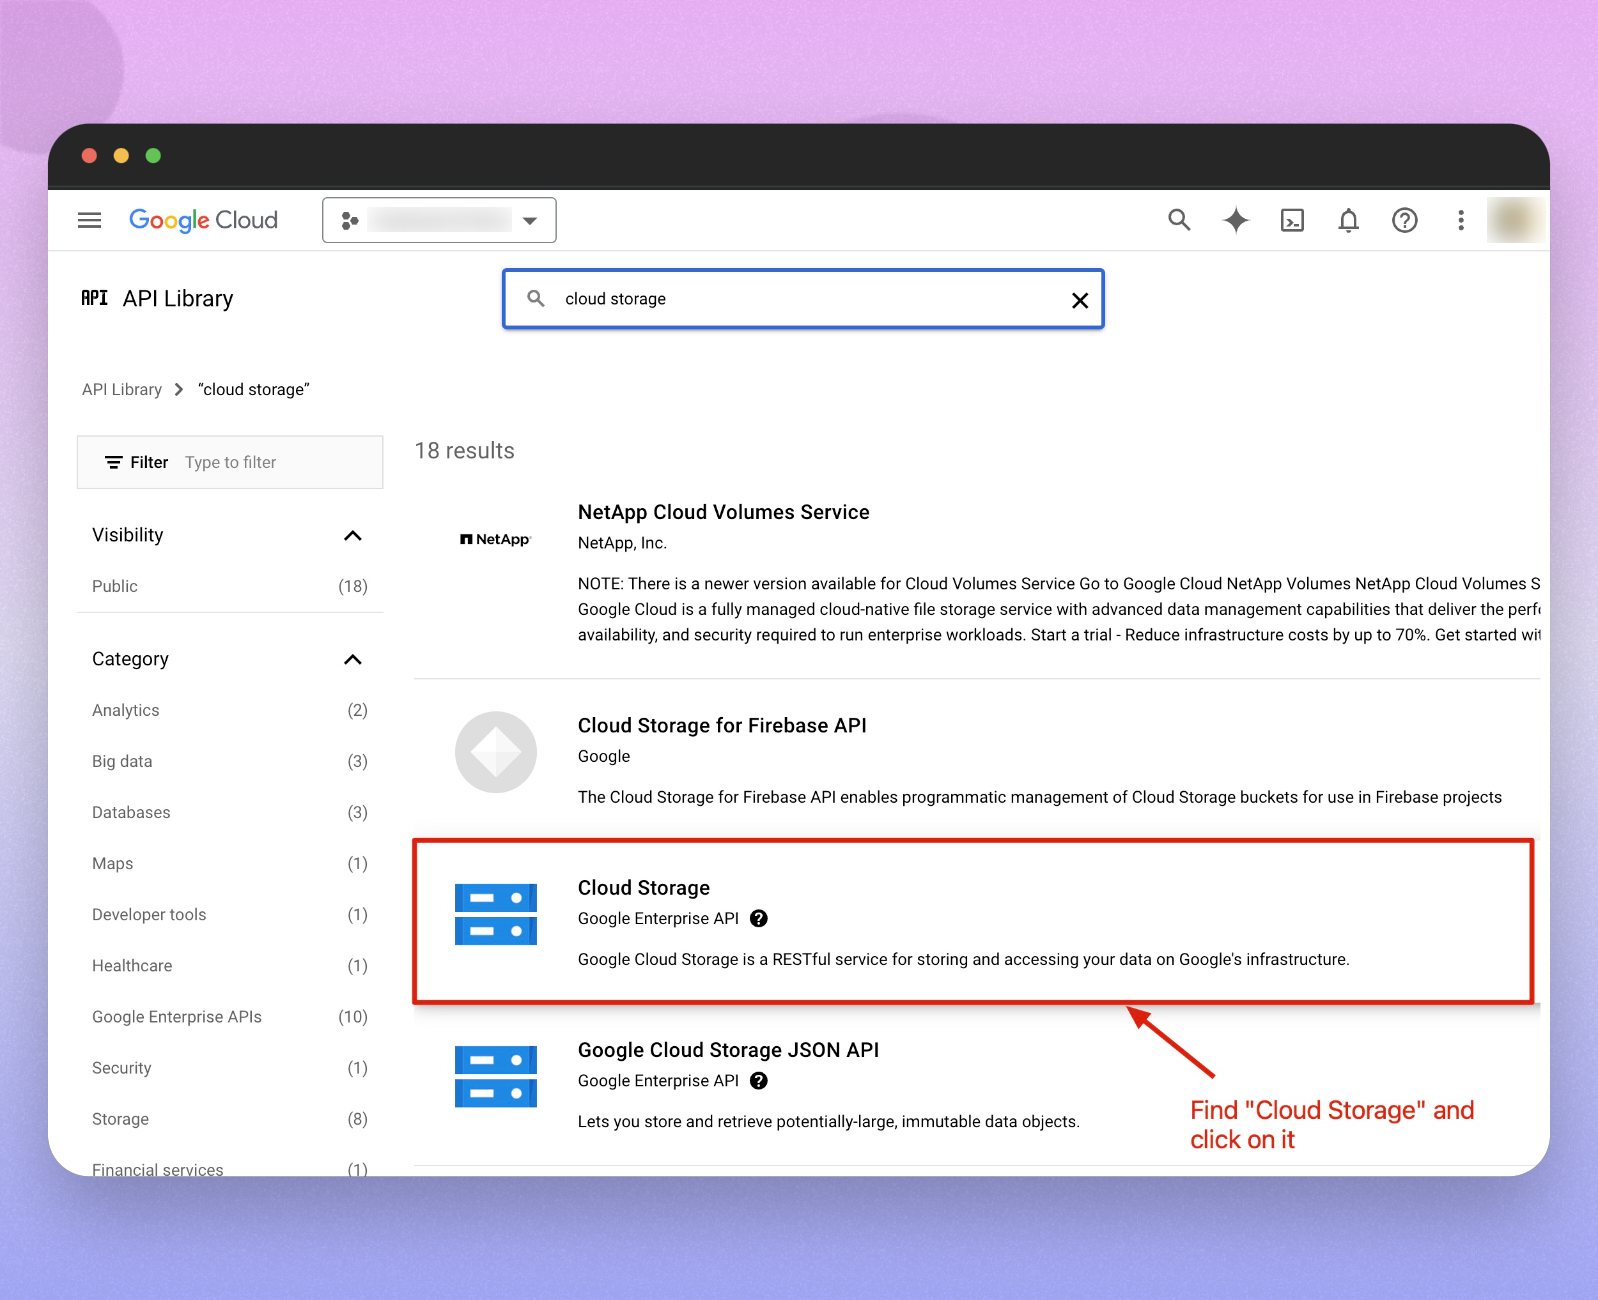
From the search results, click on Cloud Storage from the Google Enterprise API.
-
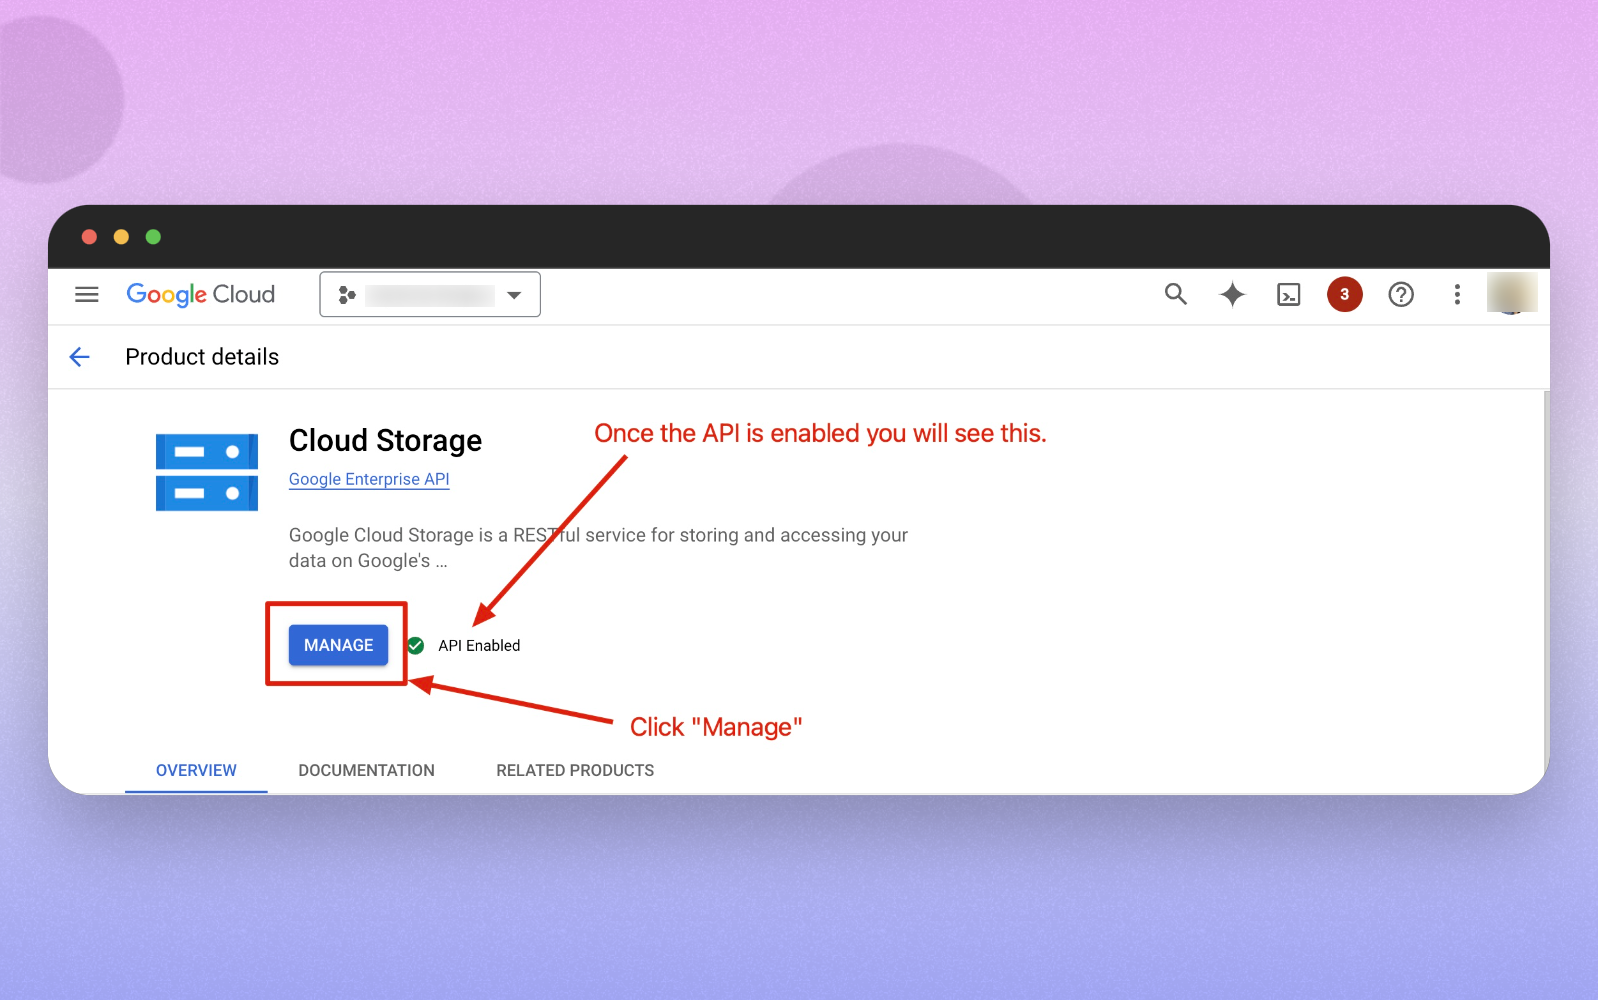
On the Cloud Storage API details page, click ENABLE.
- If the API is already enabled, proceed to the next step.
Step 2: Create the GCS Bucket
-
Open the Google Cloud Platform (GCP) menu and navigate to Cloud Storage -> Buckets.
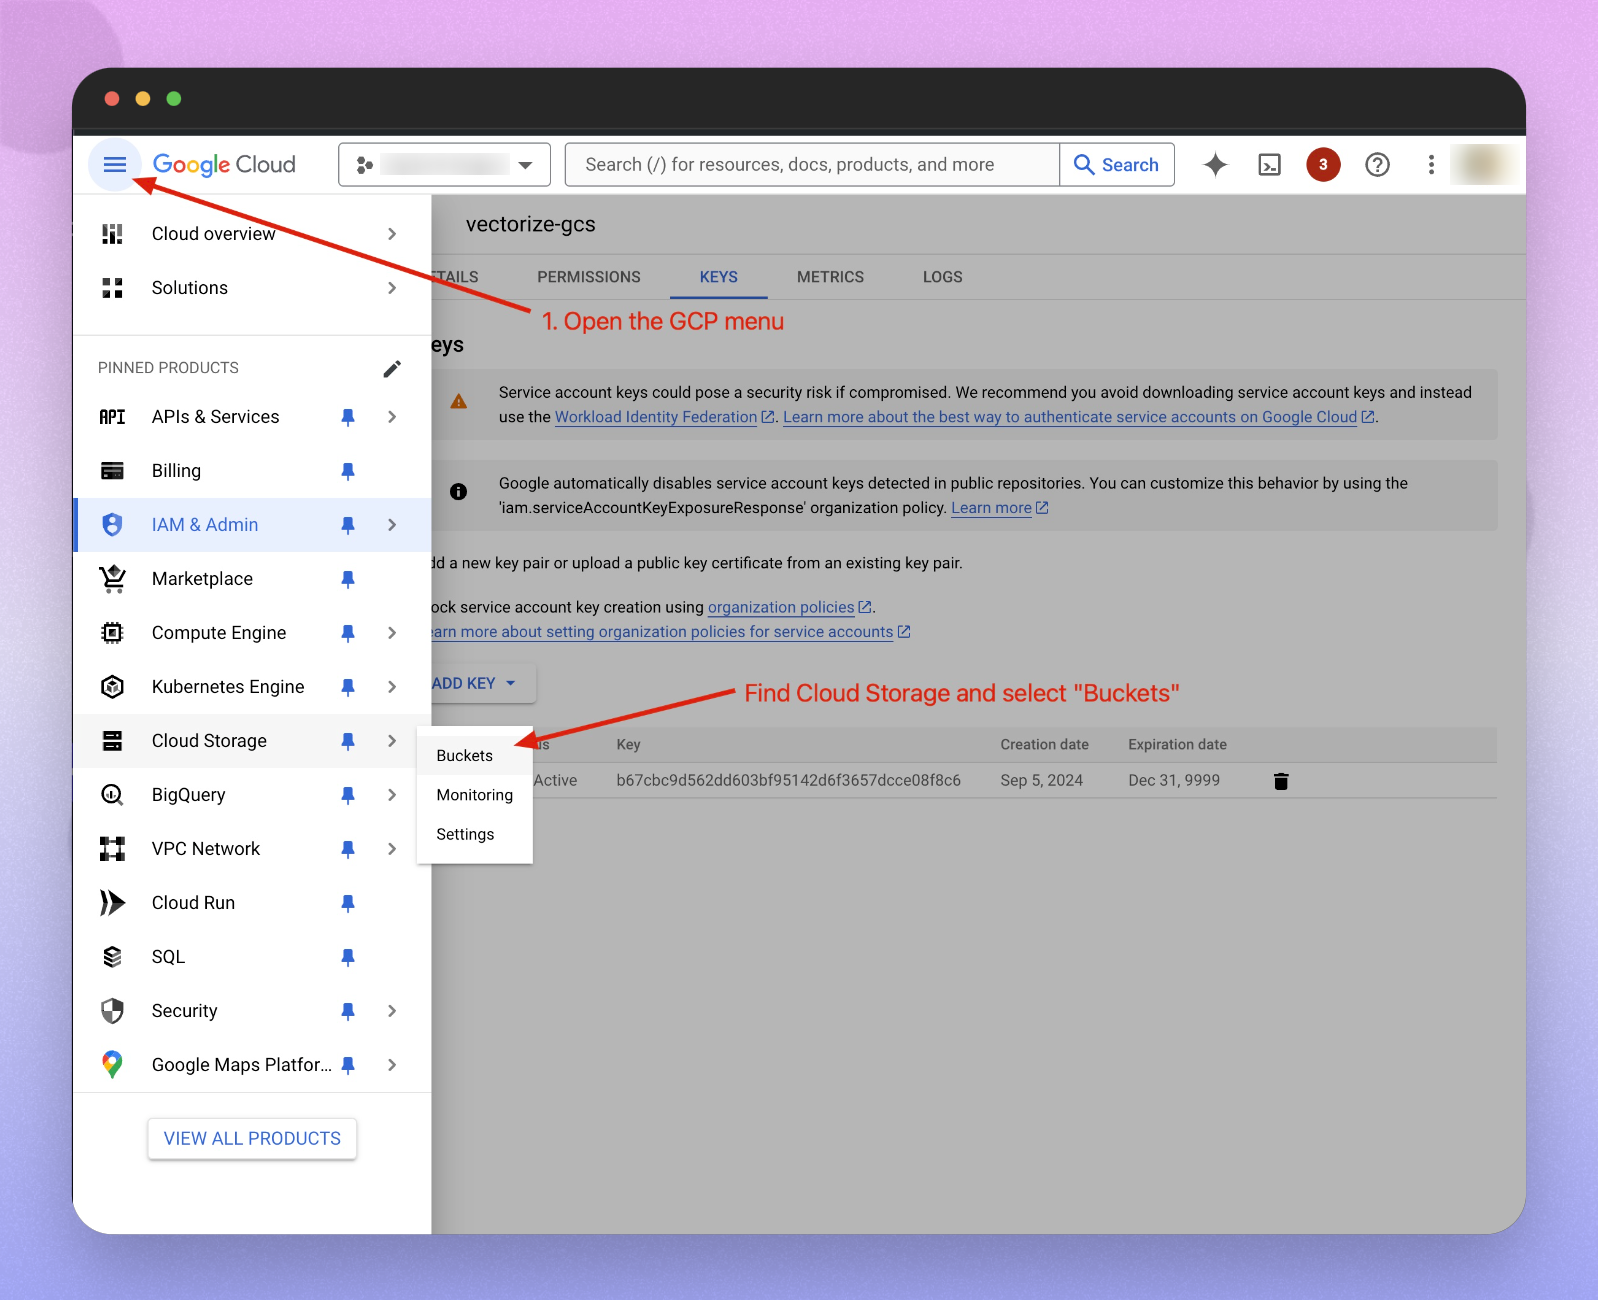
-
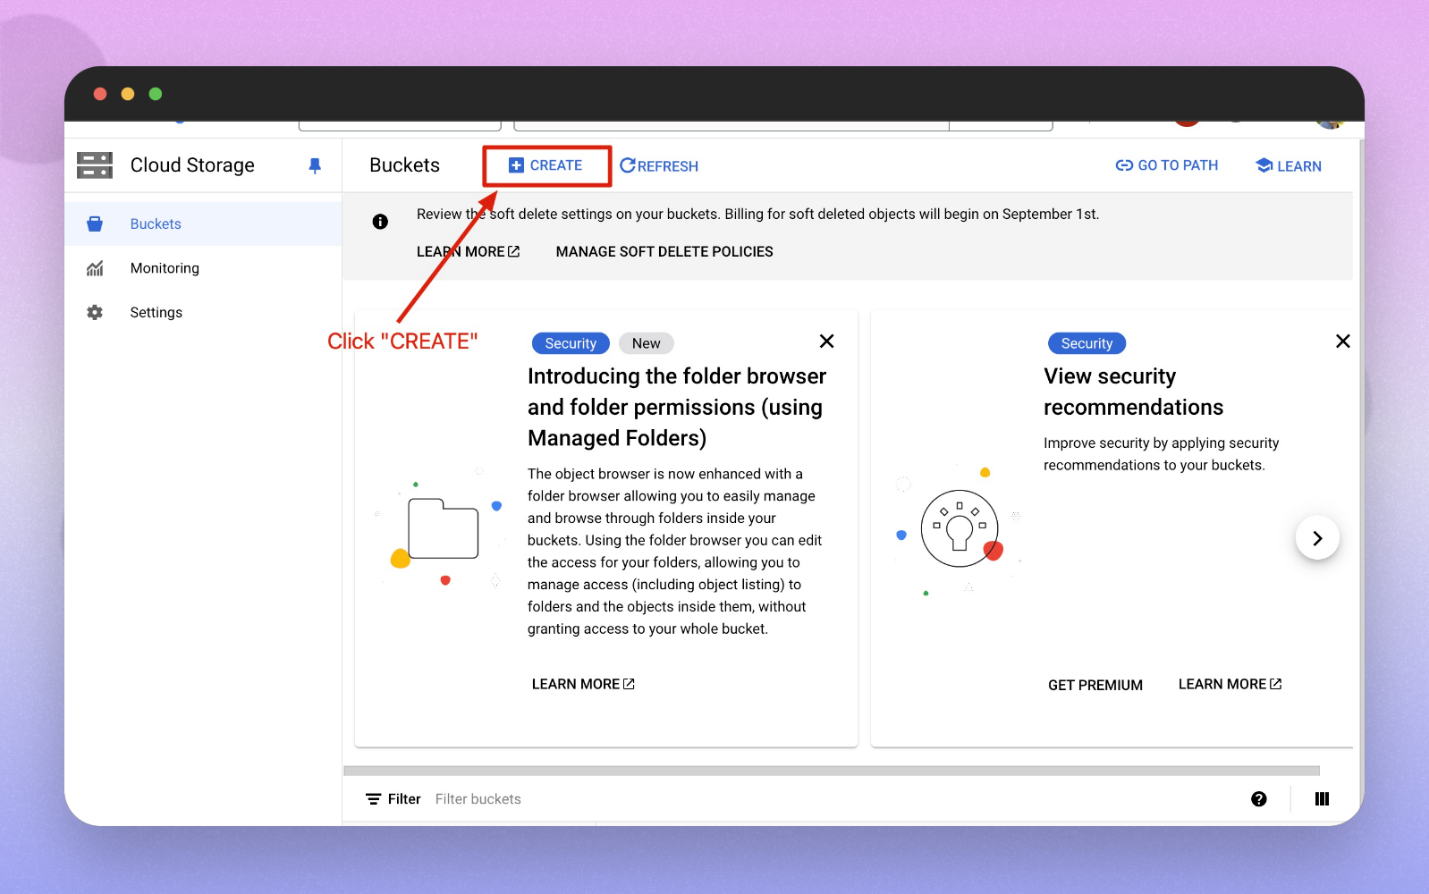
Click on the CREATE button to start creating a new bucket.
-
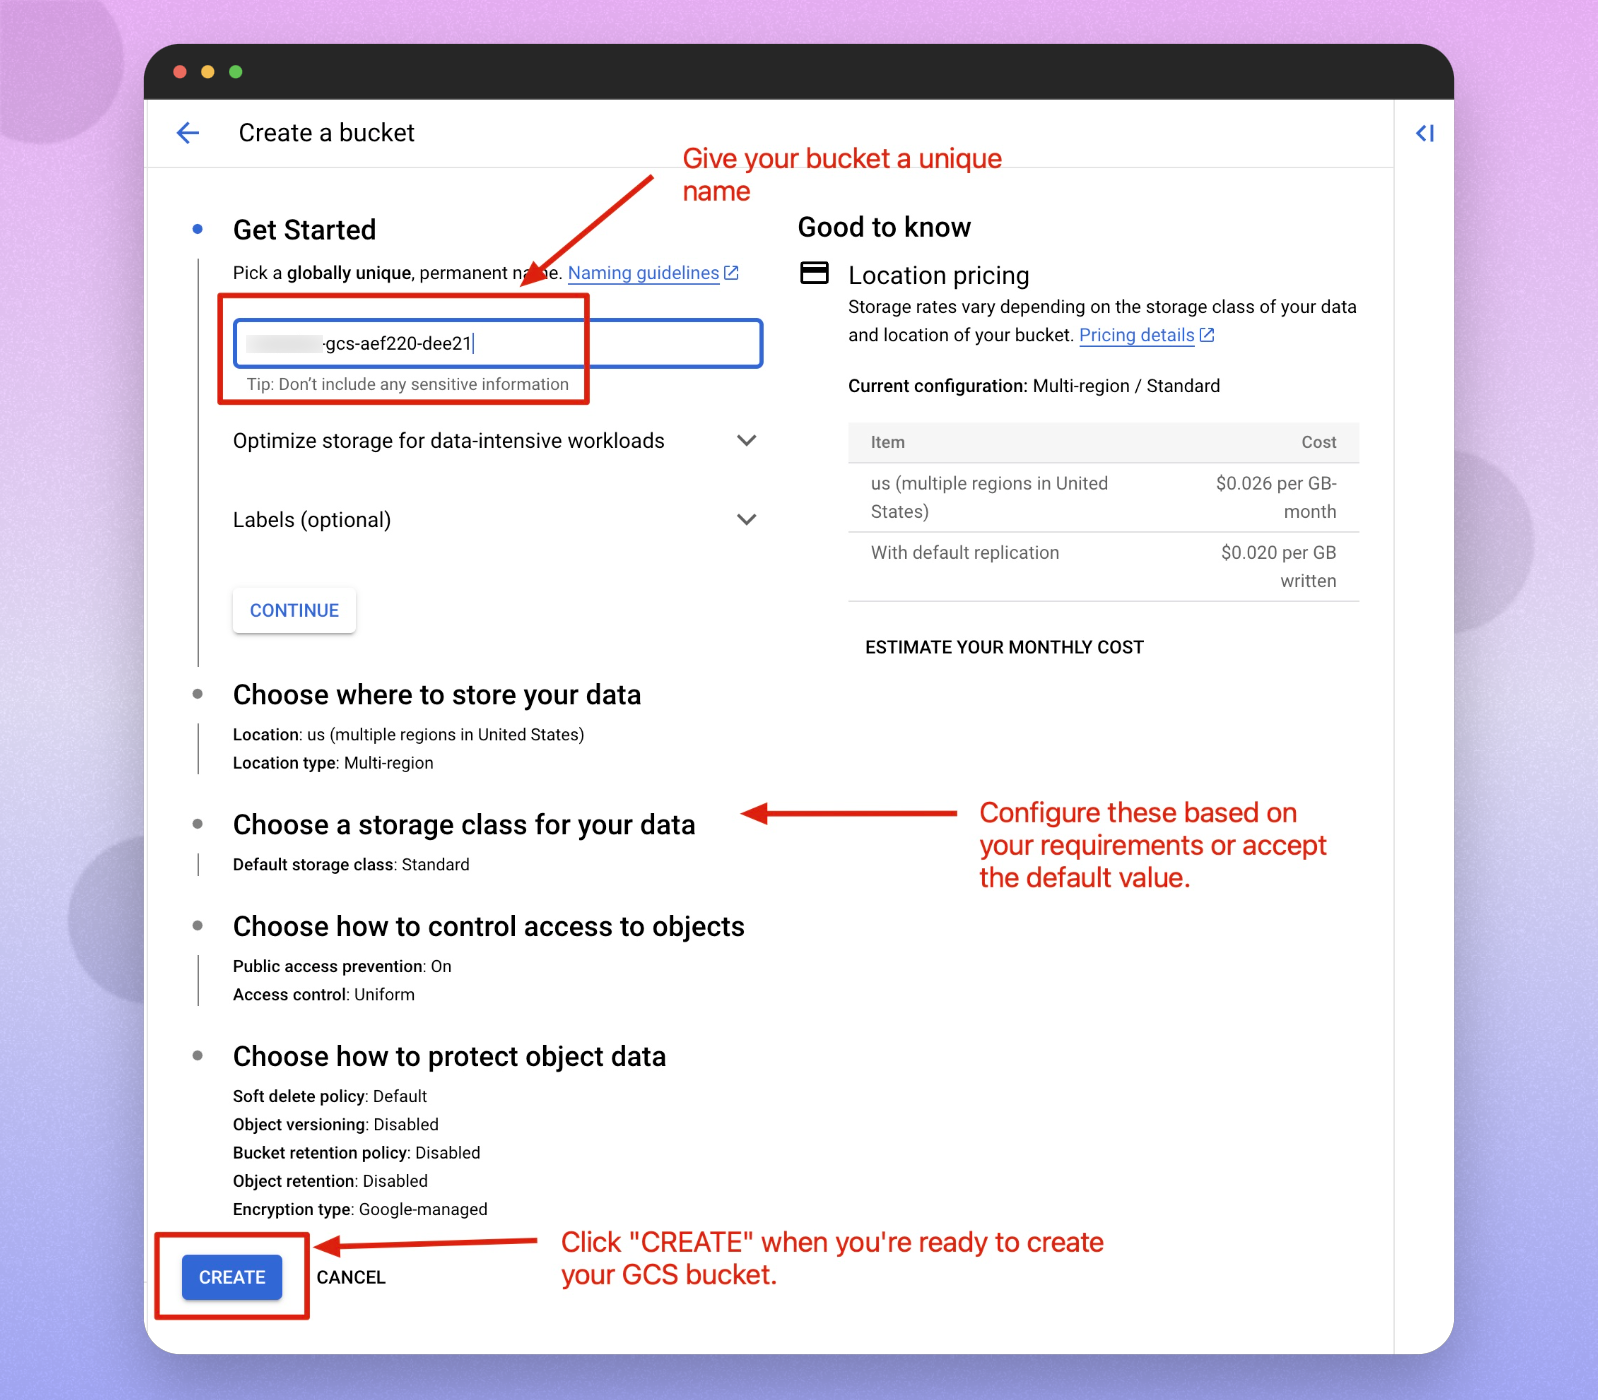
Configure your bucket with the following settings:
- Bucket Name: Enter a globally unique name (e.g.,
gcs-aef220-dee21). - Storage Location: Choose a region for your data (you can accept the default or select a specific region).
- Storage Class: Choose the default storage class (e.g., Standard).
- Access Control: Set Public Access Prevention to On and use Uniform access control.
- Data Protection: Configure options such as soft delete, versioning, retention policies, etc.
- Bucket Name: Enter a globally unique name (e.g.,
-
Click CREATE to proceed. A prompt will appear notifying you that public access will be prevented.
-
Click CONFIRM to proceed unless you have a specific use case that requires public access.

-
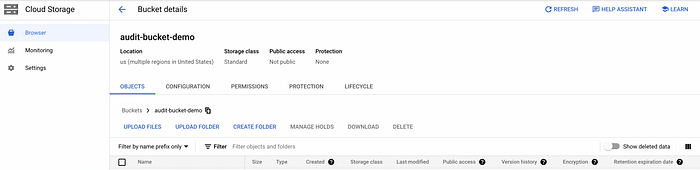
After the bucket is created, copy and save the Bucket Name, as you will need it later for Scope configuration (e.g.,
gcs-aef220-dee21).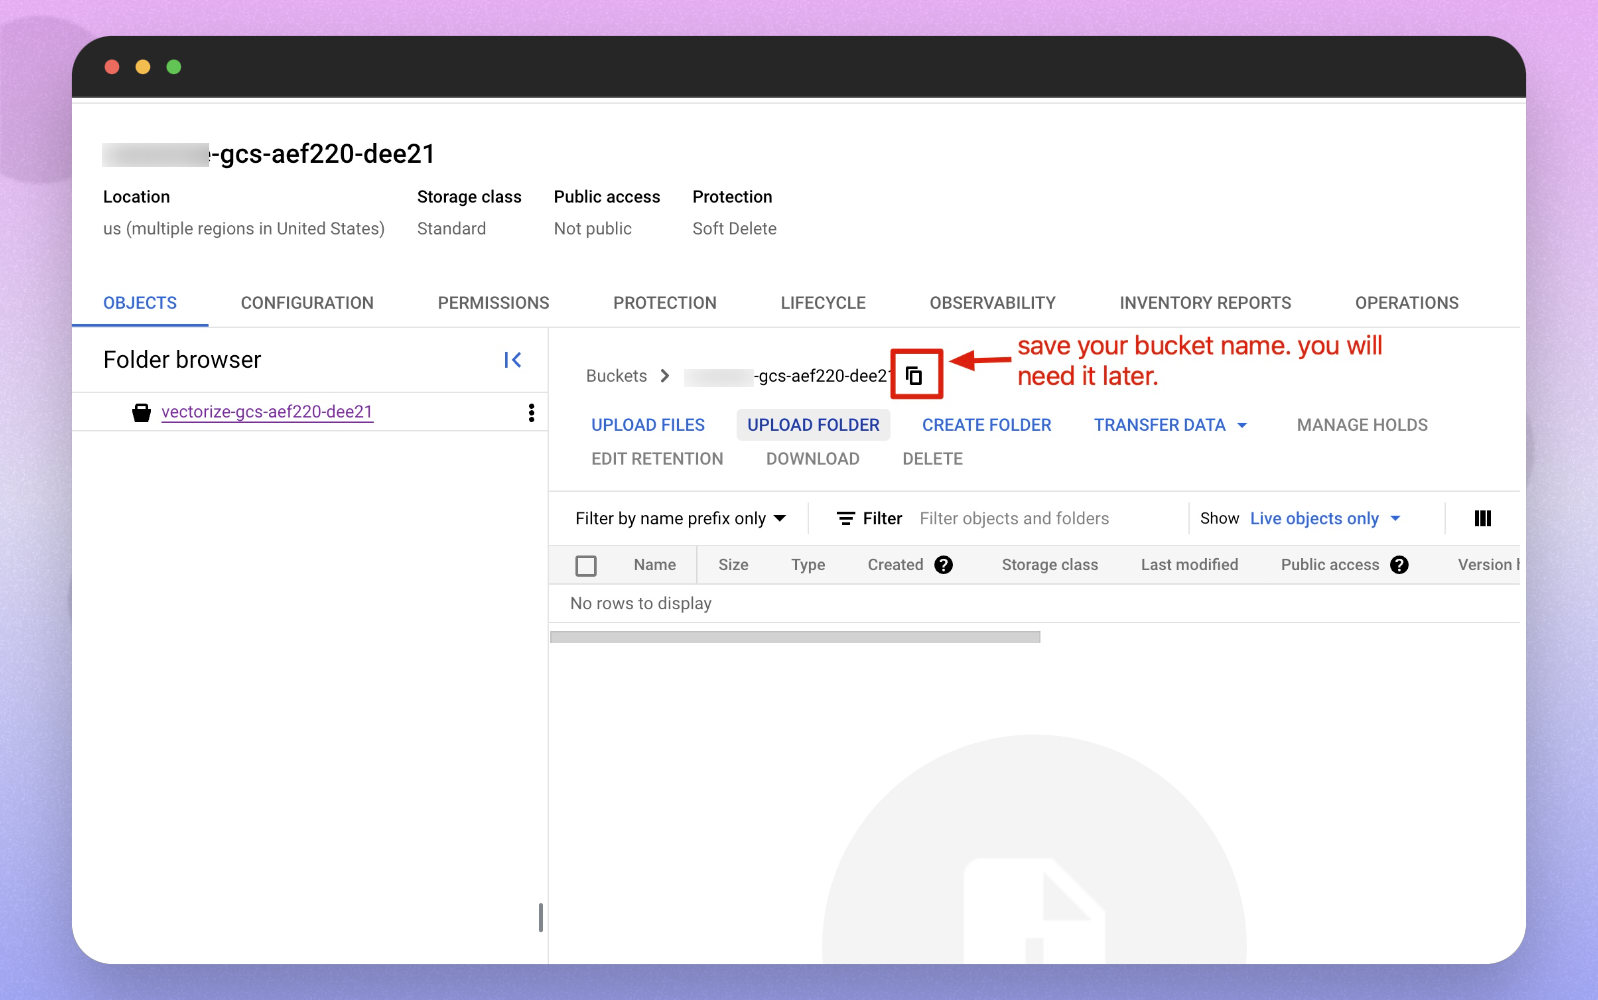
Step 3: Create a Custom IAM Role
-
Sign in to the Google Cloud Console as a project editor.
-
Navigate to IAM & Admin → Roles and select Create Role.
-
Enter a Title (e.g.,
Get buckets & objects) and an optional Description for the custom role. -
Click Add Permissions.
-
Filter the list of permissions and add the following:
storage.buckets.getstorage.objects.list
-
Click Add, then click Create.
Step 4: Set Up the Service Account and IAM Permissions
-
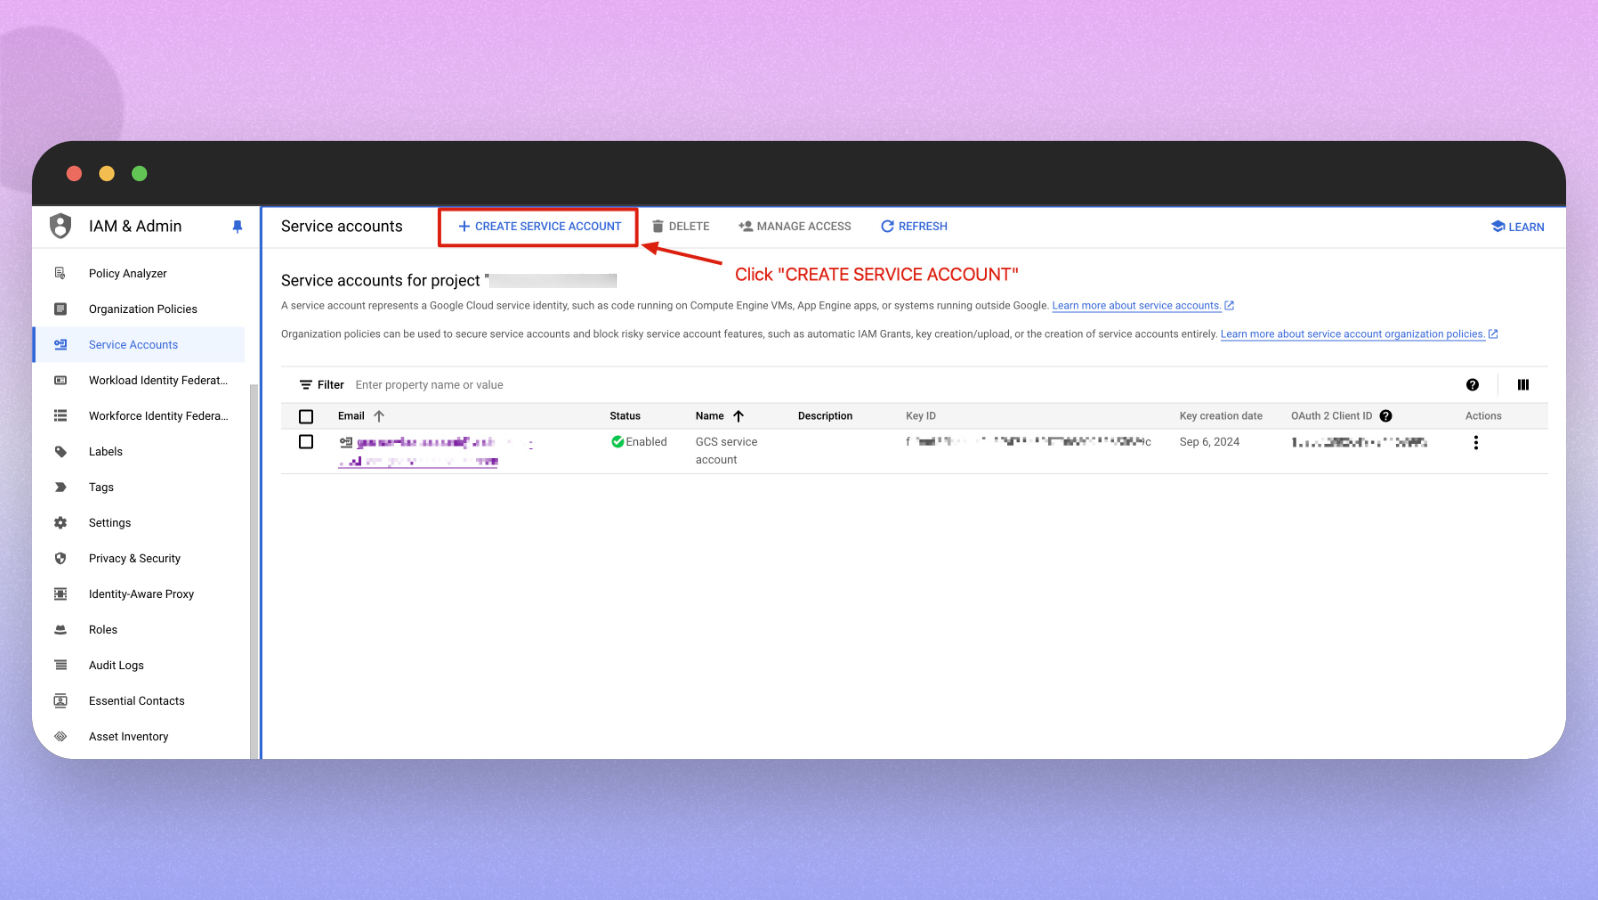
Navigate to IAM & Admin → Service Accounts.
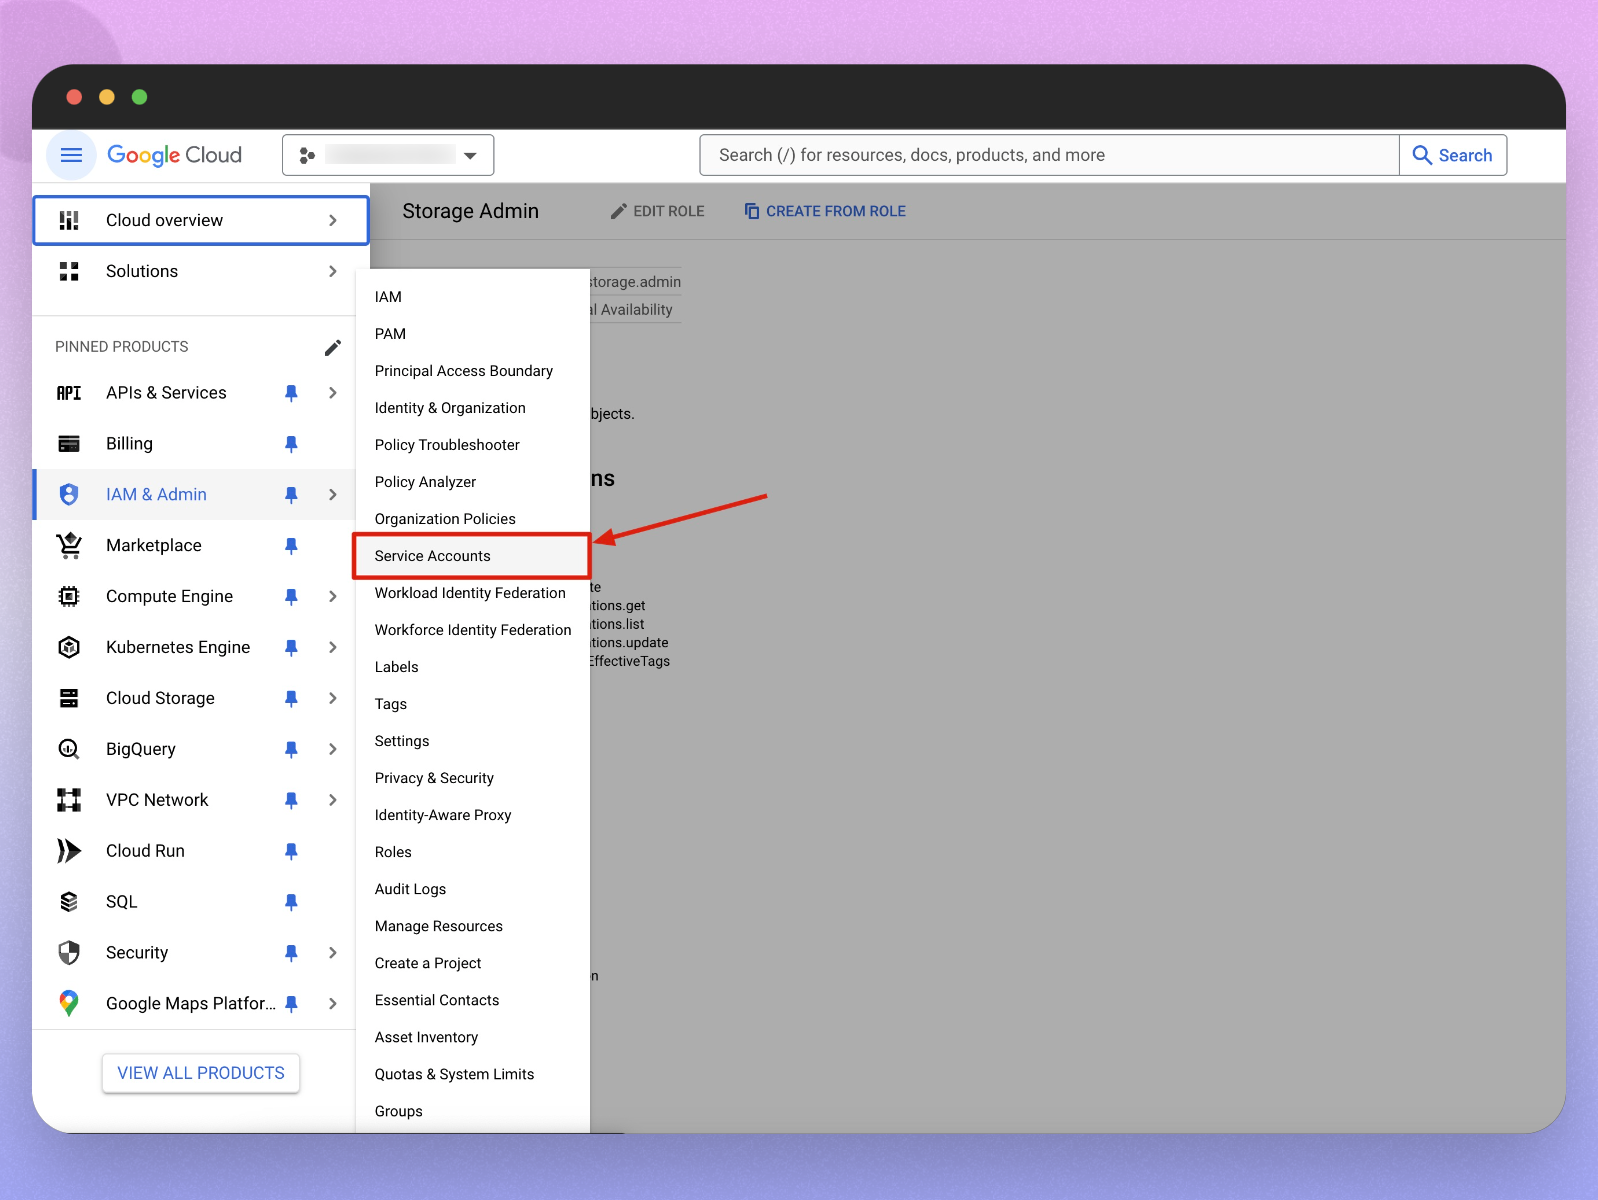
-
Click CREATE SERVICE ACCOUNT.
-
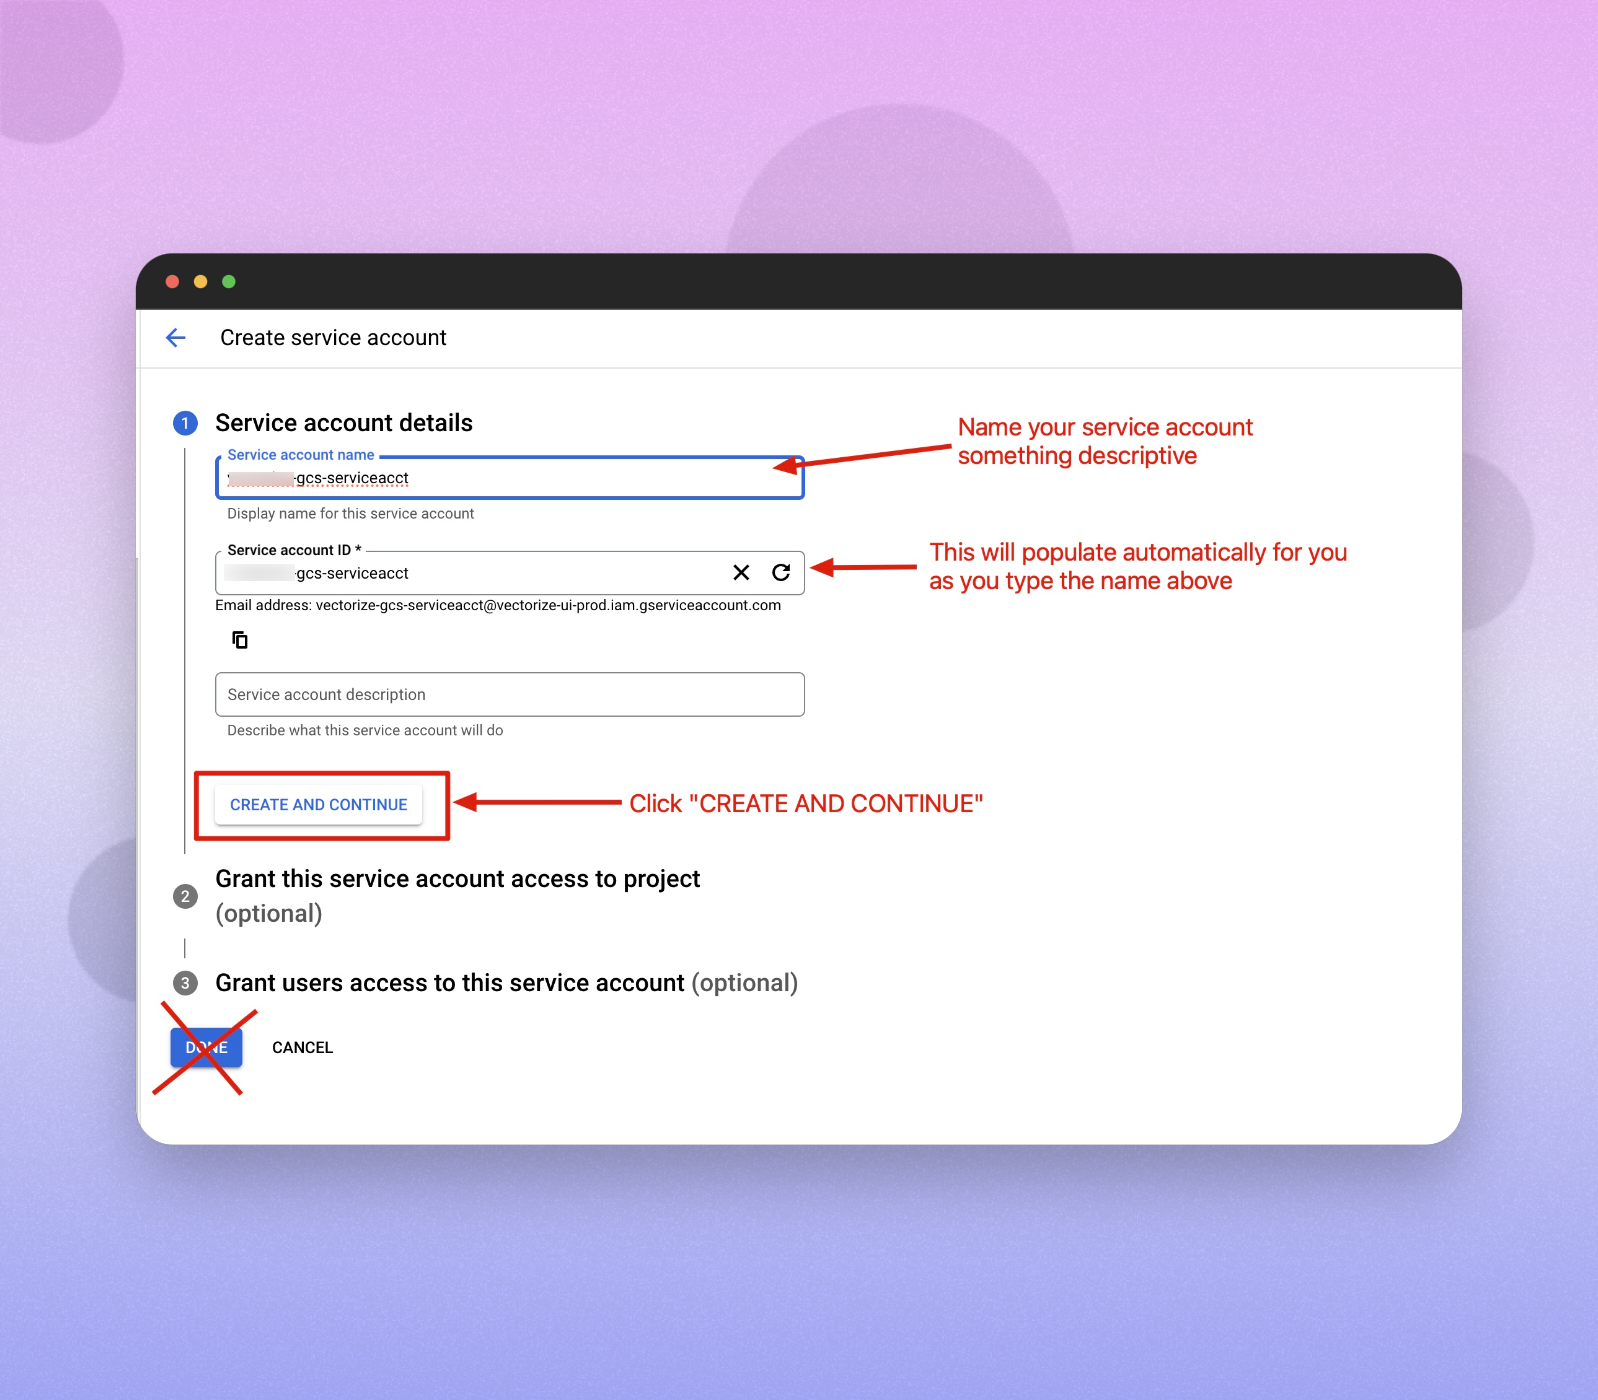
Provide a Service Account Name (this automatically populates the Service Account ID field) and click CREATE AND CONTINUE.
Note: Make sure you are clicking the CREATE AND CONTINUE button and not the more prominent DONE button.
-
In the role selection section:
- Grant the Project -> Viewer role for the service account.
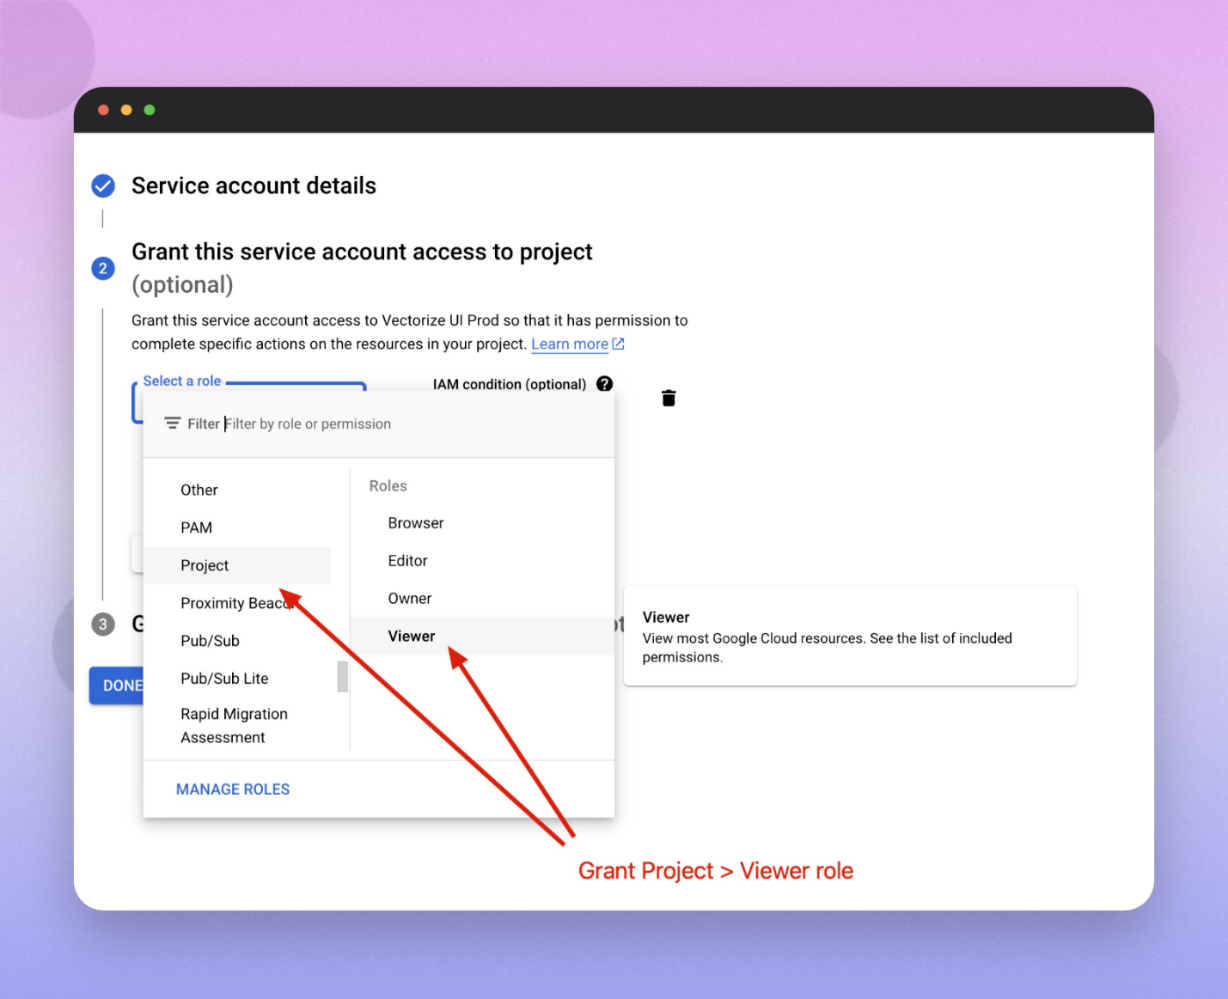
- Click ADD ANOTHER ROLE and select the custom role created in Step 3.
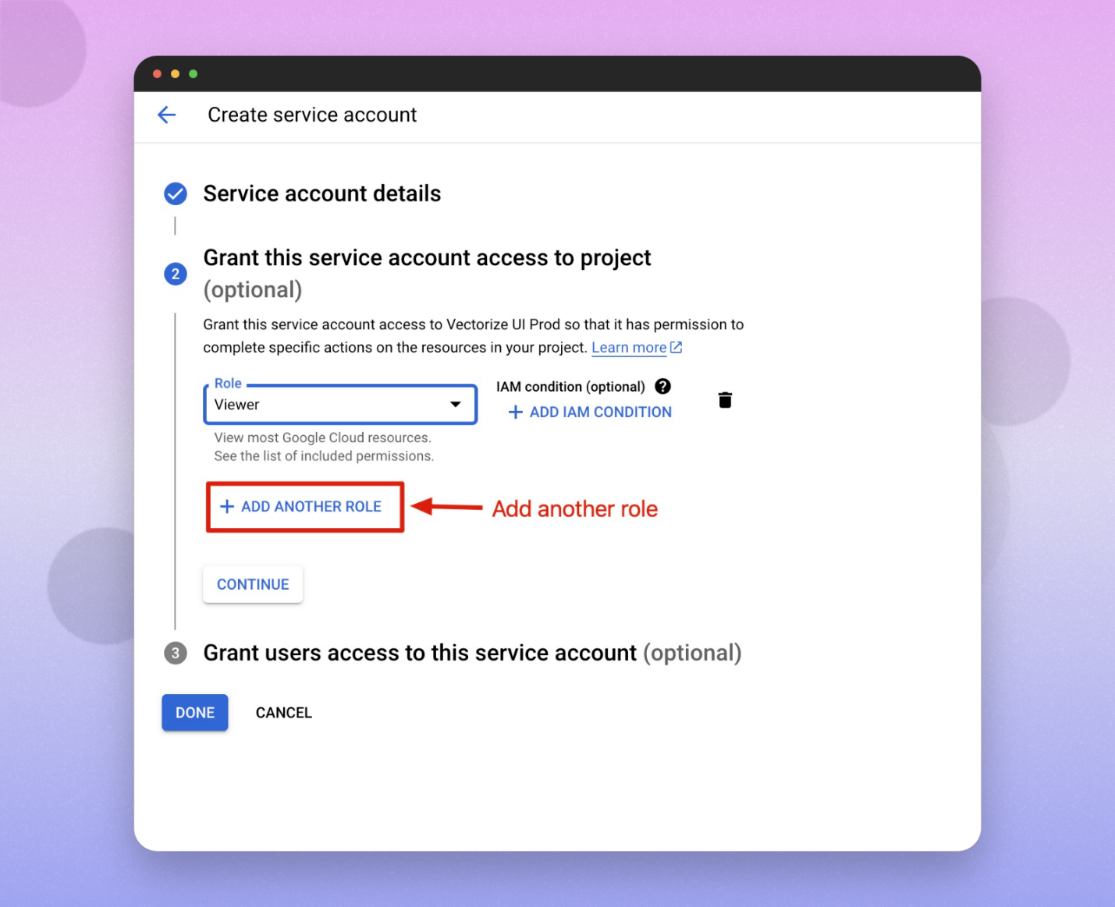
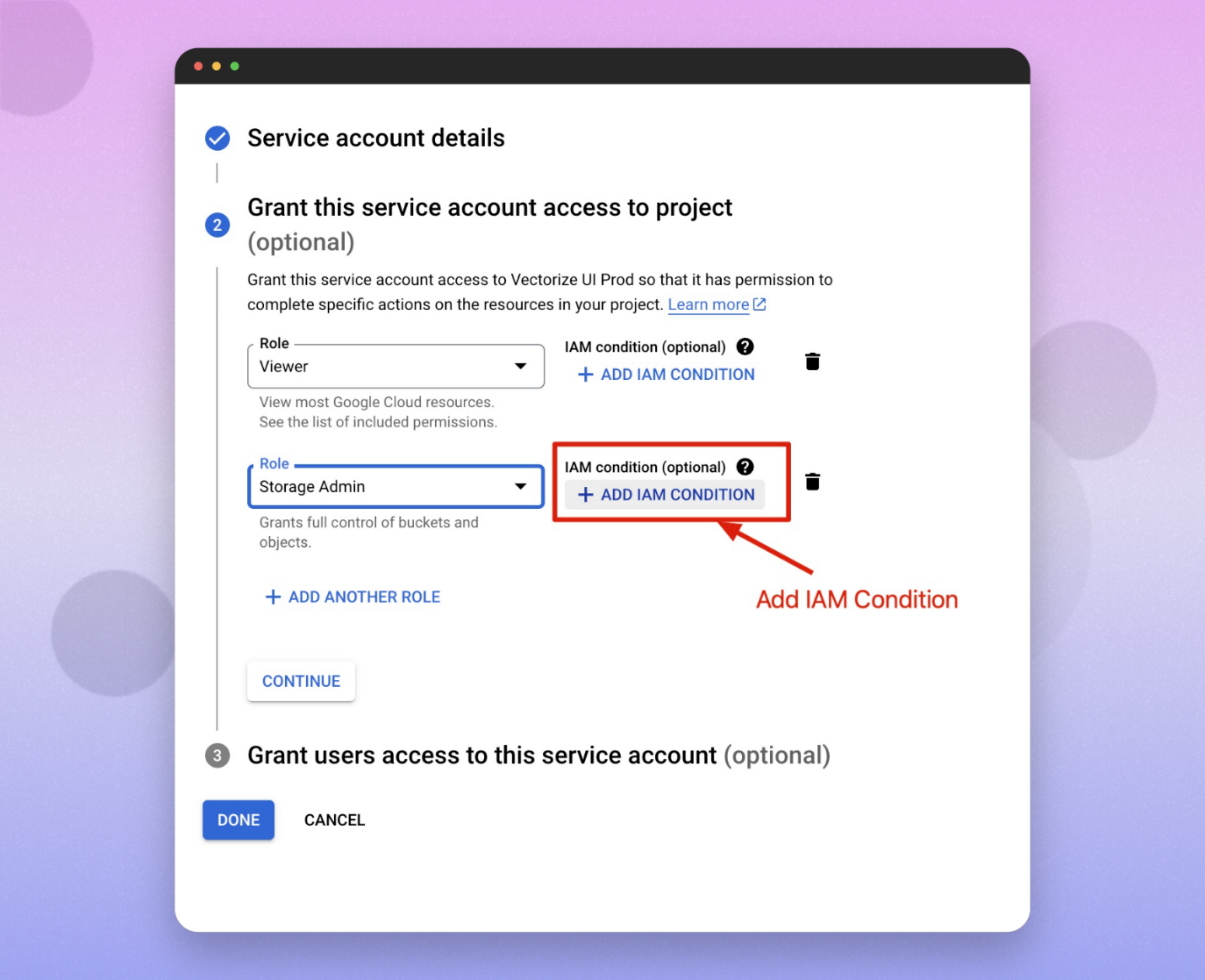
-
To limit the service account to only this bucket, add an IAM condition by clicking ADD IAM CONDITION:
-
Create IAM Condition - Name your IAM condition and paste the bucket name into the value field. Set the condition as shown:
- Condition Type: Name
- Operator: is
- Value: Name of the bucket created in Step 2
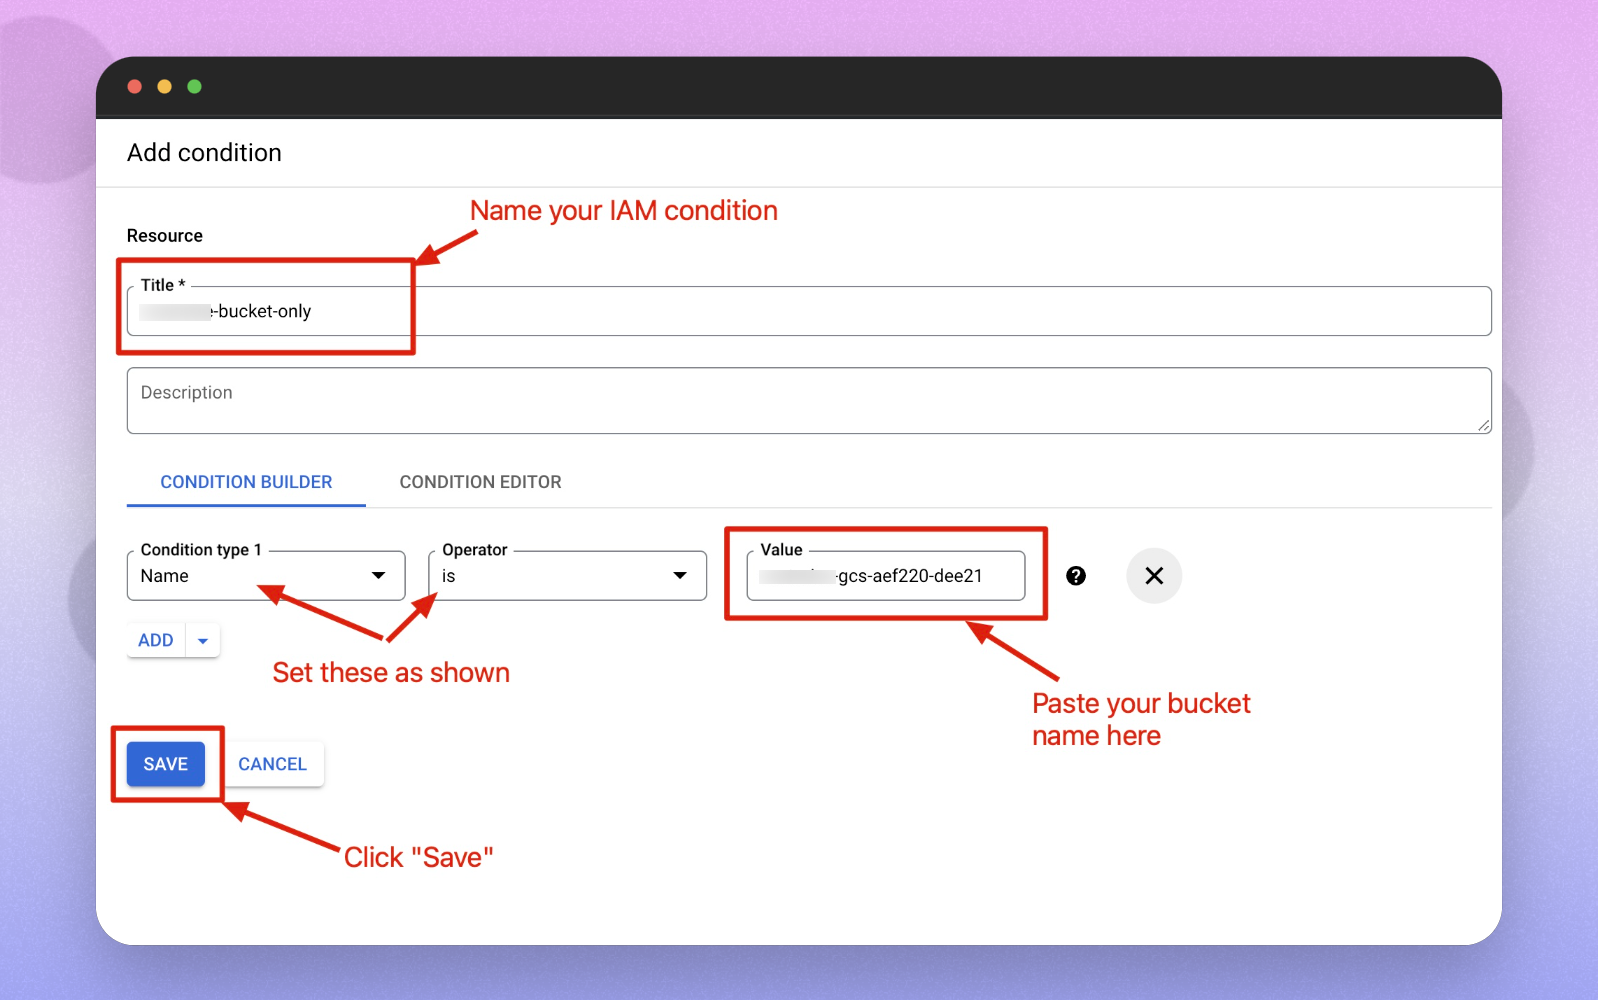
-
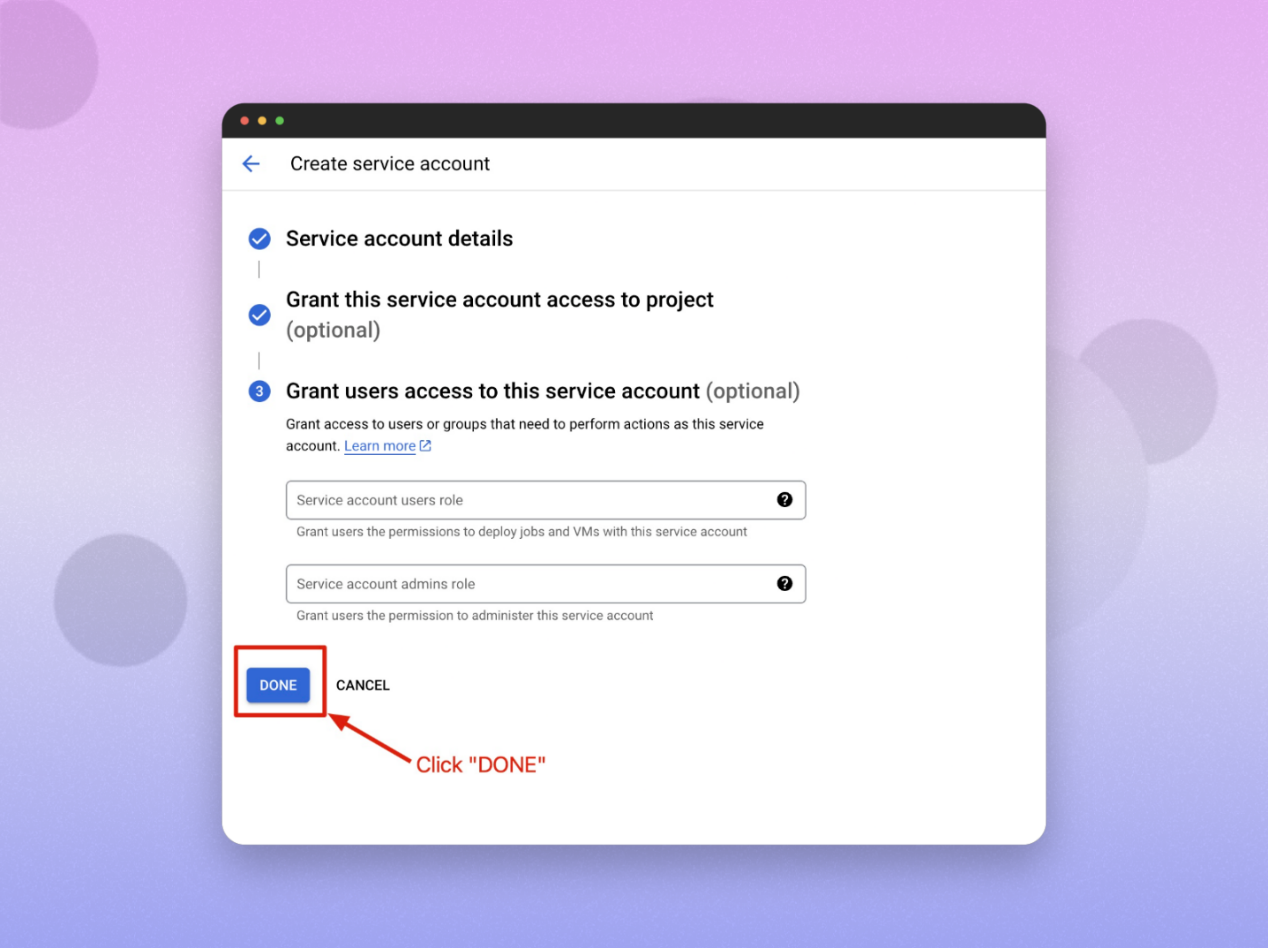
-
Click SAVE to apply the condition, then click DONE.
Step 5: Create Service Account Credentials (JSON Key)
-
In the Google Cloud Console, navigate to IAM & Admin → Service Accounts.
-
Go to Service Accounts and Select your service account.
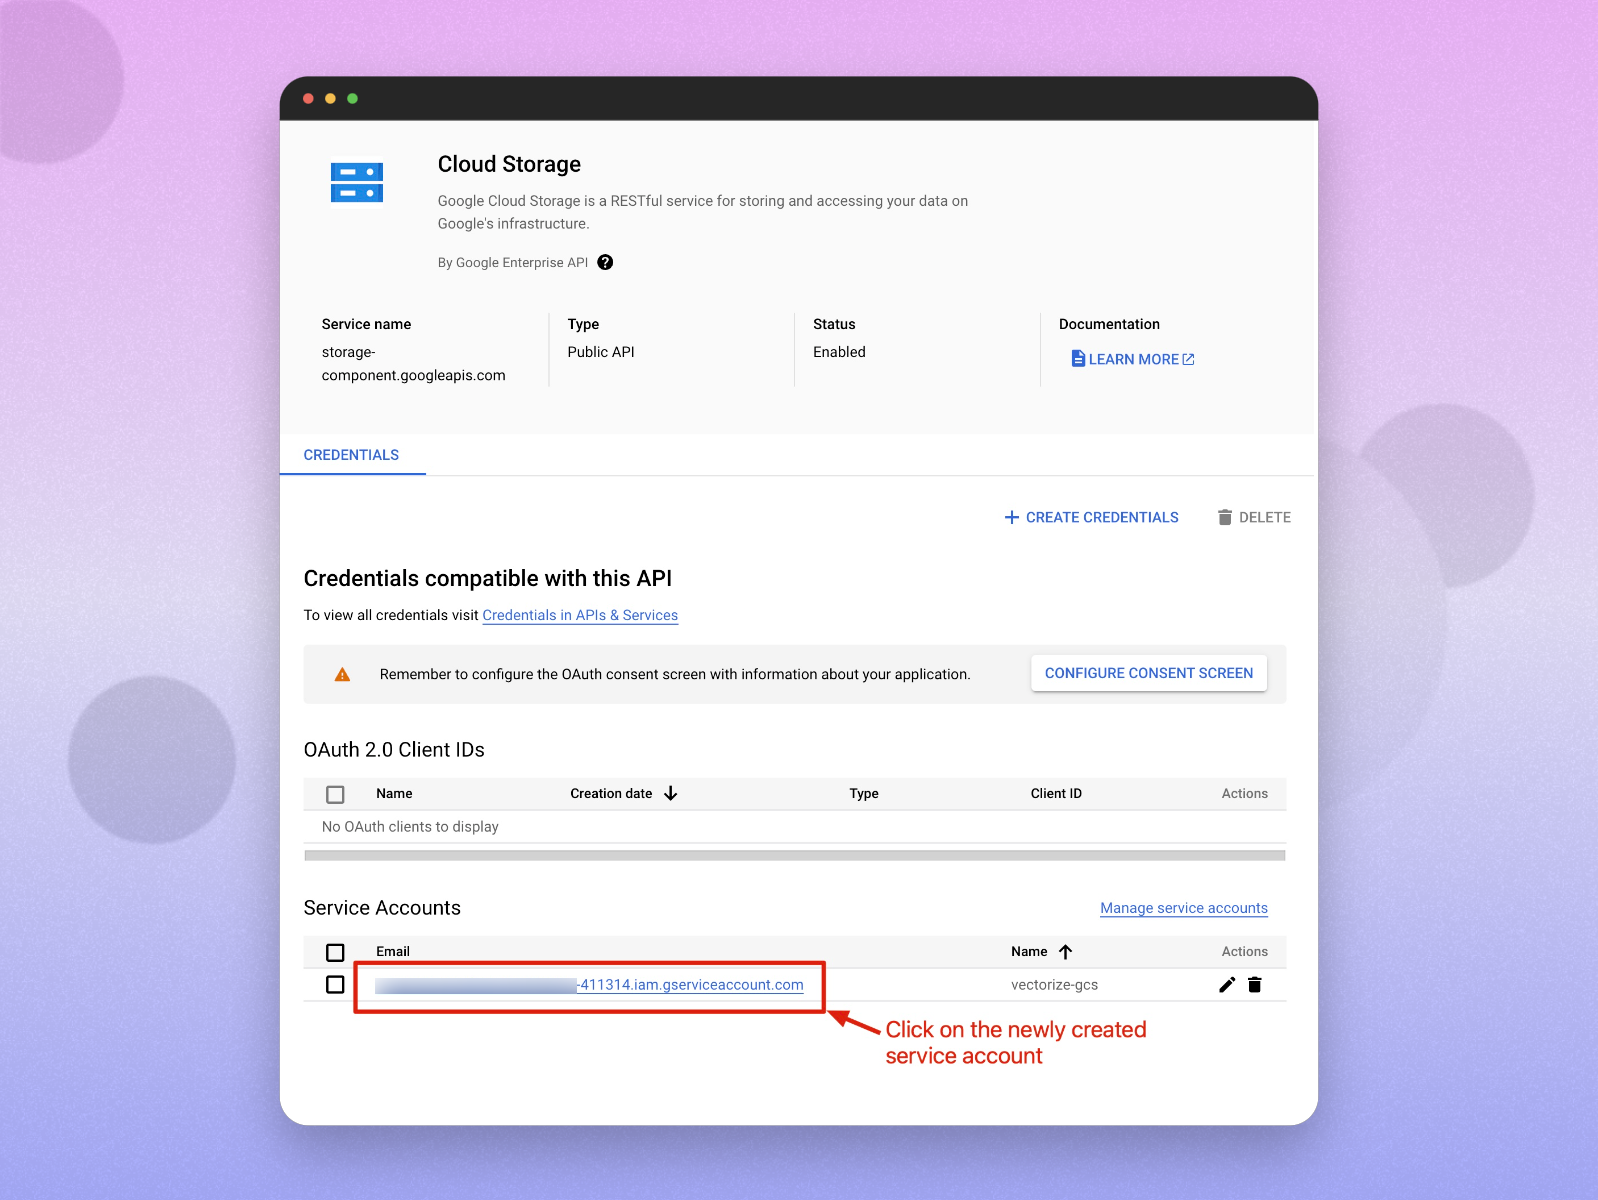
-
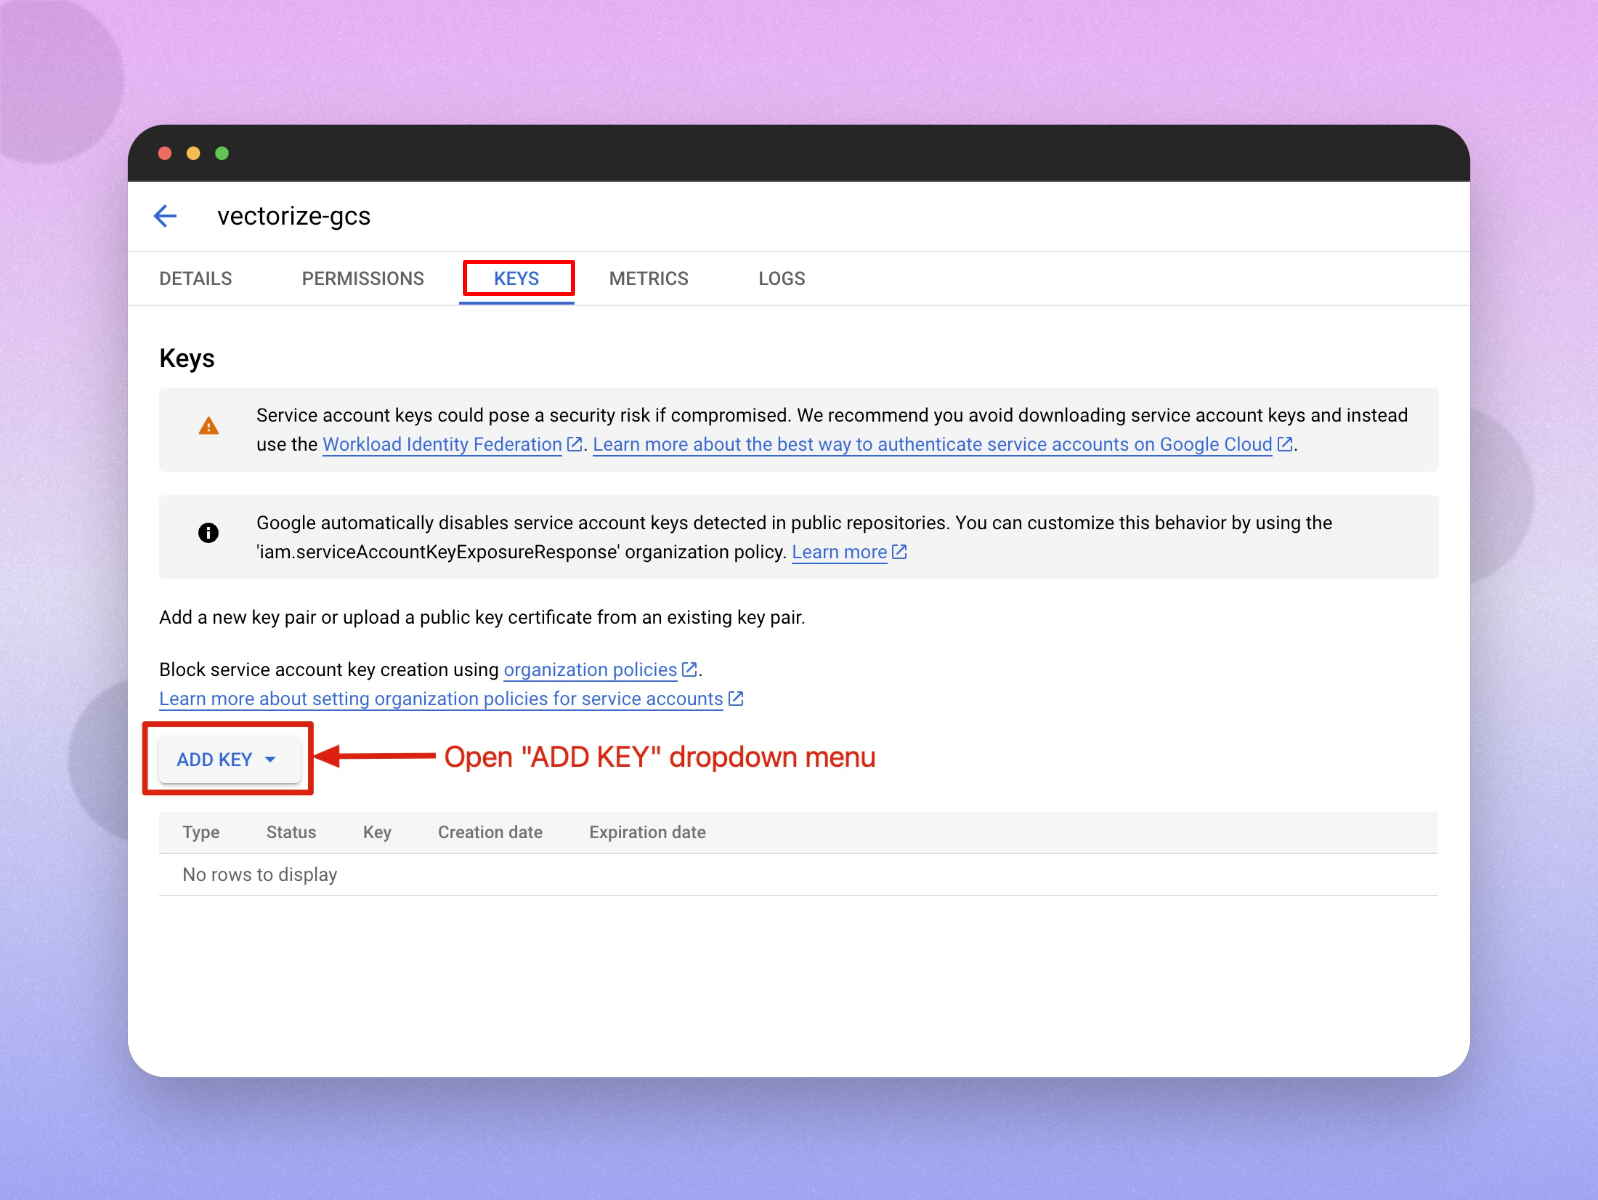
Click Keys -> Add key -> Create new key.
-
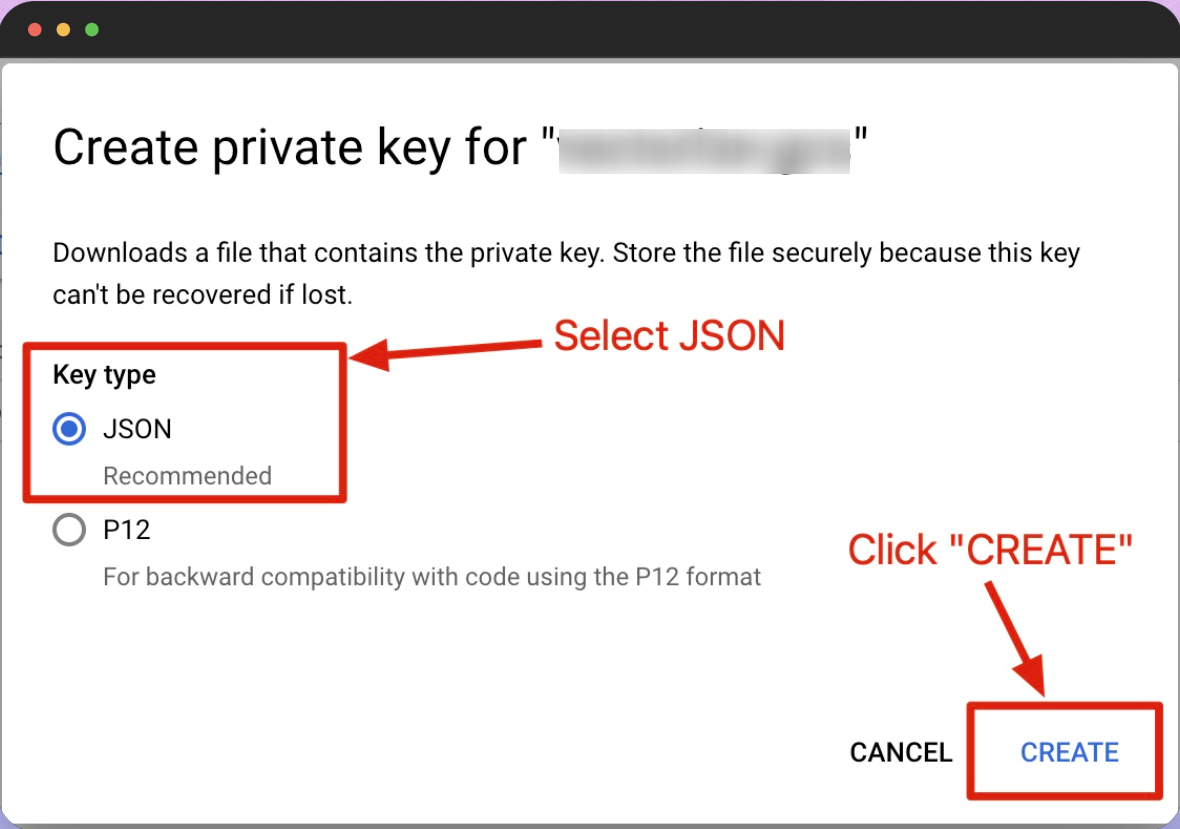
Select JSON, then click Create.
Your new public/private key pair is generated and downloaded to your machine as a JSON file. Save this file as
credentials.jsonin your working directory.Note: This file is the only copy of this key, so save it in a secure location.
-
Click Close.
The generated Service Account Key (JSON file) and Bucket Name are to be configured in Scope Setup: Step 1 for initiating the Google Cloud Storage log ingestion.
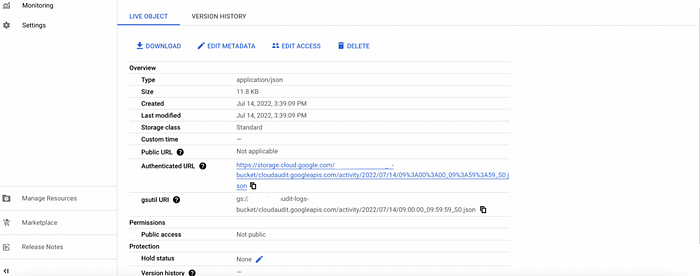
Configure Google Cloud Logs to Ingest into the Cloud Storage Bucket
This section helps users configure the following Google Cloud logs to ingest into the Google Cloud Storage bucket:
- Audit logs
- VPC flow logs
- DNS logs
- Firewall logs
Note:
- Logs are generated only when activity occurs.
- VPC Flow Logs and DNS Logs may take several minutes to appear.
- Test resources must be located in the same VPC where logging is enabled.
Step 6: Set Up Audit Logging
-
Navigate to IAM & Admin -> Audit Logs.
-
Set the default configuration and enable the following permissions:
- Admin Read
- Data Read
- Data Write
Note: Admin Activity is enabled by default. Data Access logs must be enabled manually.
Step 7: Set Up VPC Flow Logging
Prerequisites
-
Billing must be enabled on the project.
-
The following APIs must be enabled:
- Compute Engine API
- Network Management API
Steps
-
Navigate to VPC network -> VPC networks.
-
Select your VPC.
-
Click Manage flow logs.
-
Click Add configuration.

-
Configure the flow log settings:
- Aggregation interval: 5 seconds
- Sampling rate: 100%
- Metadata: All
- Filter: None
Note: Flow logging applies to the entire VPC and requires network activity to generate logs.
Step 8: Set Up DNS Logging
Prerequisites
-
Enable the Cloud DNS API.

Steps
-
Navigate to Cloud DNS -> DNS server policies.
-
Click Create policy.
-
Configure the DNS logging policy:
- Name:
dns-logging-policy - Network: Select the target VPC
- Enable DNS logging: On
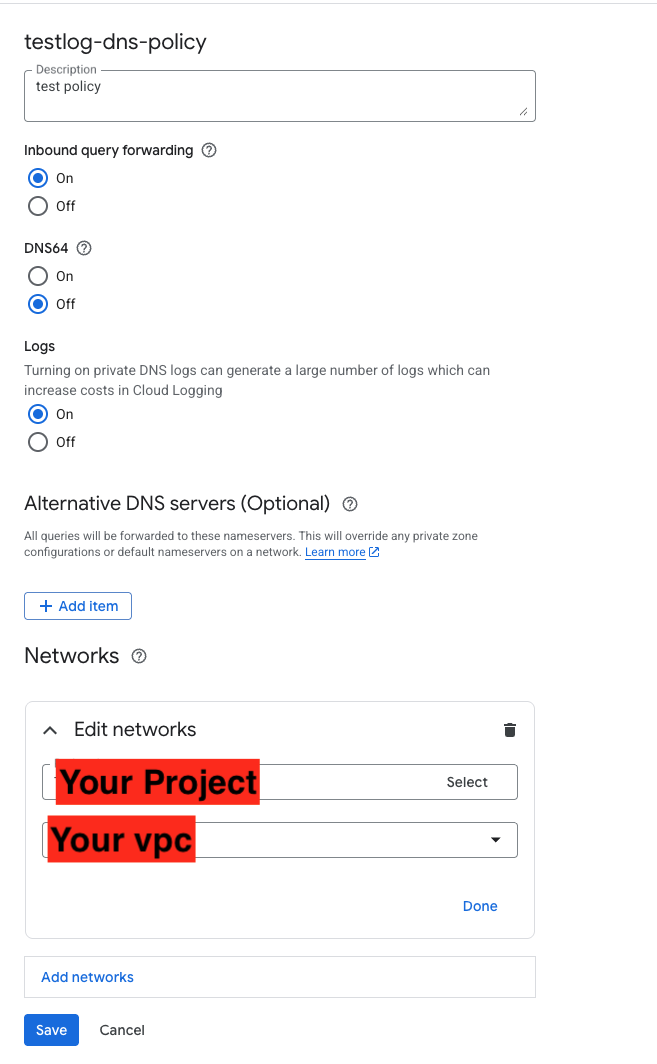
- Name:
Note: DNS logging applies at the VPC level and requires DNS activity to generate logs.
Step 9: Set Up Firewall Logging
-
Navigate to VPC network -> Firewall.
-
Select the firewall rule(s) you want to enable logging for (e.g.,
default-allow-ssh). -
Click Edit.
-
Enable Logging.
-
Click Save.
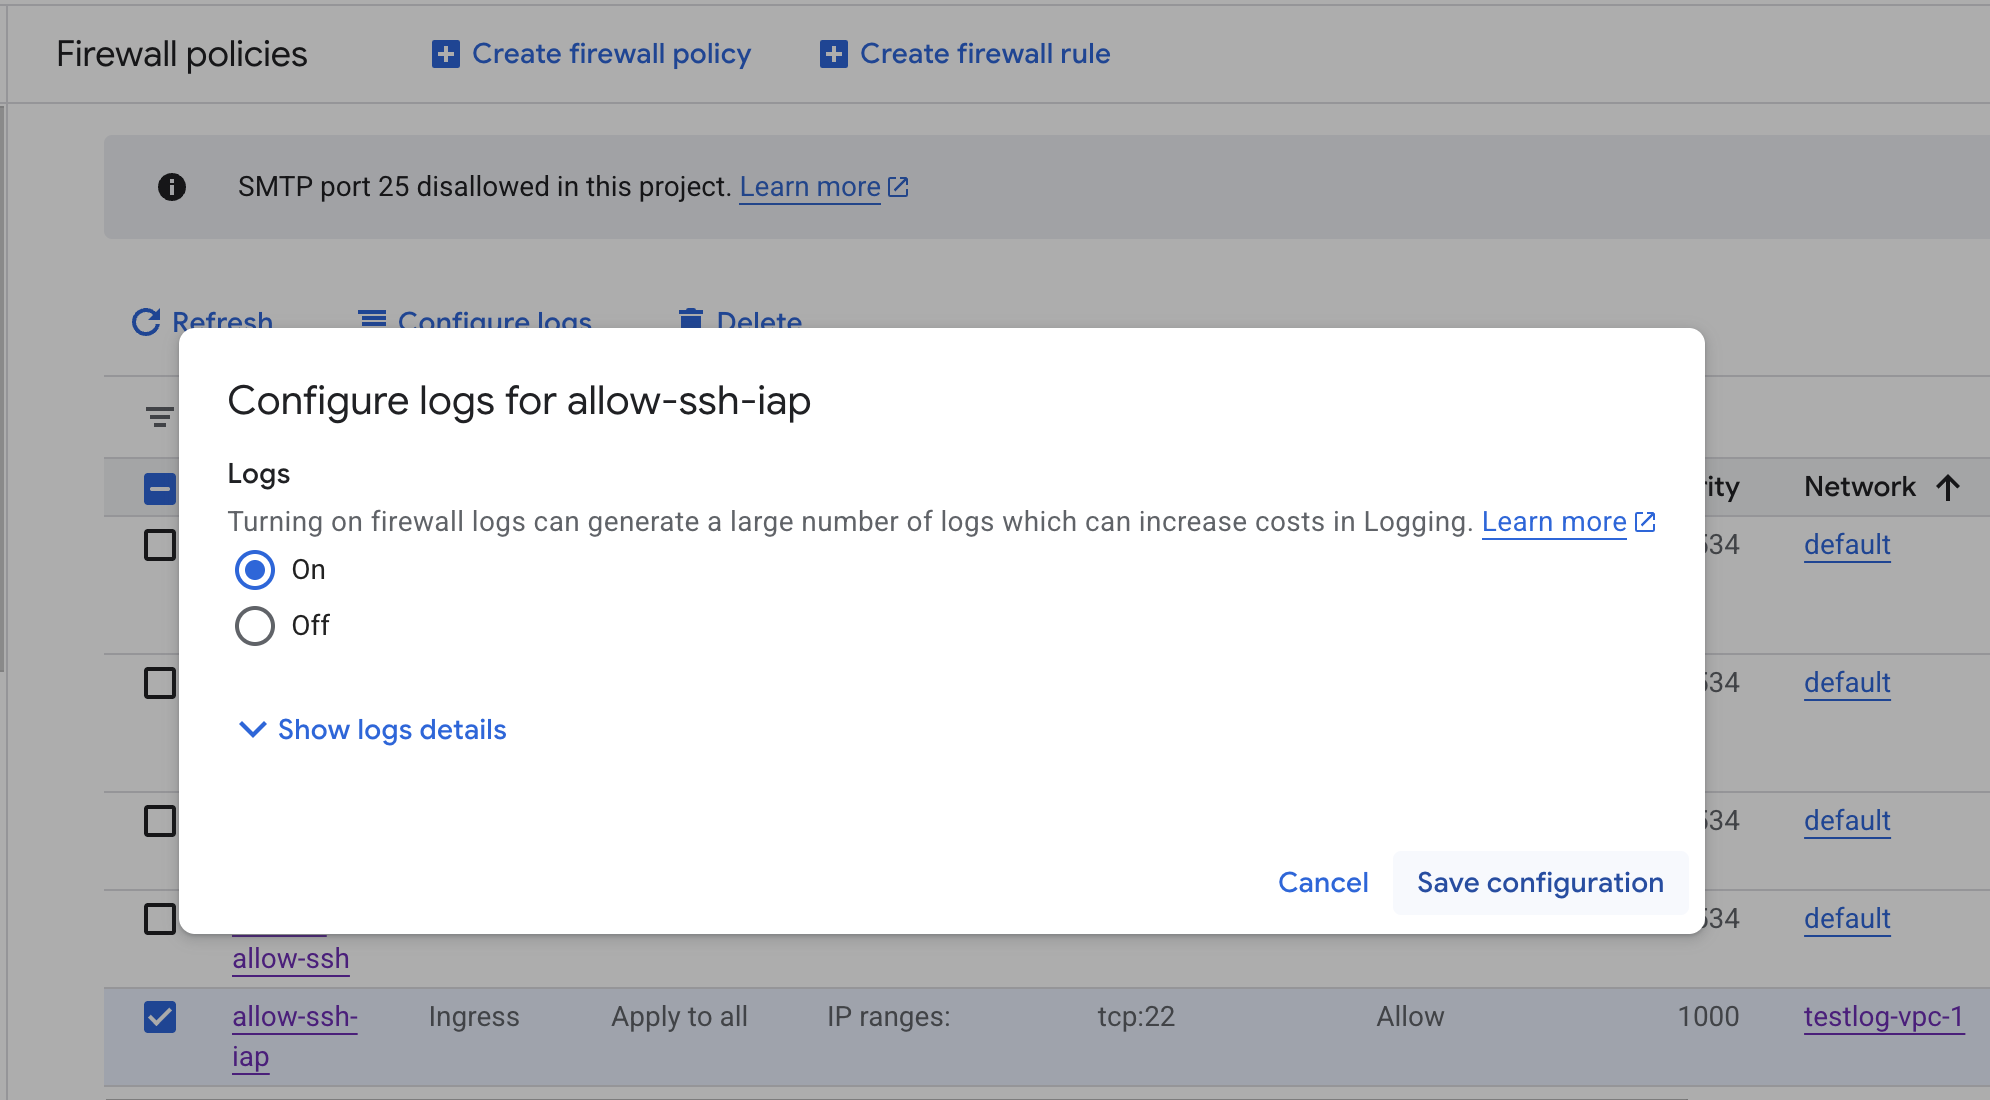
Note: Firewall logging must be enabled per individual firewall rule.
Scope Setup
Step 1: Google Cloud Storage Cloud Source Registration in the Scope Application
Once the credentials are generated, they must be configured in the Scope application to establish the connection and enable data ingestion from the Google Cloud Storage environment.
In the Scope application, to register a Google Cloud Storage cloud source, navigate to the cloud source registration page –
-
Log into the Scope application

-
Select the required Organization from the Organization dropdown

-
Navigate to the side menu -> Administration

-
Navigate to the Cloud sources tab

-
Click on the +Add Source button

-
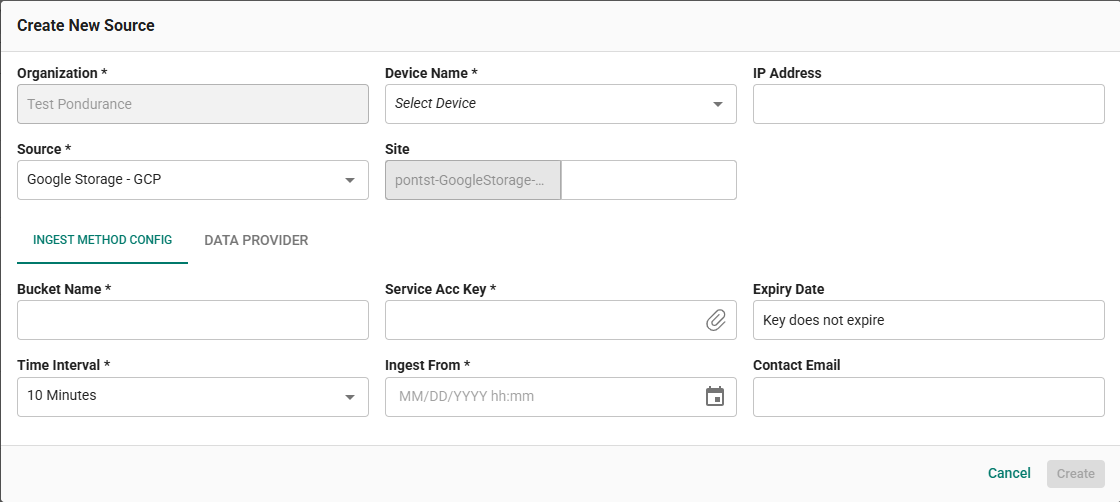
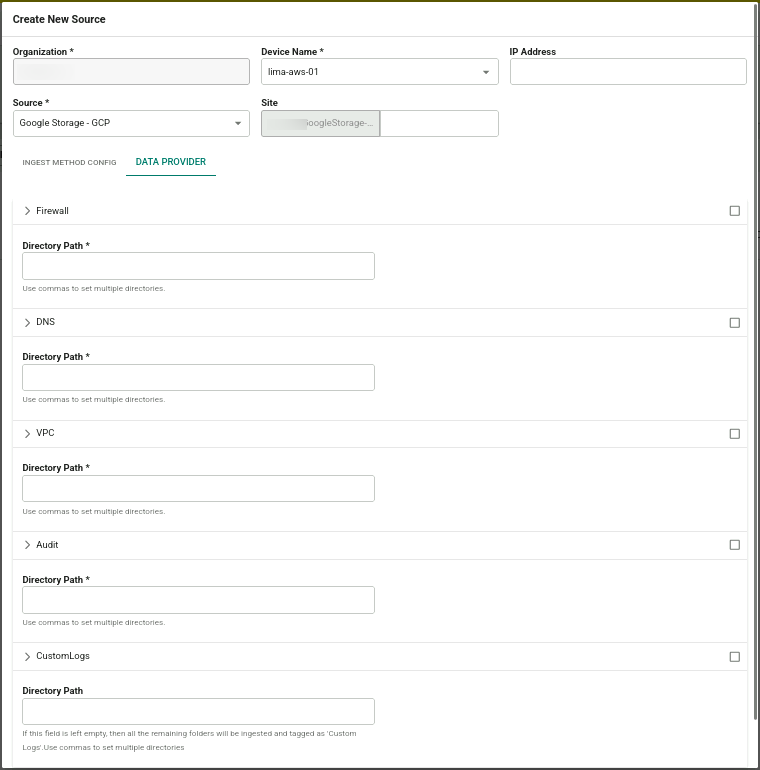
In the Add Source pop-up, provide the parameters below.
- Source: Select the Google Storage - GCP source from the Source dropdown.
Input Method Config Tab:
-
Site: The user defined name for the Google Cloud Storage cloud source.
-
Bucket Name: The bucket name created in Step 2.
-
Service Acc Key: Upload the
credentials.jsonfile generated in Step 5. -
Polling Interval: The polling interval for making periodic API calls to Google Cloud Storage. Select the time interval from the dropdown.
-
Contact Email: The email address of the person who registers the Google Cloud Storage cloud source in Scope.
Data Provider Tab:
Configure the required data providers by selecting the appropriate checkbox and providing the Directory Path (prefix) for each:
- Firewall – Select the Firewall checkbox and provide the required directory path prefix. (Example:
compute.googleapis.com/firewall) - DNS – Select the DNS checkbox and provide the required directory path prefix. (Example:
dns.googleapis.com/dns_queries) - VPC – Select the VPC checkbox and provide the required directory path prefix. (Example:
networkmanagement.googleapis.com/vpc_flows) - Audit – Select the Audit checkbox and provide the required directory path prefix. (Example:
cloudaudit.googleapis.com/system_event,cloudaudit.googleapis.com/activity,cloudaudit.googleapis.com/data_access) - CustomLogs – Select the CustomLogs checkbox and provide the required directory path prefix.
Once the required connection parameters are entered, the Google Cloud Storage cloud source registration is complete in Scope and is ready for ingestion of logs from Google Cloud Storage.